NOTE: This is for firmware version 0.28.
For Version 0.27, use this document.
For later development versions of the software that have not yet been released, search for “Current Commands List” in the common/phobGCC.h file to see the commands for that version as they may have changed.
NOTE 2: The controller starts in safe mode! To make any changes you must disable it first!
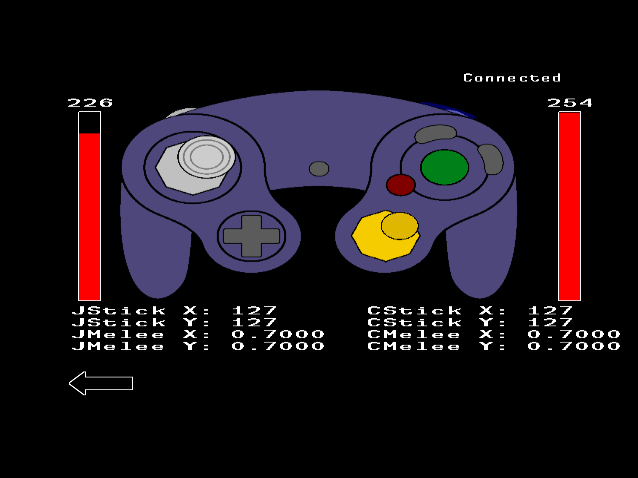
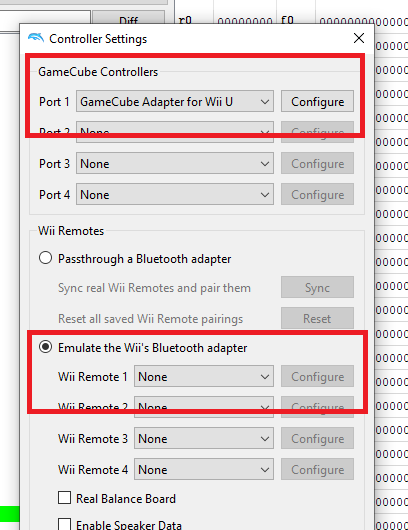
I strongly recommend using Smashscope (either on a Wii or vanilla Dolphin) for all of this. Slippi will not run Smashscope. When using Smashscope in Dolphin, make sure to set all Wiimotes to “None” in the Controllers menu or else the sticks will not display any movement.
An alternative is Uncle Punch Training Mode 3.0. In the Training Lab menu, under General enable “Input Display”, and under Info Display enable “System LStick”, “System CStick”, and “System Trigger” as the first three rows.
PhobVision
If you have a PhobGCC 2 with PhobVision installed and a CRT available, it’s highly recommended to calibrate and configure using PhobVision.
PhobVision has menu options for all of these settings, and it walks you through the stick calibration process to minimize the chance of user error.
To use PhobVision, plug a 3.5mm TRRS to RCA cable compatible with Sony camcorders into the jack on the controller and the composite video input on a CRT television, hold Z on the controller, and plug the controller’s GCC cable into a powered-on console or adapter. Navigate with the D-pad, select an item by pressing A, and back out by holding B. Note: you cannot back out while you’re in the middle of stick calibration, but it’s fine to unplug the controller before finishing to cancel if you wish.
Some menu pages are not complete yet, and on these you will be greeted by an “Under Construction” sign.
Initial Setup
This is only necessary the the first time the controller is set up after it is made, only if you are calibrating using a console. You do not need to do this otherwise, such as if you are calibrating it using PhobVision.
If the controller is functioning normally, this has already been performed and you do not need to repeat the process.
- If using Dolphin, start Dolphin. If using a Wii, turn on the Wii and use another controller to set up your configuration environment.
- Plug in the controller.
- If using Dolphin, start the game (Smashscope or Uncle Punch).
- Toggle off Safe Mode (hold AXY+Start). Both sticks should be wonky right now.
- Calibrate the left analog stick (AXY+L, follow this procedure). The left stick should behave normally now.
- Calibrate the C-Stick (AXY+R, follow this procedure). The right stick should behave normally now.
Activating the Analog Sticks - B
- After plugging in the controller, press B to activate the analog sticks. Before this, the sticks are hardcoded to be centered so that the game properly zeroes.
- If you are playing using Dolphin/Slippi, you must first have Dolphin running, then have the controller plugged in before starting the game.
- By enforcing that the sticks are centered when starting the game, this ensures that you get 1.0 cardinals and accurate notches.
- If you are using a Mayflash adapter, you must plug in both USB connectors for the controller to register in Dolphin/Slippi.
- This is necessary because if the sticks are miscalibrated, it will be very difficult to correctly calibrate them with the sticks incorrectly zeroed.
- Once the sticks are calibrated and you are sure they are reliably zero when released, you can disable this. See here.
- But each time you reset or calibrate, you will once again be required to press B.
Making Changes On PhobGCC
- Most of the time, when you give the PhobGCC a command, the Analog Stick and C-Stick will freeze pointing to the top right.
- For binary commands, it’ll hold for two seconds.
- For numerical values, it’ll hold for 0.75 seconds to make it faster to change.
- For trigger offsets, which have a wide numerical range, it will only hold for 0.1 second.
- If you’re in Melee without input visualization tools, you will see your character roll to the right to indicate this, or you’ll see the menu tilt due to the C-Stick.
Safe Mode Toggle - AXY+Start
- To turn off Safe Mode, you have to hold the key combination for about 1 second, to prevent accidental activation.
- Turning Safe Mode back on has no delay.
- This is required to make any changes on the controller, to prevent you from reconfiguring things during gameplay.
- Even if you haven’t pressed B, this will wake up the sticks.
- When you turn Safe Mode off (configuration is possible), the controller freezes for 2 seconds.
- When you turn Safe Mode back on (you can no longer configure), the controller freezes for 4 seconds to distinguish. You can also just unplug and plug the controller back in to ensure that you are back in Safe Mode.
Display Software Version - AZ + Du
- The C-Stick will display the software version in Melee units as if it were not preceded by the “0.”
- The Y-axis will show the tens and ones digits. In this case, it would be 28.
- The X-axis will show the thousands and hundreds digits. In this case, it would be 0.
- You must use Smashscope to see this numerically.
- If the controller doesn’t show 28, then you need to reference an older configuration document here.
- If it doesn’t respond to this command at all, then it’s likely the version is 0.23 or lower and you should upgrade the controller firmware.
Controller Reset - Hold ABZ then press Start
- Use this if you are upgrading from an older software version or have messed up your settings in some way.
- You need to turn off Safe Mode in order to reset.
- This will reset all the controller settings except for stick calibration. This includes snapback filtering, waveshaping, analog delay, offsets, and button remapping.
- There is a hidden hard reset option that will also erase the stick calibration, but we are not publishing the button combination because it’s unhelpful almost all of the time. Ask the devs in the Discord what it is if you really need this.
Toggle Auto-Initialize - AXYZ
- When you turn this on, both sticks will point up and to the right. When you turn it off, both sticks will point down and to the left.
- If you are positive that both of your sticks are calibrated well, you can use this to avoid the need to press B when plugging the controller in.
- If calibration ever gets wonky, you need to disable this, then recalibrate.
- If you are using a C-Stick offset, keep this off.
- This automatically gets turned off when you:
- Recalibrate: if you mess up the calibration then the controller won’t initialize correctly and it’ll be hard to calibrate properly
- Reset: if you reset it returns everything to defaults including this setting.
Rumble Strength Configuration - AB + Du/Dd
- Rumble is only available on boards version 1.2 or later. This command will do nothing for earlier boards.
- Press AB + D-pad Up/Down to increase or decrease the rumble strength.
- There are settings from 0-11.
- 9 is roughly equivalent to an OEM controller’s rumble.
- 0 turns off rumble entirely.
- Press AB+Start to show the current rumble setting on the C-Stick.
Analog Stick Calibration - AXY+L
Basic PhobGCC Analog Stick Calibration - YouTube
PhobGCC Analog Stick Calibration Guide - YouTube
PhobGCC Notch Calibration Guide - YouTube
NOTE: If using Dolphin Smashscope, you MUST disable all Wii Remotes
- Stick calibration has two phases: measurement and notch adjustment.
- You must complete both measurement and notch adjustment for the setting to be saved.
- If you’ve already calibrated the stick and just want to adjust notches you have already measured, you can skip the measurement phase and immediately begin notch adjustment by pressing Start at any time during the measurement phase.
- Calibrating either stick turns off Auto-Initialize.
Measurement Phase
When in the measurement phase of calibrating the analog stick, the C-Stick will alternate between the center and a position along the rim, starting with the cardinal directions.
The control stick will show the output of the previous calibration. Depending on the previous calibration, this may be accurate, inaccurate, freak out randomly, or in the case of an uncalibrated PhobGCC 2.0, it will be mostly pegged to (125,125). The output you see here has no bearing on the results.
- If the C-Stick is centered, let go of the control stick and press either L, R, or A to measure that position.
- If the C-Stick is not centered, hold the physical analog stick into the notch indicated by the C-Stick’s output and press L, R, or A to measure that position.
- Make sure to enter the notch from the direction you would during gameplay.
- If you don’t have a notch at the position indicated by the C-Stick, let go of the stick and press L, R, or A.
- You must measure all four cardinal directions (East, North, West, South) and all four diagonal directions or calibration will not work.
- The first time you calibrate a controller that has modder-added notches, it is highly recommended to skip all the modder added notches and start with only the 8 primary directions.
- If you think you messed up a measurement, you can go back to a previous notch measurement by pressing Z. It’ll go back to measuring the center immediately before a given notch.
- Once you finish measuring all the notches (32 presses of L/R/A), the stick should behave normally. You are not done calibrating. Proceed to the Notch Adjustment Phase below.
- If it does not behave as expected, see Measurement Phase Troubleshooting below.
Measurement Phase Troubleshooting
- If the Analog Stick’s output is not accurate during this phase, do not worry. The previous calibration does not matter.
- If the C-Stick is not alternating between being centered and circling all the way around the rim, and you are using Dolphin to calibrate, you need to reinitialize Dolphin by making sure that Auto-Initialize is off, unplugging and replugging, restarting Dolphin, and then tapping B.
- If after the measurement phase is done, the stick has one or two sectors that jump into another quadrant randomly, you probably mis-measured a notch. Mash L, R, or A a bunch to finish the calibration and start again.
- If after the measurement phase is done, the stick output is completely haywire and jumping all over the place randomly, you may have let go of the stick before pressing L, R, or A. Mash L, R, or A a bunch to finish the calibration and start again.
- Alternatively, if you have Firefox notches, try calibrating the main 8 directions only to completion, then go back and calibrate all of them.
- If after the measurement phase is done, the stick output is backwards on one or both axes, you probably were trying to make the stick output match the C-Stick, instead of moving the physical stick into the notch indicated by the C-Stick. Mash L, R, or A a bunch to finish the calibration and start again.
Notch Adjustment Phase
When in the notch adjustment phase of calibrating the analog stick, the C-Stick will stay along the rim and rotate along from notch to notch, starting with the diagonals.
- The Analog Stick position does not affect notch adjustment. The output is a live preview of how the calibration will be with your given adjustments.
- The C-Stick points at the notch that is currently up for adjustment.
- Press X or Y to shift the output of the notch clockwise or counterclockwise, respectively.
- You won’t see anything change if you don’t put the stick into the notch that’s being adjusted.
- Make sure to enter the notch from the same direction you would during gameplay when checking the output.
- To reset to an undistorted position for the notch, press B. The C-Stick will be displaying the position that was measured.
- Press L, R, or A to move to the next notch.
- To go back to a previous notch, press Z. You cannot go back to the measurement phase.
When the C-Stick’s output returns to center, the stick calibration is now saved.
Notch Adjustment Troubleshooting
- If your notch coordinates are very inconsistent, try twisting the stick like a knob and see if the origin value shifts. If so, try gently tightening the screws holding the stickbox down; they may be loose.
- If your notch coordinates have slightly different values when approaching straight from center compared to rolling clockwise or counterclockwise along the rim, this is normal (within two or three values).
- If your notch coordinates cannot be adjusted to the desired value, check the C-Stick’s coordinates to see if it’s too far from the desired value. You can try recalibrating from the start and measuring it again, but it may not help. See a modder to get your notches adjusted if needed.
C-Stick Calibration - AXY+R
This process is exactly like Analog Stick Calibration, but instead, the Analog Stick moves to show you how to move the C-Stick.
Analog Stick Smart Snapback Adjustment - A + X/Y + Du/Dd
Increasing the Analog Stick Smart Snapback Filter adjustment doesn’t hurt responsiveness of the stick when moving away from the center. Increasing the value of this filter only makes it return to center more slowly.
- Press A + X/Y for your axis + D-pad Up/Down to increase/decrease.
- Example: AX+Du suppresses X-axis snapback more, AY+Dd suppresses Y-axis snapback less.
- When you change this setting, the current snapback filter settings are shown as the numerical coordinates of the C-Stick.
- The scale goes from 0-10, and defaults to 4.
- 0 completely disables the Smart Snapback Filter. This removes the rise time improvements, hurting dashdancing on the X axis, and you will have snapback.
- 4-10 is equivalent to 1-7 on 0.22-0.23 and 0-6 on v0.21.
- Sticks usually need a setting of 4-7. 9+ is for special situations such as metal stick caps or lighter spring weights.
- If you have an OEM stick cap and snapback is still a problem, try setting the snapback filter to 0 and check how far the snapback goes. If it goes past 70, you may have to tame snapback by adding a bit of grease to the stickbox.
- Press L+Start to see the current Smart Snapback filter values on each axis of the Analog Stick.
- At the same time, you can see the current axis smoothing values on the C-Stick and Waveshaping values on the triggers.
Analog Stick Waveshaping Adjustment - L + X/Y + Du/Dd
The Waveshaping filter stops the output from moving while the stick axis is moving quickly. This setting controls the threshold where that transition occurs.
This can be used to make pivots or short flicks behave more like a good OEM controller. This enhancement to pivots and flicks works best with an OEM spring or a Smalley L2 spring, not with lighter “slickbox” style springs, but you can crank it up and make it work at the expense of responsiveness.
- Press L + X/Y for your axis + D-pad Up/Down to increase/decrease.
- Example: LX+Du strengthens the effect on the X-axis, LY+Dd reduces the effect on the Y-axis.
- When you change this setting, the current Waveshaping filter settings are shown as the numerical coordinates of the C-stick.
- The scale goes from 0-15, and defaults to 0.
- 0 disables Waveshaping entirely.
- Something between 6 and 10 is usually required to get pivots to behave like OEM controllers.
- Ideally, change both axes together to preserve things like dashback out of crouch.
- Press L+Start to see the current Waveshaping filter values on the L and R trigger analog values.
- At the same time, you can see the current Smart Snapback filter values on the Analog Stick and the axis smoothing values on the C-Stick.
Analog Stick Axis Smoothing Adjustment - R + X/Y + Du/Dd
The Analog Stick Axis Smoothing is just a simple low-pass filter similar to a capacitor on a vanilla Gamecube controller. Increasing this setting slightly reduces responsiveness. If you have the Smart Snapback Filter disabled, you can use this to suppress snapback.
- Press R + X/Y for your axis + D-pad Up/Down to increase/decrease.
- Example: RX+Du increases the X-axis Delay, RY+Dd decreases the Y-axis delay.
- When you change this setting, the current axis smoothing settings are shown as the numerical coordinates of the C-Stick.
- The scale goes from 0-9, and defaults to 0.
- Single-Motion Ledgedashing: ~5 on X-axis and 0 on Y-axis
- Alternatively, set the Smart Snapback adjustment on the Y-axis to 0 and set the Axis Smoothing to 0 for both X and Y-axes. This gives stronger single-motion ledgedashes but you may experience Y-axis snapback.
- Press L+Start to see the current axis smoothing values on each axis of the C-Stick.
- At the same time, you can see the current Smart Snapback filter values on the Analog Stick and Waveshaping values on the triggers.
C-Stick Snapback Adjustment - AZ + X/Y + Du/Dd
The C-Stick Snapback Filter is actually a low-pass filter similar to the Analog Stick Axis Smoothing that has dual purposes, for reducing the chance of getting the wrong move and for suppressing snapback.
- Press AZ + X/Y for your axis + D-pad Up/Down to increase/decrease.
- Example: AZX+Du increases the X-axis snapback suppression, AZY+Dd decreases the Y-axis snapback suppression.
- When you change this setting, the current snapback filter settings are shown as the numerical coordinates of the C-Stick.
- The scale goes from 0-9 and defaults to 0.
- To reduce the chance of getting the wrong move, increase the value on the axis that you don’t want, and decrease the value on the axis you do want.
- To fully suppress snapback on an axis, use a somewhat high value here (start with 7).
- Press R+Start to see the current snapback filter values on each axis of the Analog Stick.
- At the same time, you can see the current offset values on the C-Stick and Waveshaping values on the triggers.
C-Stick Waveshaping Adjustment - LZ + X/Y + Du/Dd
The Waveshaping filter stops the output from moving while the stick axis is moving quickly. This setting controls the threshold where that transition occurs.
- Press LZ + X/Y for your axis + D-pad Up/Down to increase/decrease.
- Example: LZX+Du increases the effect on the X-axis, LZY+Dd decreases effect on the Y-axis.
- When you change this setting, the current snapback filter settings are shown as the numerical coordinates of the C-Stick.
- The scale goes from 0-15, and defaults to 0.
- 0 disables Waveshaping entirely.
- Press R+Start to see the current Waveshaping filter values on the L and R trigger analog values.
- At the same time, you can see the current snapback filter values on the Analog Stick and the current offset values on the C-Stick.
C-Stick Offset - RZ + X/Y + Du/Dd
- Press RZ + X/Y for your axis + D-pad Up/Down to increase/decrease.
- Example: RZX+Du increases the C-Stick X Offset, RZY+Dd decreases the C-Stick Y Offset.
- When you change this setting, the current offset settings are shown as the numerical coordinates of the C-Stick.
- This shifts the global coordinate C-Stick coordinate. This helps with hitting downward angled forward smashes, for example.
- If you have this on, do not enable autoinitialization or else it’ll cancel out this setting when used on a USB GCC adapter (whether on Smash Ultimate or in Dolphin).
- Press R+Start to see the current offset values on each axis of the C-Stick.
- At the same time, you can see the current snapback filter values on the Analog Stick and Waveshaping values on the triggers.
Analog Trigger Modes AB + L/R
- Press AB + L to cycle through the trigger modes for L-trigger.
- Press AB + R to cycle through the trigger modes for R-trigger.
- There are 6 trigger modes:
- Mode 1: Standard behavior with the analog slider active and a digital press at the bottom of the travel. Smashscope will show red bars and then turn blue on digital press.
- Mode 2: Digital-only, where the analog slider is disabled. Smashscope will show nothing. You will still get LRA+Start in this mode.
- Mode 3: Analog-only, where the digital press is disabled. You will still get LRA+Start in this mode. Smashscope will show only red bars.
- Mode 4: Trigger-Plug Emulation, where the analog slider will only go up to the user-defined max (see below) and then allow you to input a digital value. Smashscope will show red bars that rise but stop at a predefined value, and they will turn blue on digital press.
- Mode 5: Analog Value At Digital, where the analog slider is disabled and the digital press will result in a user-defined analog value (see below). You will still get LRA+Start in this mode. Smashscope will only show red bars.
- Due to the Melee controller ruleset, Mode 5 is incompatible with modes 1, 3, and 4.
- If you have Mode 5 set on one trigger and either 1, 3, or 4 on the other trigger, the other trigger will not output anything at all.
- Mode 6: Analog and Digital Value at Digital, where the analog slider is disabled and the digital press will result in a user-defined analog value (see below) and a digital input. Smashscope will show only blue bars.
- This is useful when using a controller with trigger plugs for Smash Ultimate and other games that disregard the digital press.
- Mode 7: Hairtrigger Analog, where the analog value is multiplied between one and threefold based on the user-defined analog value (see below).
- The greater the value, the higher the multiplier. This is useful for Smash Ultimate where you don’t need to push down as far to activate your shield.
- The trigger modes are displayed as Analog Stick values for the L-trigger and C-Stick values for the R-trigger.
Analog Trigger Value Adjustment - B + L/R + Du/Dd
- For Analog Trigger Modes 4-6, this shifts the user-defined limit for the analog value.
- For Analog Trigger Mode 7, this adjusts the scaling of the analog value from 1x at 49 to 3x at 227.
- Press B + your trigger (L/R) + D-pad Up to increase or D-pad Down to decrease.
- The possible range of values goes from 49 to 227, with 49 being equivalent to Z-lightshield in Melee, the largest legal value.
- Melee treats all values 140 and above as the strongest analog shield.
- Ultimate only shields when the analog value is 79 or above.
- The values are displayed on the C-Stick, with the X-axis corresponding to L and the Y-axis corresponding to R.
- Once you cross above 100, the corresponding Analog stick axis will display 100 and the remainder of the value will be shown on the C-Stick.
- If you configure in Uncle Punch or 20XX, the C-Stick might not reflect the actual value when the displayed coordinate is outside the Melee input circle. Confirm your settings using Smashscope or by checking the actual resulting trigger value.
Trigger Jump
You can swap one of X or Y with one of L, R, or Z.
If you swap with L or R, X or Y will act only as a digital press input on the trigger. Conversely, X or Y will only be output when the swapped trigger’s digital press is engaged. So if you want Melee lightshield on the face button use Mode 5, and if you want a shield that works in both Melee and Ultimate use Mode 6.
- Press XZ+Start to swap X and Z. This will swap back if previously swapped.
- Press YZ+Start to swap Y and Z. This will swap back if previously swapped.
- Press LX+Start to swap X and L. This will swap back if previously swapped.
- Press LY+Start to swap Y and L. This will swap back if previously swapped.
- Press RX+Start to swap X and R. This will swap back if previously swapped.
- Press RY+Start to swap Y and R. This will swap back if previously swapped.
 This work is licensed under a Creative Commons Attribution-ShareAlike 4.0 International License.