PhobGCC v1.X Programming Guide
This is a guide to programming the teensy microcontroller on PhobGCC v1.X.
Here’s a video walkthrough if you would like to watch instead.
Tools
- A computer running Windows, MacOS, or Linux.
- A screwdriver for opening your controller (Tri-point is the stock screw, but some controllers may be built with Torx or Phillips).
- A data-capable micro-USB cable with a compact plug.
- This cable is the recommended one should you just want to buy one.
Controller Disassembly
Unplug and then open your controller by removing the six screws on the back located at the end of the handles, near the triggers, and behind the C-stick and D-pad. Pull the back shell off and lay it down. Carefully lift the board out of the shell and place the front shell down.
Installing the IDE, Libraries, and Teensy Files
NOTE: It is not recommended to update your libraries as some newer versions may have issues NOTE2: You only need to do this once
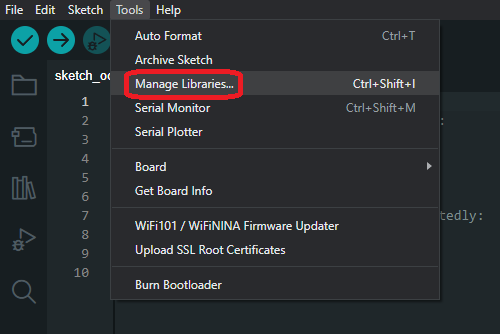
Go to The Arduino Website and to the software section and download the Arduino IDE 2.0.0 for your operating system. Go through the install as normal. Upon first run, it may ask about internet access and to install the USB Driver. These are required in order to program the PhobGCC. Once the IDE is installed, you can go to the ‘Tools’ drop-down and select ‘Manage Libraries…’.
You’ll want to search (what is in the single quotes) and install the following:
- ‘curveFitting’ by Rotario
- ‘Bolder Flight Systems Eigen’ by Brian Taylor
- ‘Bounce2’ by Thomas O Fredericks
- ‘teensytimertool’ by luni64
- NOTE: You’ll want to install version 1.0.0 of this library using the drop-down.
You may need to resize the left panel in order to see the Install button.
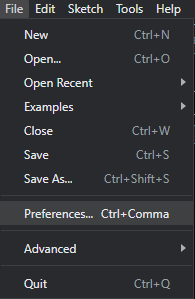
Next you’ll want to go to the ‘File’ drop-down and click on ‘Preferences…’ as seen below:
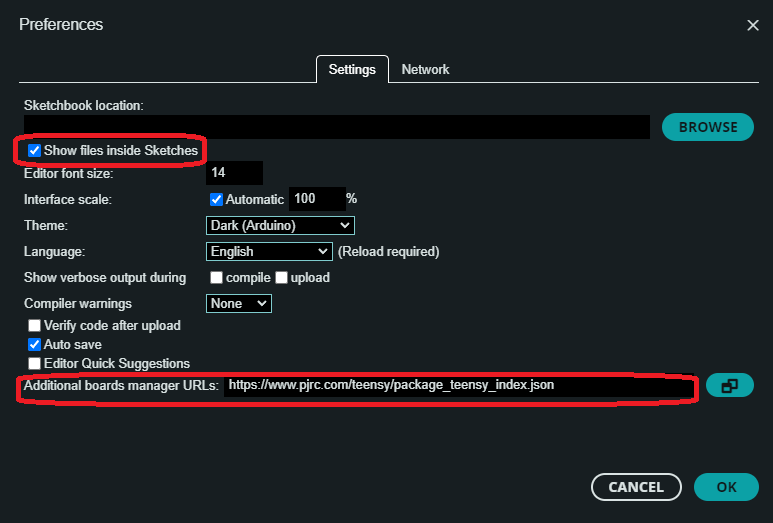
and in the ‘Additional board manager URLs’ section, you’ll want to paste in https://www.pjrc.com/teensy/package_teensy_index.json. You’ll also want to enable the “Show files inside Sketches” checkbox as shown below:
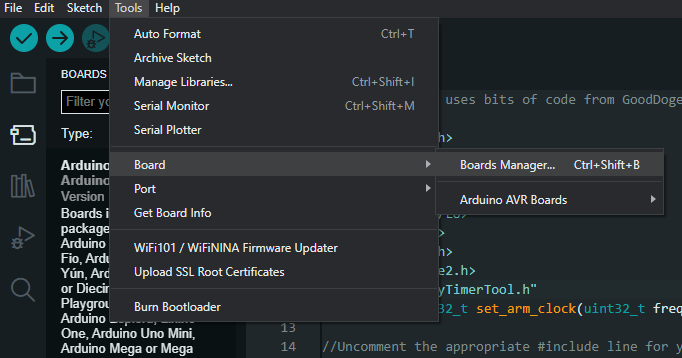
Next you’ll want to go to the ‘Tools’ drop-down, in the ‘Board’ section, Click on ‘Board Manager’ as seen below:
And search for and install ‘teensy’ by Paul Stoffregen.
Downloading and Flashing The PhobGCC Firmware
Go to the Releases section of the PhobGCC-SW Github and download the latest available firmware code zip: Source code (zip).
Extract all the files from the archive to the Arduino folder in your Documents/Home folder.
Open the PhobGCC.ino file that is inside the PhobGCC folder in Arduino IDE.
Inside the subfolder common, find the document phobGCC.h and open it in a text editor (Notepad, if you have nothing else).
Look near the top of the document for the following section:

Remove the // (NOT THE #) at the start of the line which contains your board version, and save the file.
Only uncomment one line.
If you do not know which one you need, please post a photo of your board in the #user-tech-support channel of the PhobGCC Discord and someone will assist you.
Then plug in your PhobGCC using a Micro-USB cable to your computer. Once it is plugged in, go to the ‘Select Board’ drop-down in the top left and click on the “Unknown COM#”. If this does not appear, your cable didn’t work.
Choose your Teensy version and the port which has “Teensy” in the name, then click the right arrow in the top left. This will compile and upload the firmware to your board.
Once this is complete, you can unplug your PhobGCC and reassemble the controller.
Troubleshooting
- Make sure your cable works, you should hear the operating system’s notification sound for plugging a USB device in.
- Make sure you only remove the
//from your board version, not the#. - If the board reports as null, try another port.
- If you get a warning that says
#warning "can't use staticFunctional with GCC < V7! Fallback to function pointer callbacks", then you installed the wrong version of teensytimertool. - If you’re uncertain if the board flashed properly, you can click on the eyeglass in the top right to open the serial monitor (you may need to unplug and replug your PhobGCC). At the top of the output, it’ll say the board version, teensy version, and software version.
- If there’s a message about
Missing FQBNthen you need to update board files.
For all other issues, please refer to the PhobGCC Discord’s tech support. PhobGCC Discord