PhobGCC Version 2.0.5 Ordering Guide
This is an illustrated guide to acquiring all the parts you need to assemble a PhobGCC v2.0.5.
Required Parts
The following parts are unique to the PhobGCC and must be acquired per this guide, with no non-identical substitutions.
- 1x PhobGCC v2.0.5 Board
- 4x Magnets
- 4x Underslung Magnet Mounts
- 6x Wires
- Optional: 4x D-pad Buttons
- Optional: 1-6x Mouse Buttons for ABXYLR
- Optional for PhobVision:
- Panel-mount 3.5mm TRRS Jack
- JST-PH 2.0 2-pin male connector & female pigtail
- TRRS to RCA video adapter cable (doesn’t go in the controller but required for use)
The following parts are standard to a GCC and can be acquired via a number of different ways, some of which will be outlined here.
- 2x T3 Stickboxes
- 2x Trigger Potentiometers
- 2x Trigger Paddles
- 1x Cable with a GCC Plug
- 1x Rumble Bracket
- 1x Z-button Switch
- Optional: 1x Rumble Motor
There are two main ways to acquire a PhobGCC v2.0.5 Board. The first way is if you intend to only build a single controller, you can contact a local modder in your region using this map to see if they have spare for sale. Alternatively, you can also check Etsy or eBay as some often appear for sale. If you cannot find a single board for sale or you intend to build more than one PhobGCC, you can order the boards directly from a board house. These instructions will be for JLCPCB and Elecrow.
Parts You Don’t Need
Don’t acquire these, because they’re not necessary or won’t work with PhobGCC 2.0.5 at all:
- Snapback capacitors, snapback modules: snapback is corrected in software.
- Heartbeat modules or equivalent shunt resistors: we have no stick potentiometers so these are unnecessary.
- Teensy or Raspberry Pi Pico: the PhobGCC 2 has no need of any external microcontroller board.
- OEM C-Stick ribbon cables from a GCC: PhobGCC 2 needs 6 connections to the C-Stick daughterboard, and reusing the OEM cable has been a source of reliability issues.
- Hall Sensors: these are built into the PhobGCC board.
- Hall Effect Stickboxes: the PhobGCC uses magnets that you attach to a standard Gamecube controller stickbox.
Purchasing the PhobGCC v2.0.5 board
If you have a GCC modder in your area, consider buying a board from them.
Otherwise, you can purchase premade boards directly from Elecrow, which stocks 4 common colors at very reasonable prices.
If you plan on ordering around 50 boards or more, or if you want more unusual colors, you should submit a traditional PCB order by following the Elecrow Ordering Guide.
Warning to US residents: ordering from Chinese board houses at this point is likely to result in heavy tariffs.
Optional: Purchasing LR Trigger Paddles
If you don’t or can’t use OEM GCC Trigger paddles, you can order trigger paddles separately.
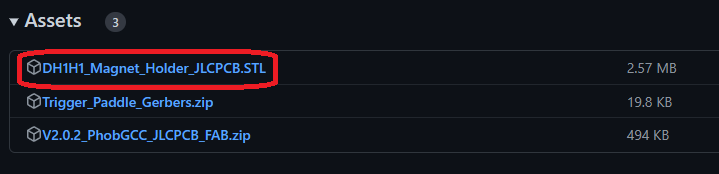
First, you can download the files available in the PhobGCCv2-HW Github in the releases section as shown below:

Click “Order Now” on JLCPCB, make sure you are set to “Standard PCB/PCBA” tab, click “Add Gerber File”, and upload the Trigger_Paddle_Gerbers.zip. Once the files are uploaded, you should see the board process and then load in as shown below:

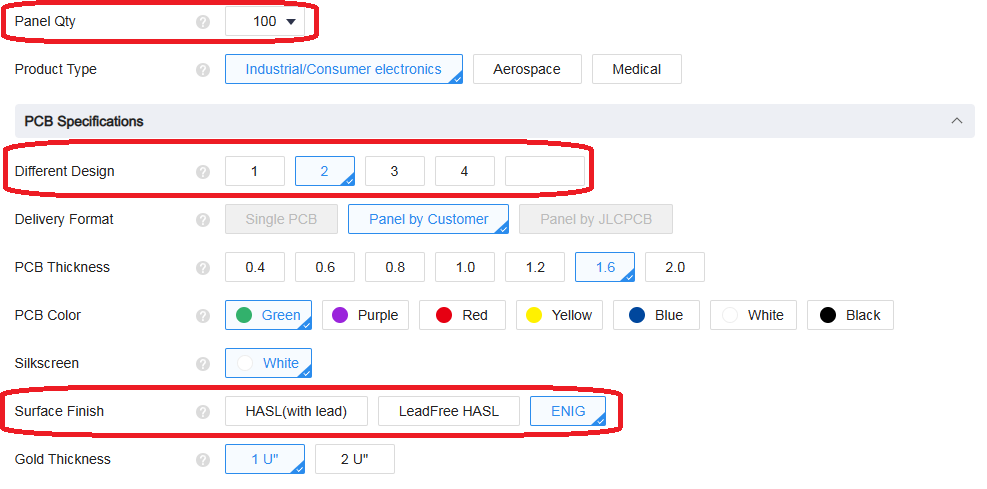
Once you’ve checked that the size is set to 9.7x41.72mm, you can progress with configuring it. The recommended settings are the defaults, setting your board quantity, setting “Different Design” to 2, and setting the Surface Finish to ENIG, as seen below:
NOTE: IF YOU ORDER MORE THAN 30, THE OPTION FOR DEBURRING/EDGE-ROUNDING APPEARS. IT’S RECOMMENDED TO ENABLE IT!
NOTE2: SINCE THESE BOARDS ARE SO SMALL, THE QUANTITY DOESN’T CHANGE THE PRICE. WE SUGGEST ORDERING PLENTY SINCE ITS CHEAP. THE DIFFERENCE BETWEEN 20 AND 200 IS $18.
You can then click “Save To Cart” and pay for your boards.
Optional: Purchasing DH1H1 Magnet Mounts
If you can’t source magnet mounts locally or via Etsy, you can order them from JLCPCB.
DO NOT USE THESE WITH MAGNETS OTHER THAN DH1H1.
First, you can download the files available in the PhobGCCv2-HW Github in the releases section as shown below:
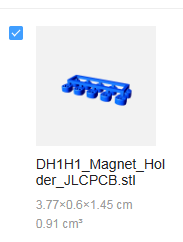
Click “Order Now” on JLCPCB, make sure you are set to “3D Printing” tab, click “Add 3D Files”, and upload the DH1H1_Magnet_Holder_JLCPCB.STL. Once the file is uploaded, you should see it render as shown below:
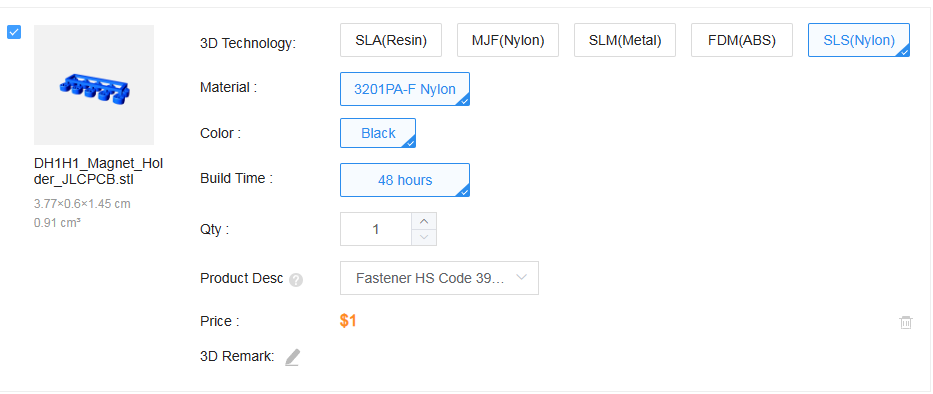
The recommended settings are SLS Nylon. You then set the product description to Other -> Fastener as shown below
NOTE: QUANTITY 1 GETS YOU 10 MOUNTS, WHICH IS ENOUGH FOR 2.5 PHOBS. 2 GETS YOU 20 MOUNTS FOR 5 PHOBS. MAKE SURE YOU ORDER ENOUGH!
You can then click “Save To Cart” and pay for your mounts.
NOTE: If you get asked about wall thickness, click “Yes” and confirm. It’s okay
Purchasing Other PhobGCC Parts
The remaining parts can be purchased from distributors as listed below.
- Magnets: choose one type and stick with it.
- Magnet Mounts:
- NOTE: PhobGCC v1.X MAGNET MOUNTS WILL BE VERY BAD, AND MAY NOT WORK AT ALL. MAKE SURE TO GET THE UNDERSLUNG MAGNET MOUNTS!
- Download This OpenScad file. It is by default set up for DH1H1 Magnets, so you can edit it for whatever magnet you use, adjust it for your printer, and then generate the STL using OpenScad. Once you have the STL, you can print it using your own machine or check out local makerspaces, libraries, and print shops.
- If you use magnets other than DH1H1, you will need to adjust the magnet offset to get the optimum signal strength using PhobVision to check. Speak with the devs on Discord to find out more.
- Wire for C-Stick (choose one):
- 26-gauge stranded wire such as this from McMaster.
- 6-pin Ribbon Cable from Kadano (EU)
- 6-pin Ribbon Cable from Tbox (NA)
- Optional Mouse Buttons for ABXYLR: you can use mouse buttons for any number from 0 to 6 of the buttons. Generally the high actuation force buttons are preferred.
- Low Actuation Force Buttons
- High Actuation Force Buttons
- Teflon Tape For Support This is necessary for mouseclick face buttons, but there are alternatives.
- Optional Discrete Buttons for D-Pad:
- Optional for PhobVision: you need all of these if you choose to install PhobVision.
- TRRS Jack
- JST-PH 2.0 2-Pin Connector and Pigtail or similar: size is critical; don’t use a double pigtail.
- TRRS to RCA Video Cable or similar: MUST BE TRRS = Audio Left, Video, Ground, Audio Right
Purchasing Other GCC Parts
The GCC-specific Parts have a few different methods of acquisition
- Stickboxes
- T3 GCCs as per this guide
- Official Wii Classic and Wii Classic Pro Controllers
- Sold Loose on Etsy
- Trigger Potentiometers
- Any GCC
- Official Wii Classic Controllers (No Handles)
- Kadano’s Etsy Store
- Cable with a GCC Plug
- Any GCC
- Alibaba Cables
- Liquid Cable
- Rumble Bracket
- Any GCC
- Wumble
- FIRESCC
- Ube-S-Phob
- Z-button Switch
- Stock - Any GCC
- Tactile - Official Wii Classic Controllers (No Handles)
- Heavy Tactile - BattleBeaverCustoms
- Tactile - FIRESCC
- Tactile - Digikey NOTE: NEEDS SOME MODIFICATION OF CONTROLLER BUTTON RUBBER
- Mouseclick - BibbEZ
- Optional Rumble Motor
- Any GCC
- Cellphone Rumble
Assembly
Once you have all the parts you need, follow the build guide to assemble your PhobGCC.