NOTE: This is for PhobGCC 2 with firmware version 0.29.
PhobVision
PhobVision is a feature specific to PhobGCC version 2 that provides graphical configuration, calibration, and training tools built into the controller.
Not every PhobGCC v2 has PhobVision installed. If you’re interested, ask your local modder if they can install it.
Starting PhobVision
To start PhobVision:
- Plug a 3.5mm TRRS to RCA video cable compatible with Sony camcorders into the controller, and plug the yellow plug into a TV composite input. The cable must be TRRS = Audio Left, Video, Ground, Audio Right. You can alternately use the red plug of a 3.5mm TRS to stereo RCA audio cable.
- Hold the Z button on the controller.
- Plug the GCC cord into a powered-on console or GCC adapter.
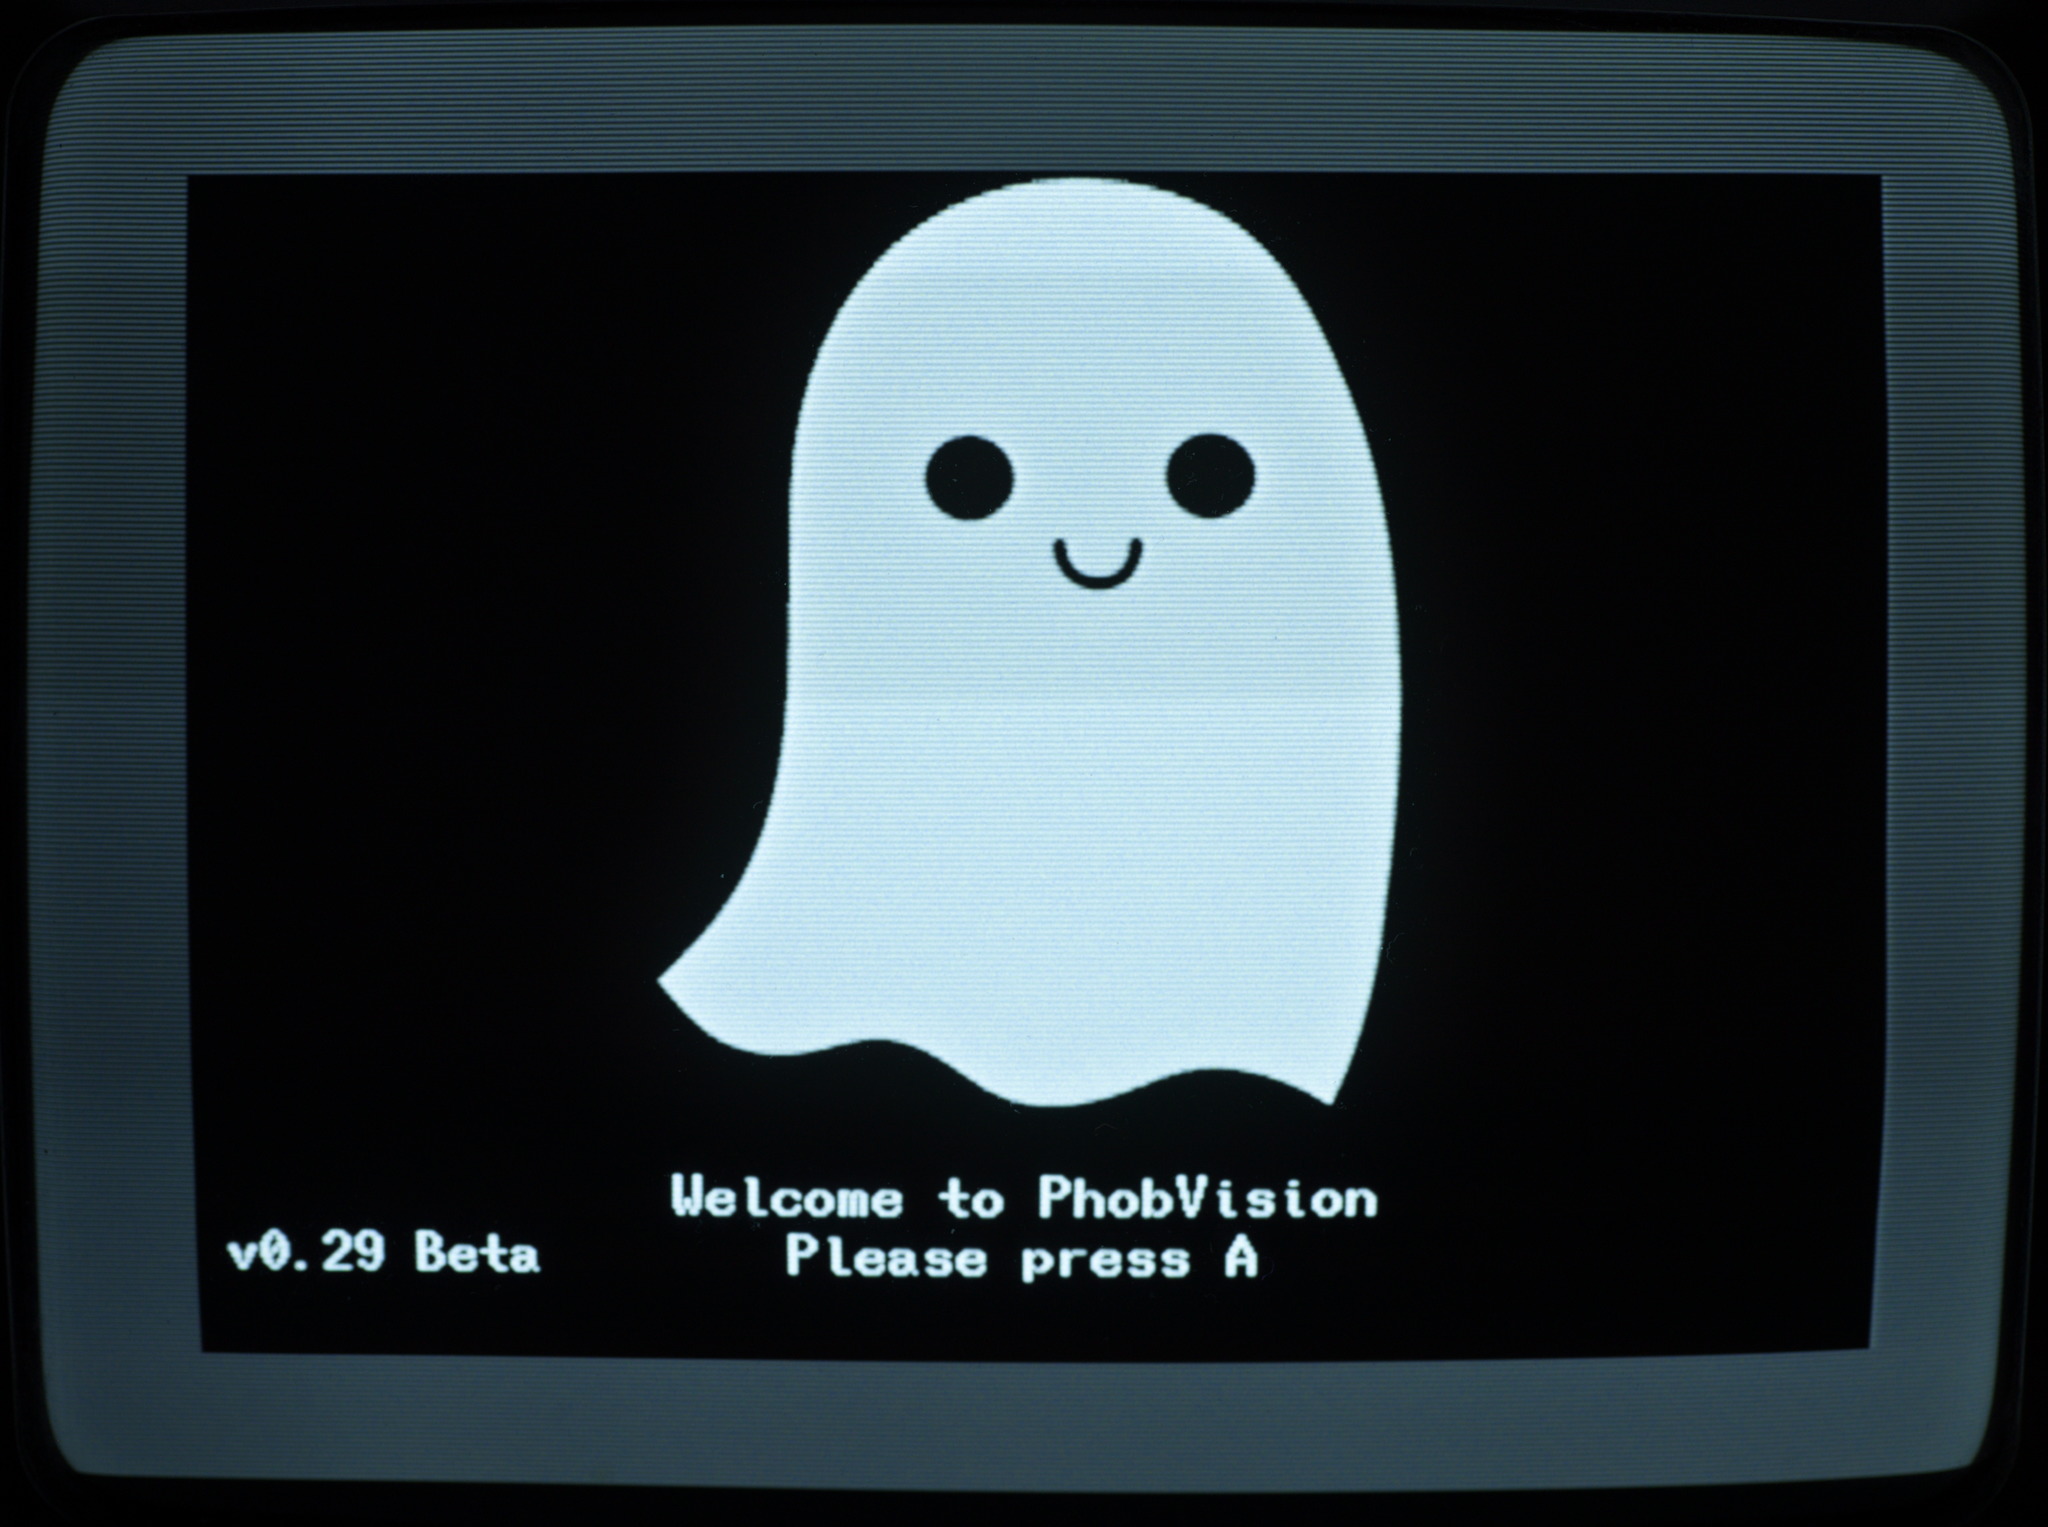
If you hold Z while the controller first receives power, it will not connect to the console or adapter and instead boot into PhobVision mode where it will be outputting composite video. Note that if the Z button is stuck, this may result in the controller never connecting to a console.
Navigating PhobVision
Use the D-pad to navigate around, use A to select items, and hold B for 0.5 seconds to go back in the menu system.
If you change a setting, tapping B briefly will save the changes. Continuing to hold B will cause you to back to the next higher menu level.
Stick Calibration
When you use PhobVision to calibrate, you can follow the instructions onscreen, which should correspond with the instructions in the PhobGCC Calibration Guide. It doesn’t have room to say it, but you can still press Start to skip the measurements and begin notch adjustment on the notches you’ve measured.
However, you are presented with more information than you would get while calibrating using Smashscope, and this may be useful.
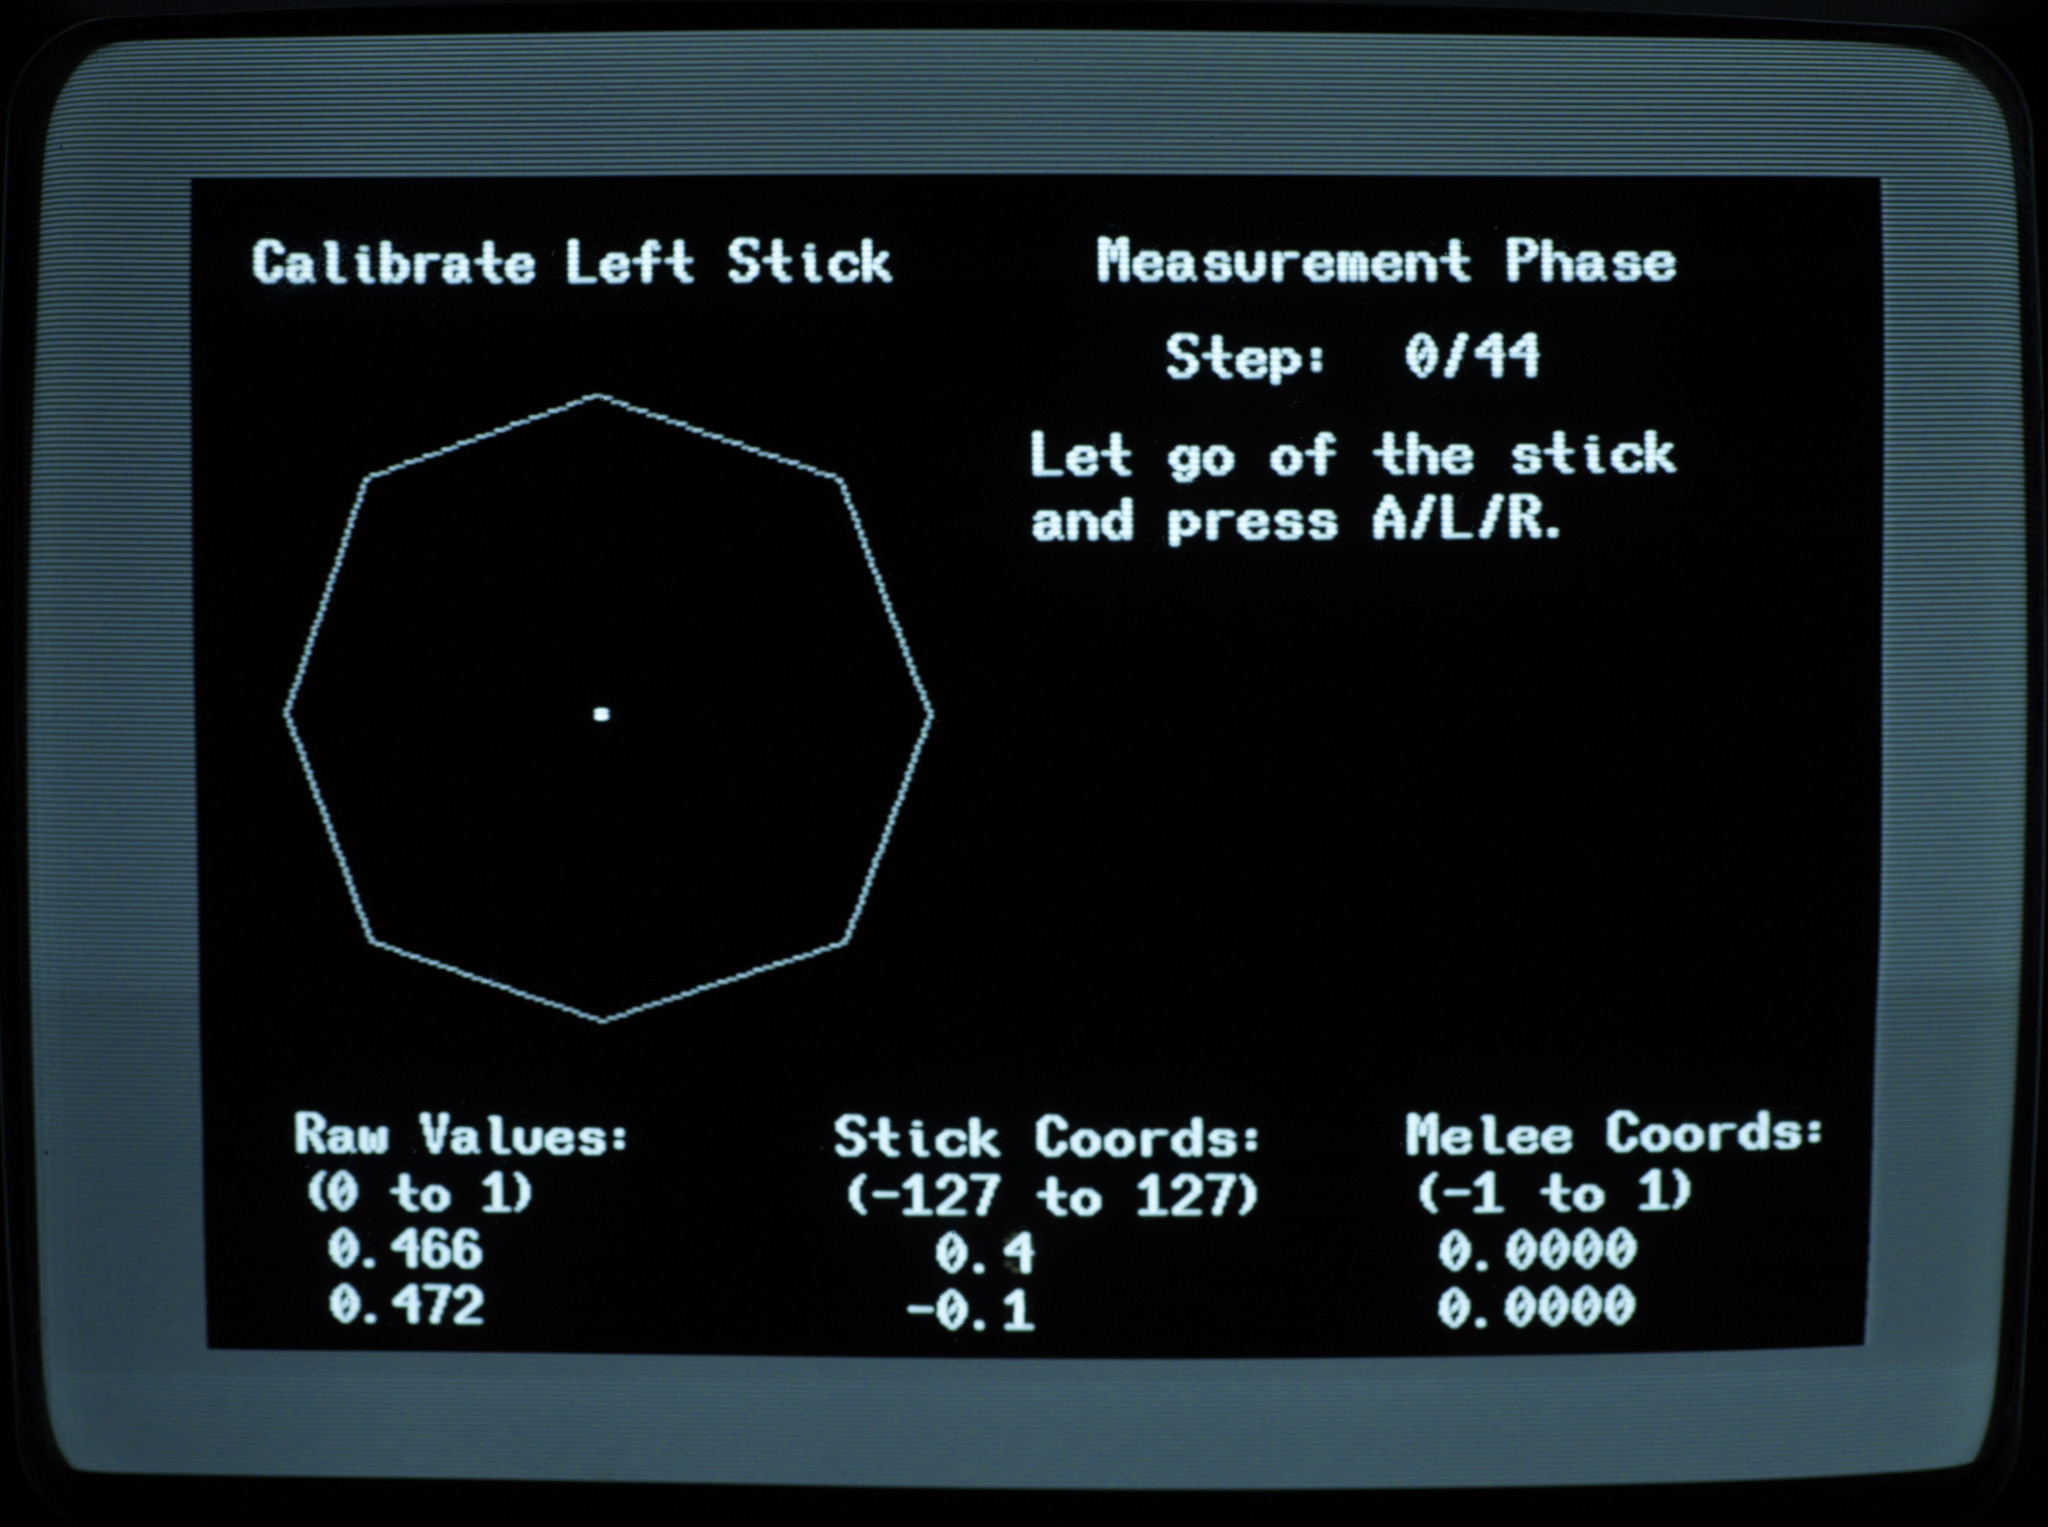
On the top right, it shows you what step you are at in the procedure. During notch adjust, if you haven’t measured some of the notches, then it will skip some of the steps.
On the bottom left, you see the raw measurements, in a range from 0 to 1, that the controller is reading from the Hall effect sensors. This is useful for determining whether something is wrong with the controller. Both axes should respond to the stick movement. If the raw measurements for the C-Stick are always zero or one, then there is likely something wrong with the wiring. If only the C-Stick is affected, it’s likely a broken connection, but if both sticks are affected, then it is likely a short affecting the shared communication bus.
At the center is the controller output that would be sent to the console, with floating point precision. This is useful when doing notch adjustment to see where you are within each integer coordinate.
On the right is the coordinate Melee would see after the controller output gets mapped to its smaller input circle.
One more thing of note is that if you are currently calibrating, there only way to back out and cancel the calibration is to unplug the controller’s GCC cable.
Configuration
These should be fairly self-explanatory to operate.
Choose between which settings you change using (usually) left/right on the D-pad, and change the settings with up/down. If you hold up/down for more than 10 changes, it will begin to change more rapidly.
If you have changed a setting from what was last saved, tapping B briefly will save the changes. Continuing to hold B will cause you to back to the next higher menu level.
PhobScope
The PhobScope tools let you view and record the controller’s inputs and outputs with millisecond precision to see the results of your calibration and configuration.
Input Viewer
The Input Viewer shows the current stick positions of the controller, as well as the button and trigger states both before and after remapping and trigger modes are applied.
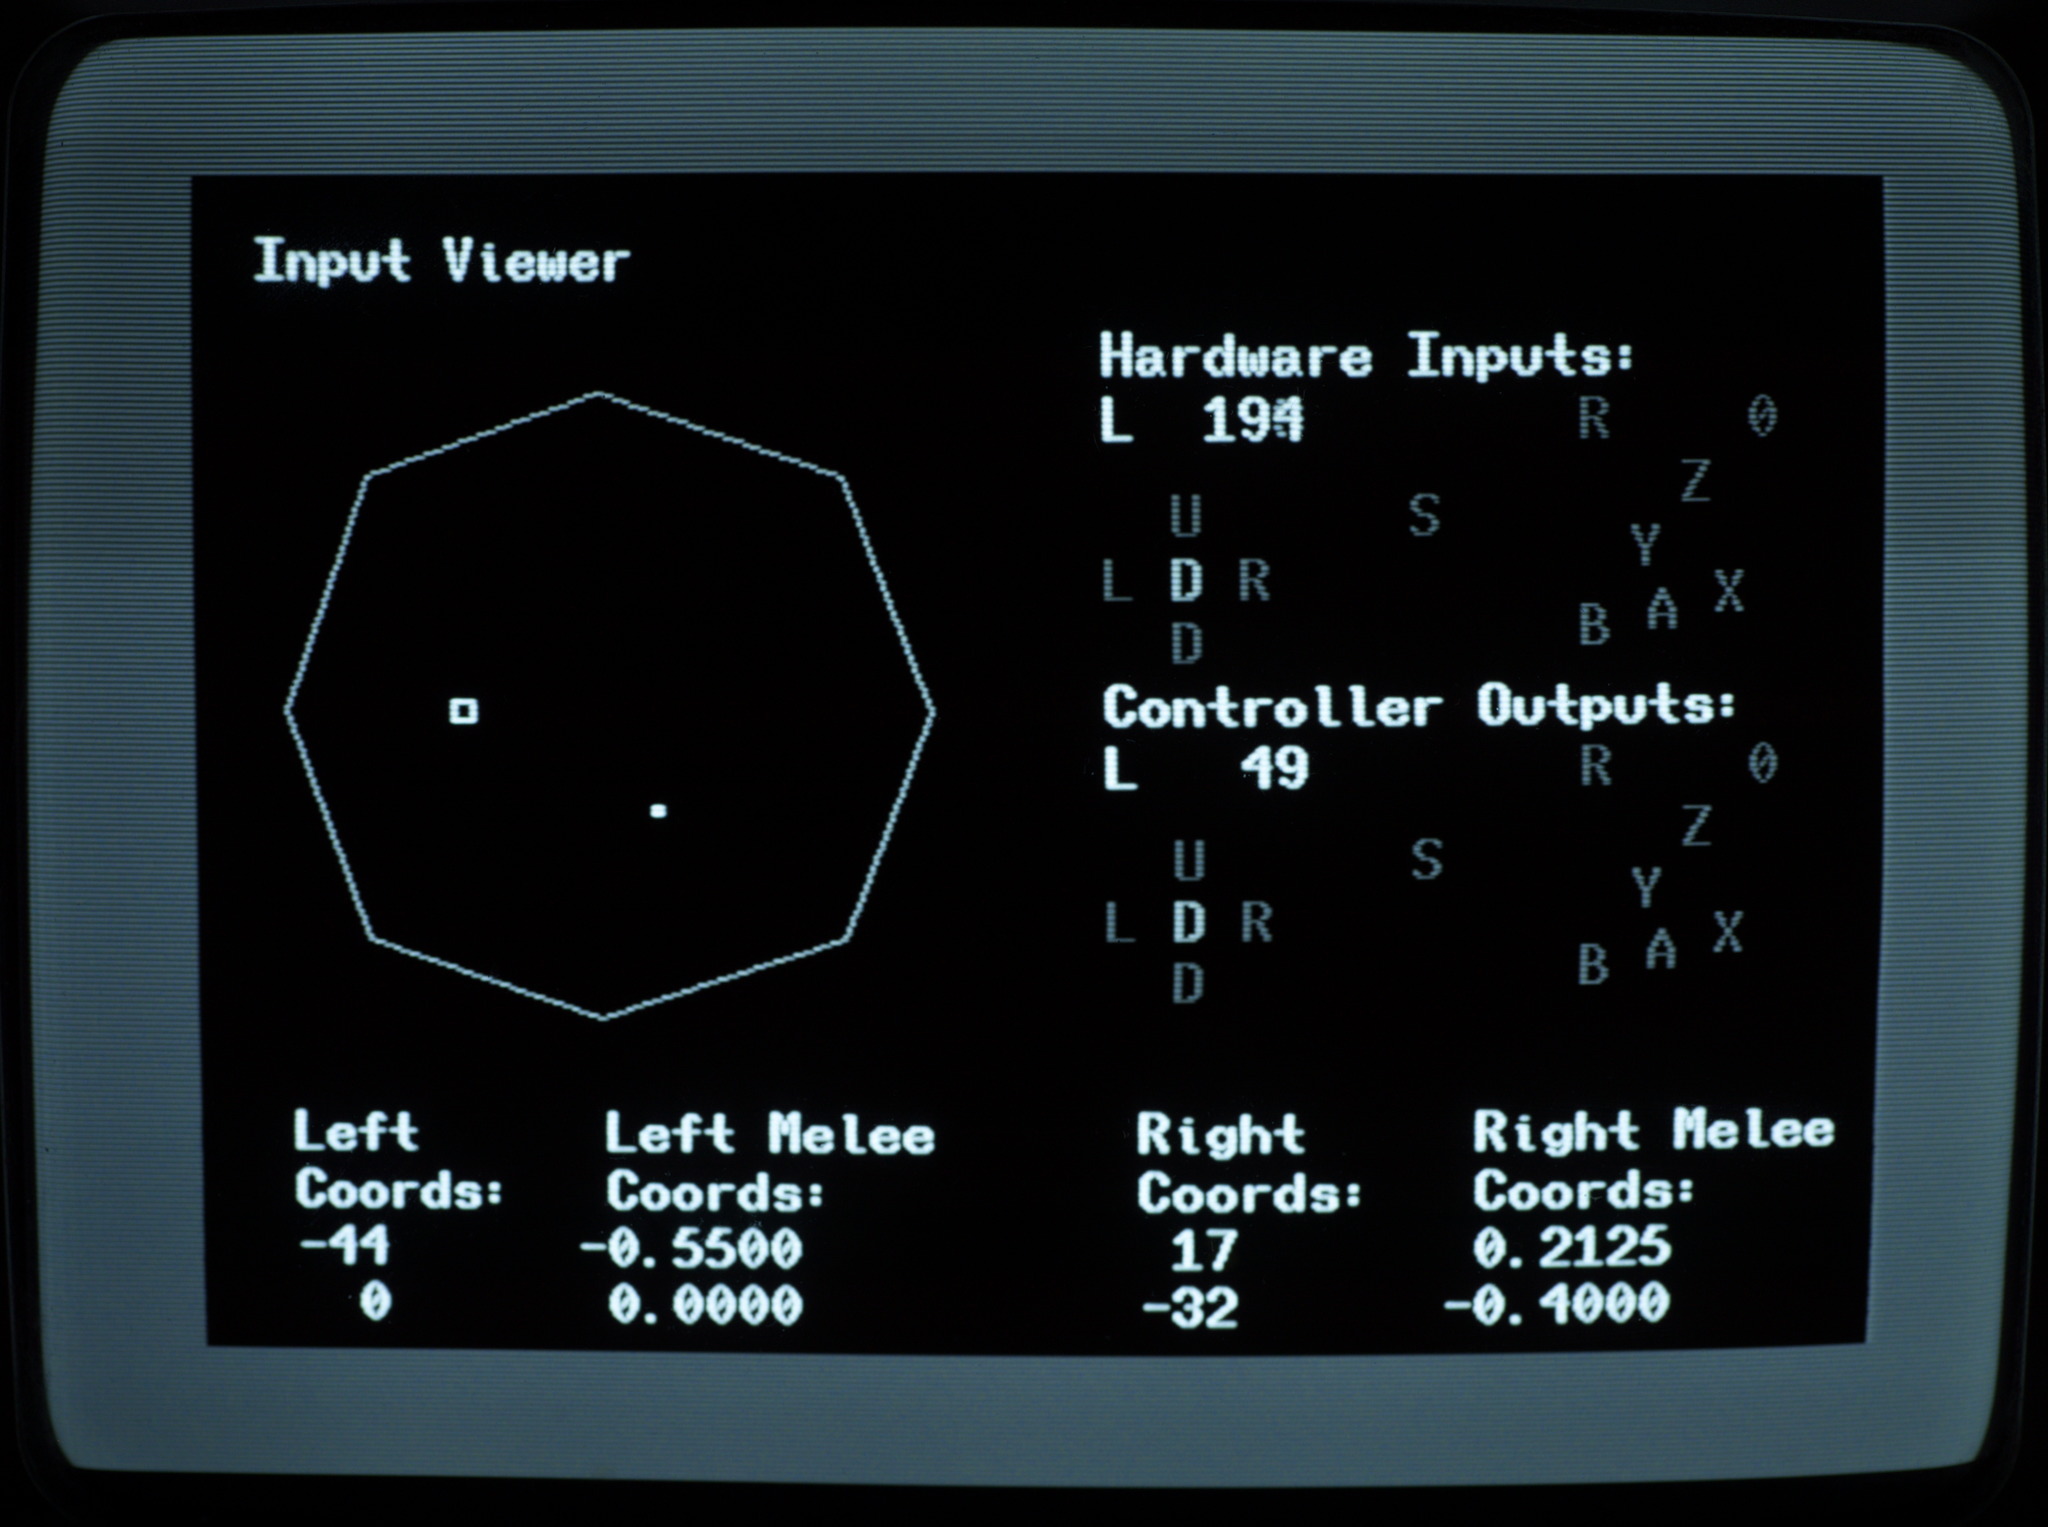
The left side shows an octagon representing the standard 100-unit-radius stick gate, with the position of the left stick shown as a large square and the C-stick shown as a small square.
The top right shows the hardware inputs of the controller with no trigger modes, remapping, or button lockouts applied. Below that you can see the actual output of the controller with your settings applied. A non-active input will be gray, while an active input will be white. The analog trigger values are shown numerically. Occasionally there’s a one or two unit discrepancy between the trigger analog values of the Hardware Inputs and Controller Outputs. This is normal.
At the bottom are the stick coordinates output by the controller for the left stick and the C-stick. You can see both the coordinates sent to the console and the coordinates as interpreted by Melee.
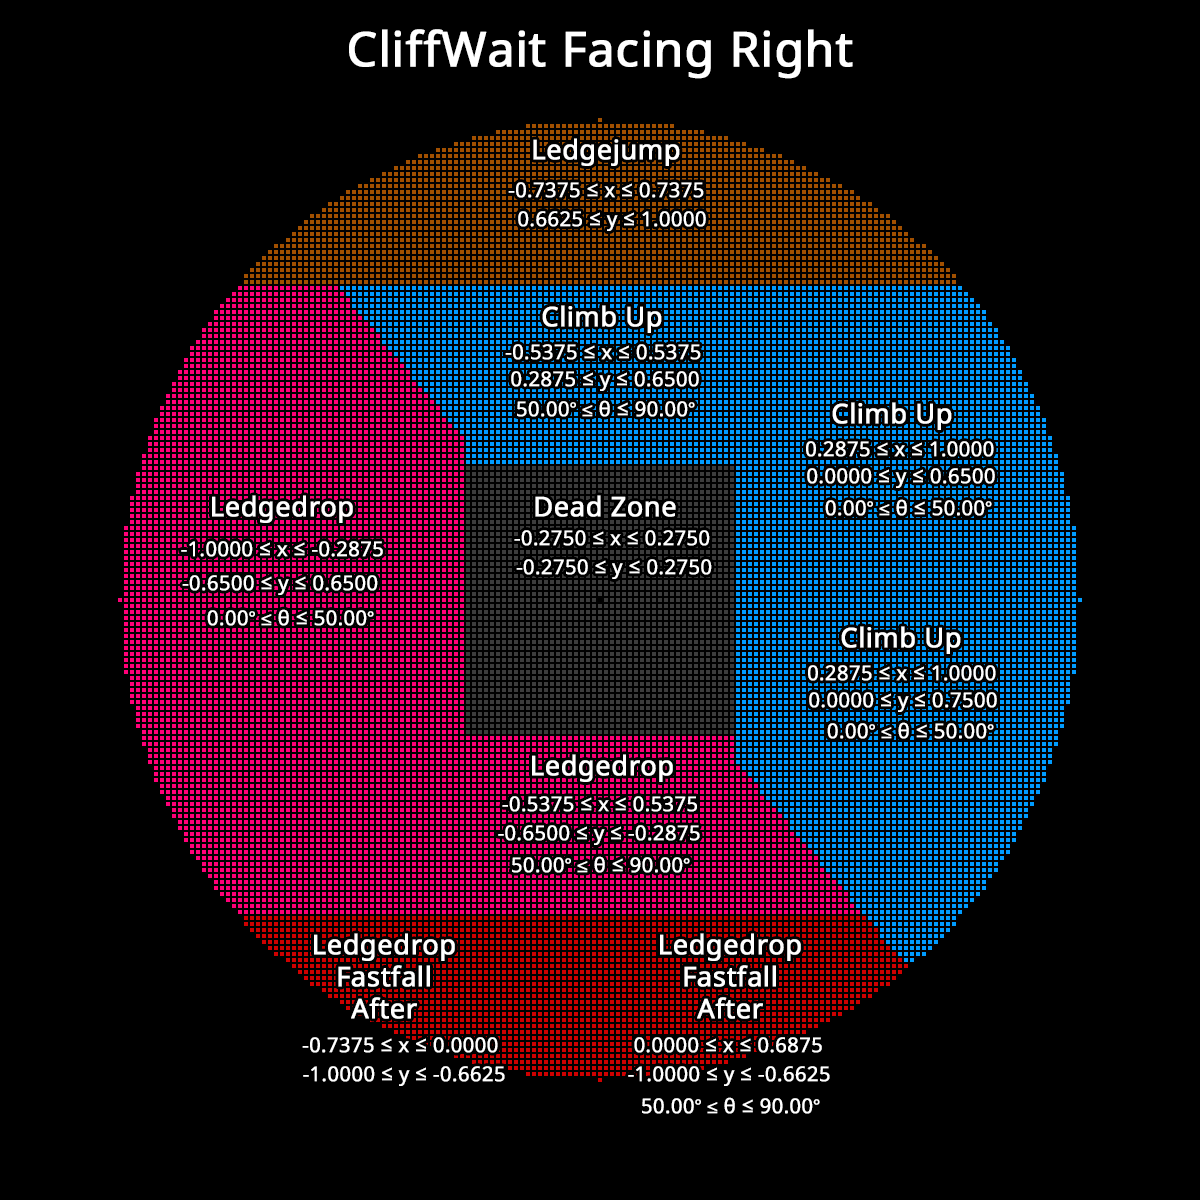
Stickmap Plots
The Stickmap Plots let you record 100 milliseconds of stick motion in 2D and plot it overlaid on various stickmaps relevant to Melee.
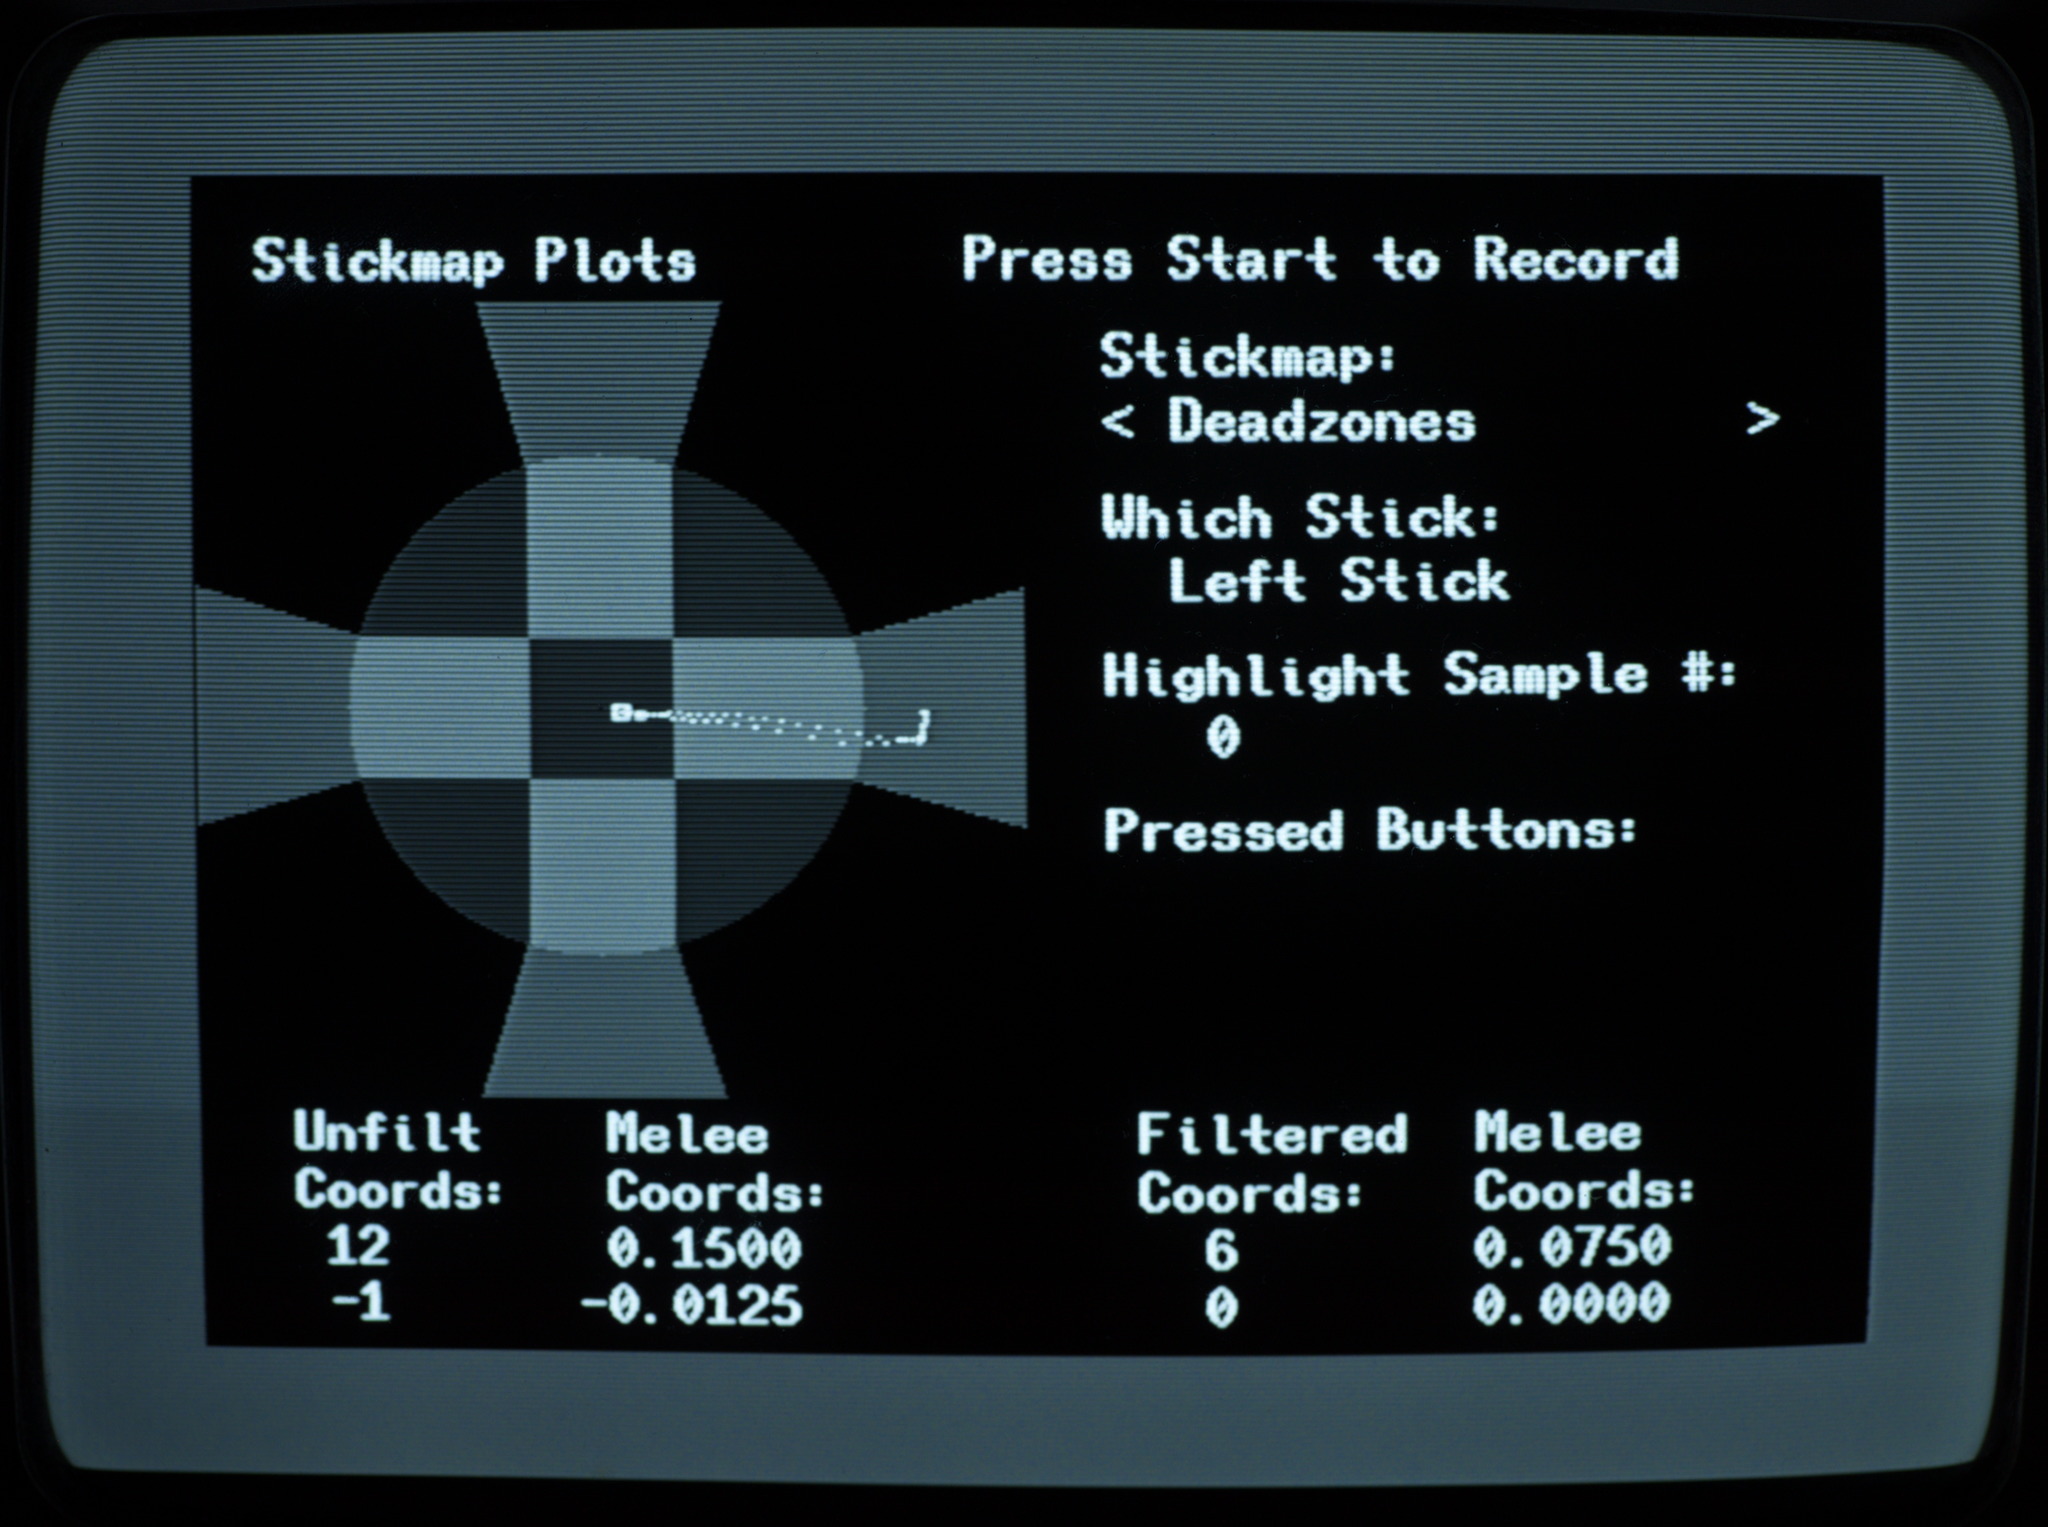
This can help you perfect your stick inputs and filter configurations for in-game techniques such as ledgedashing and dashback out of crouch.
After you press Start, the recording begins after the unfiltered stick values move 10 units away from where it was when you pressed Start.
On the left is the visualization of the stick motion. The filtered stick output is shown as white points and the unfiltered stick motion is gray points. The currently highlighted sample is shown as a large box for filtered output and a small box for unfiltered stick position.
On the right is the options you have for the recording, as well as a list of any buttons pressed at the time of the currently highlighted sample. You can select from various stickmaps, choose which stick’s motion to record, and scroll through the samples to see info at any recorded point of time.
At the bottom you can see the coordinates of the currently highlighted sample.
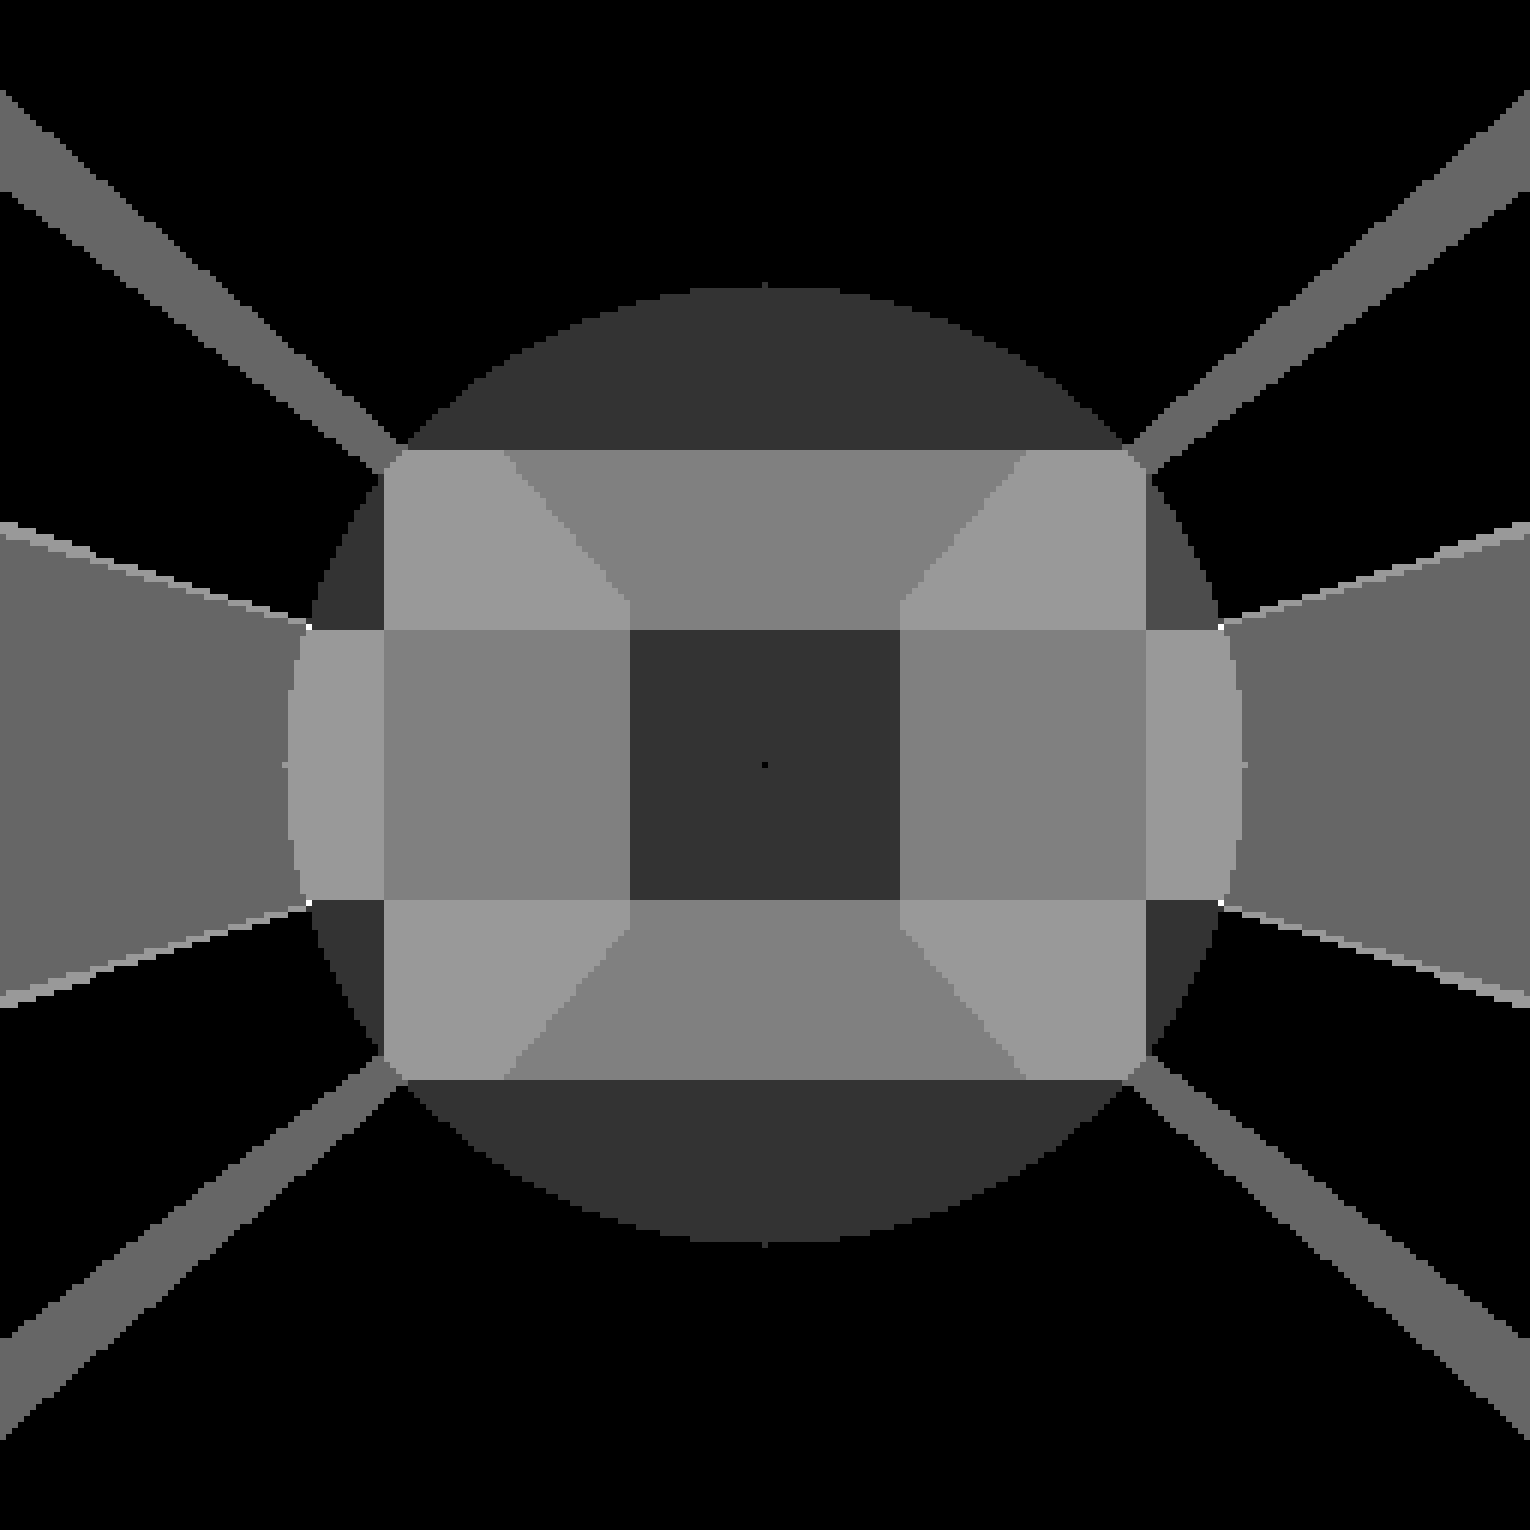
Stickmaps
You can choose to overlay the stick motion on various stickmaps from Melee.
The regions on the edge of the Melee unit circle are extended out to edge of the full controller output space.
Labeled stickmaps courtesy @venus23gg; stickmaps created using Altimor’s Melee Stick Coordinate Visualizer.
None
Self-explanatory: you only see the stick motion itself.
Deadzones
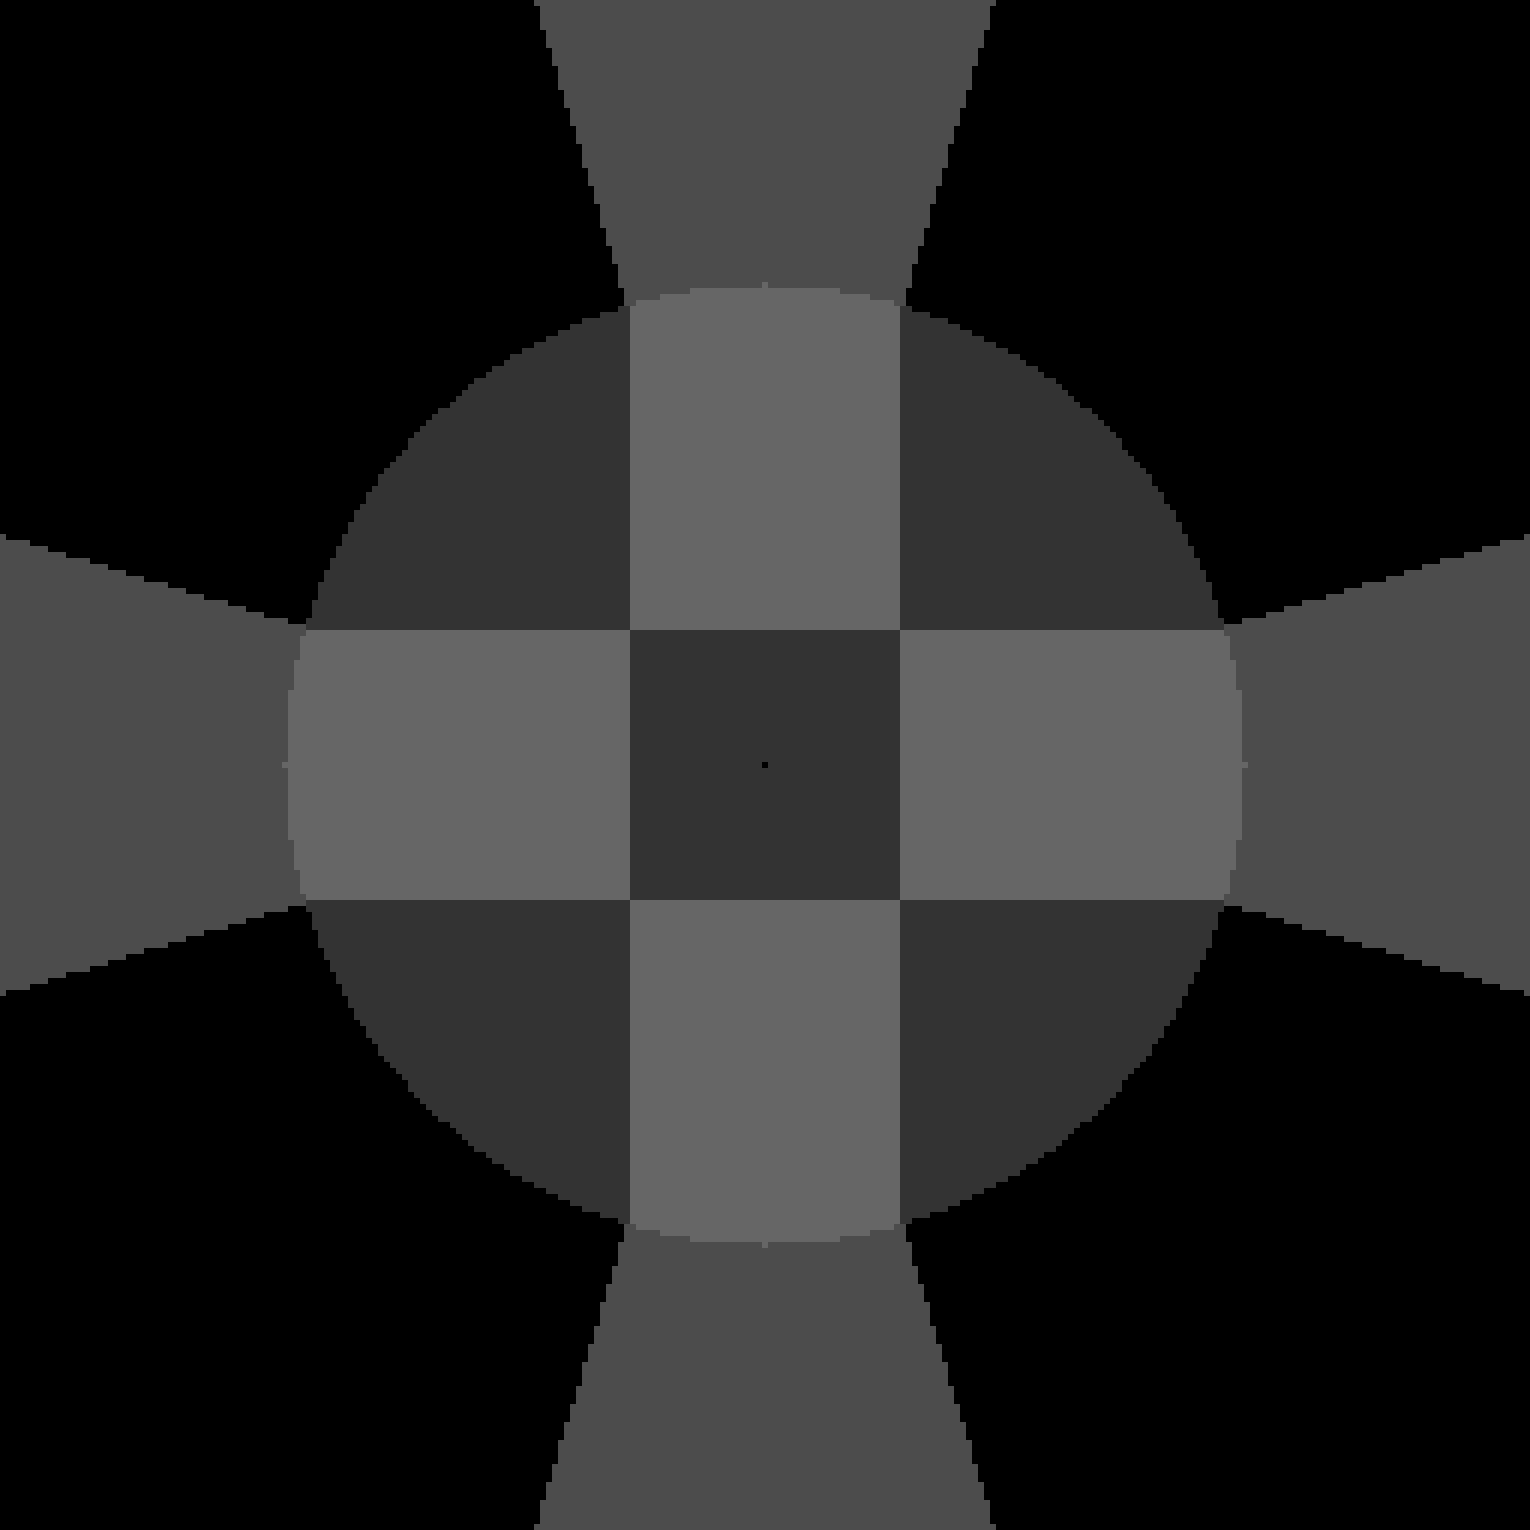
This shows you the Melee deadzones.
It may be useful for practicing SDI.
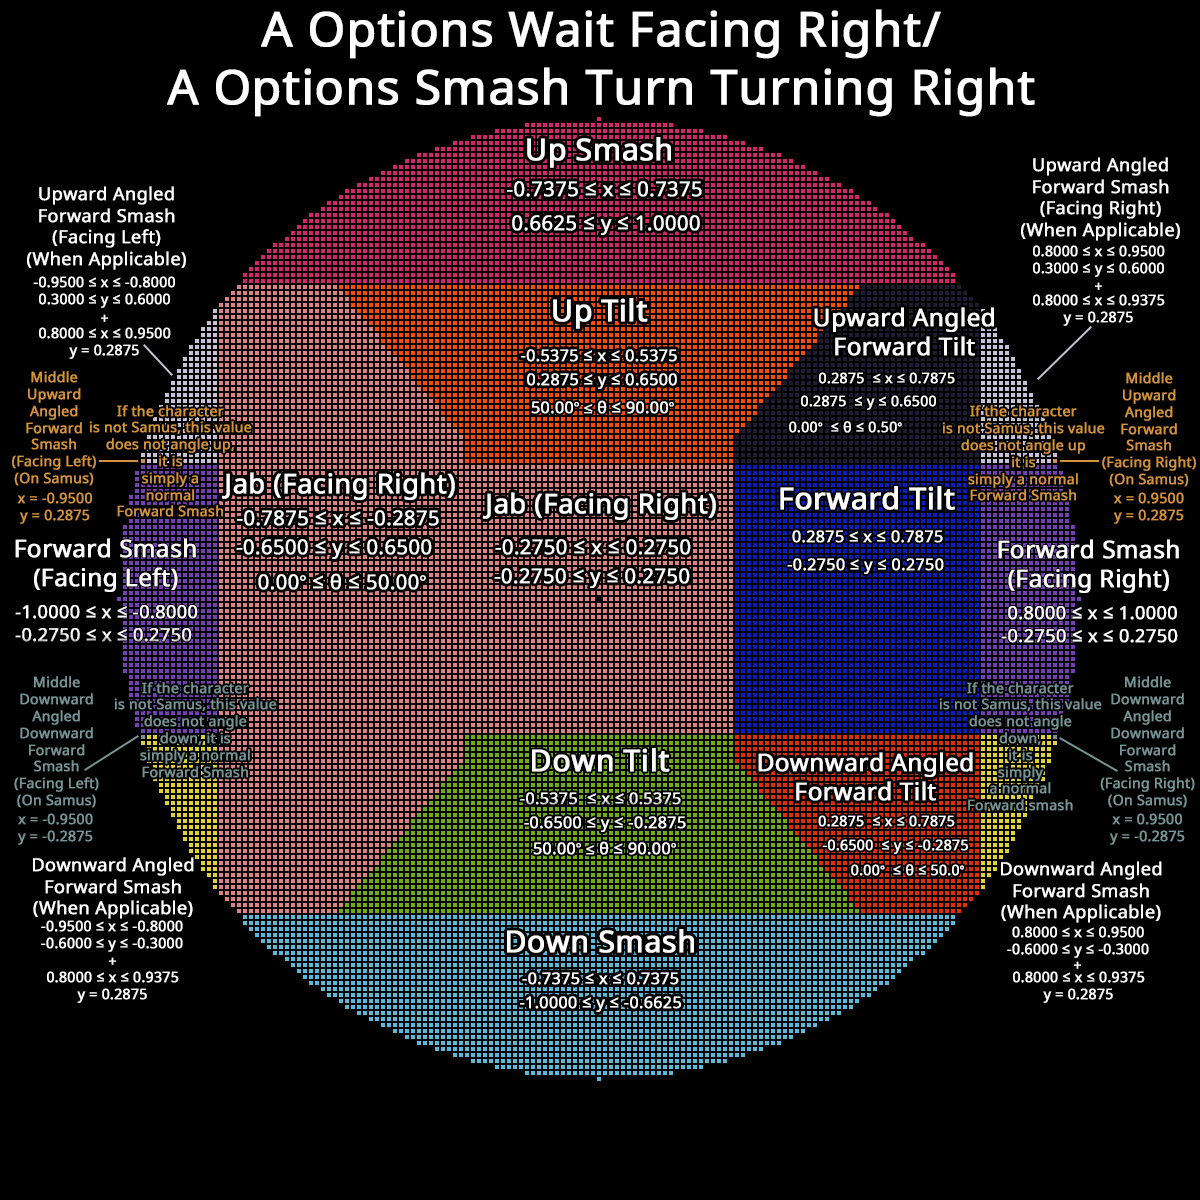
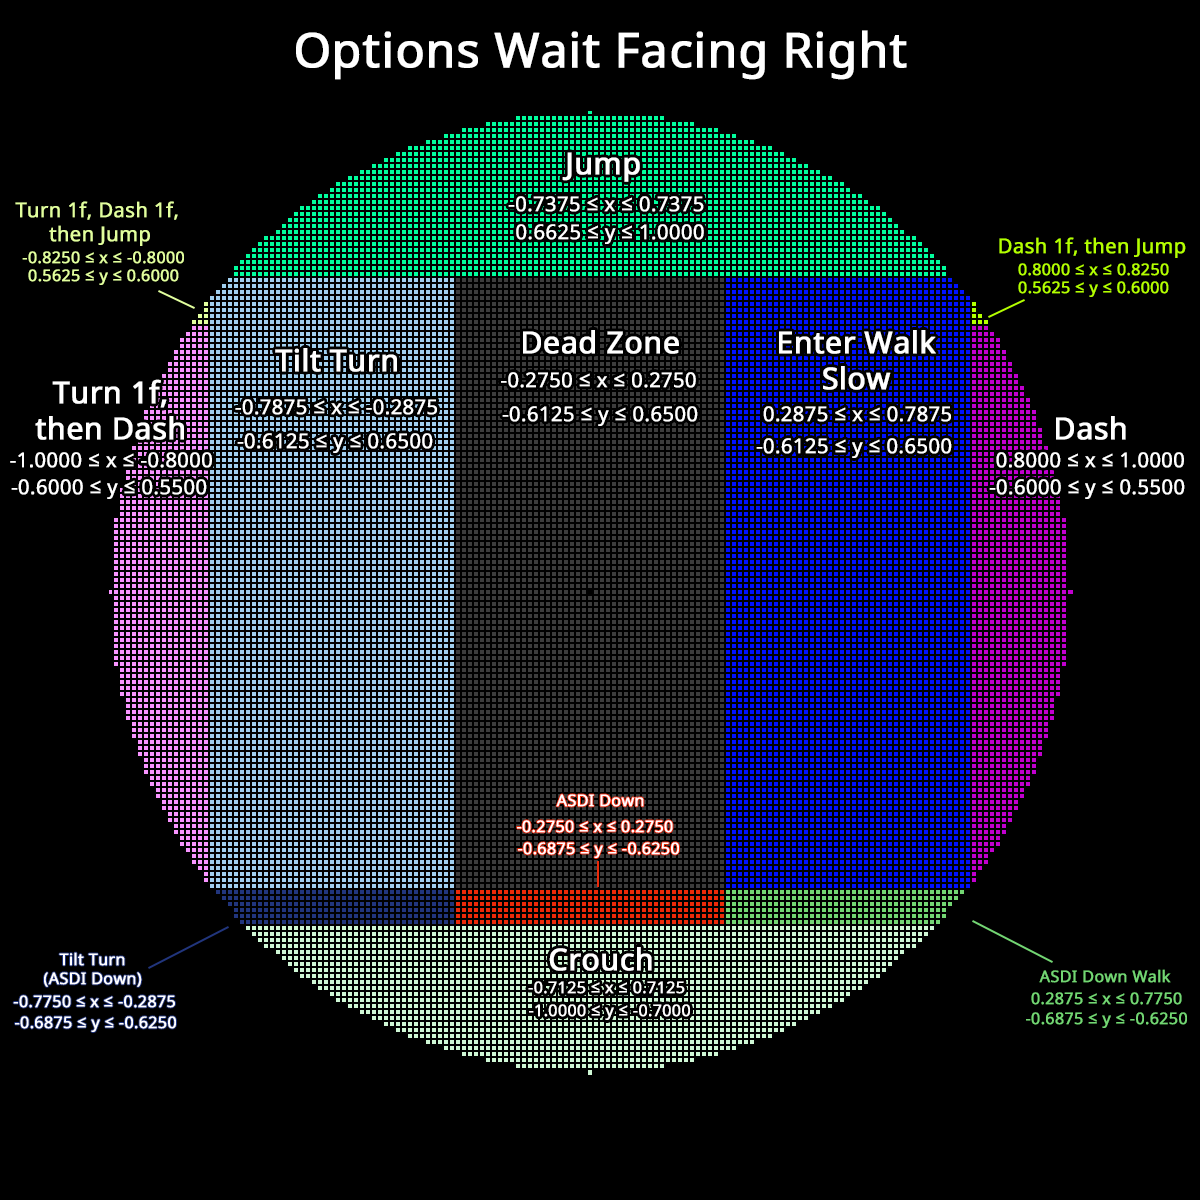
Wait Attacks
This shows you the stickmap for A attacks while standing in wait on the ground.
Here’s a labered image of this stickmap, although the PhobVision version is made symmetrical:
Wait Movement

This shows you the stickmap for movement while standing in wait on the ground.
Here’s a labeled version of it:
Crouch

This shows you the stickmap for movement while crouching.
Here’s a labeled version of it:
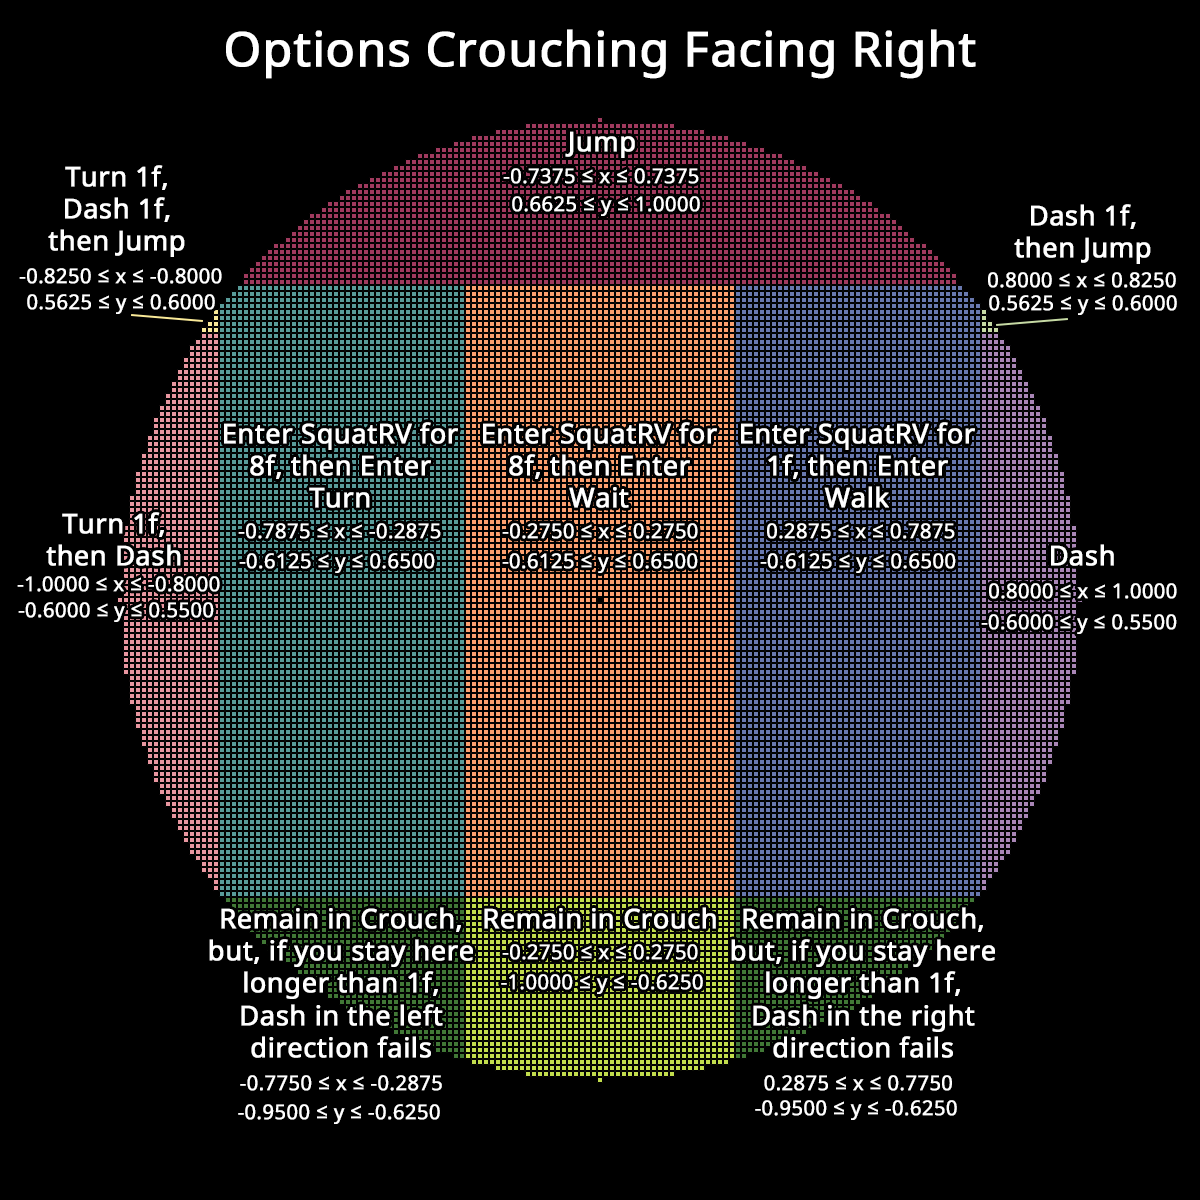
This is particularly useful for practicing dashback out of crouch (DBOOC).
Hold the stick down and then press Start to begin recording, then roll the stick to horizontal as quickly as you can.
Check how long you spend in the lower “Remain in crouch, but if you stay here longer than 1f, Dash fails” zones. If you spend more than 17ms (1 frame), there’s a chance your DBOOC will fail. If you spend more than 33ms (2 frames), then you’re guaranteed to fail.
If you play on UCF 0.80 or prior, if you get unlucky and get polled by the console in the narrow bright lower diagonal regions at all, your dash will fail. On UCF 0.84 and later, those regions are effectively included in the region where you cannot stay for more than 1 frame.
Left and Right Ledge
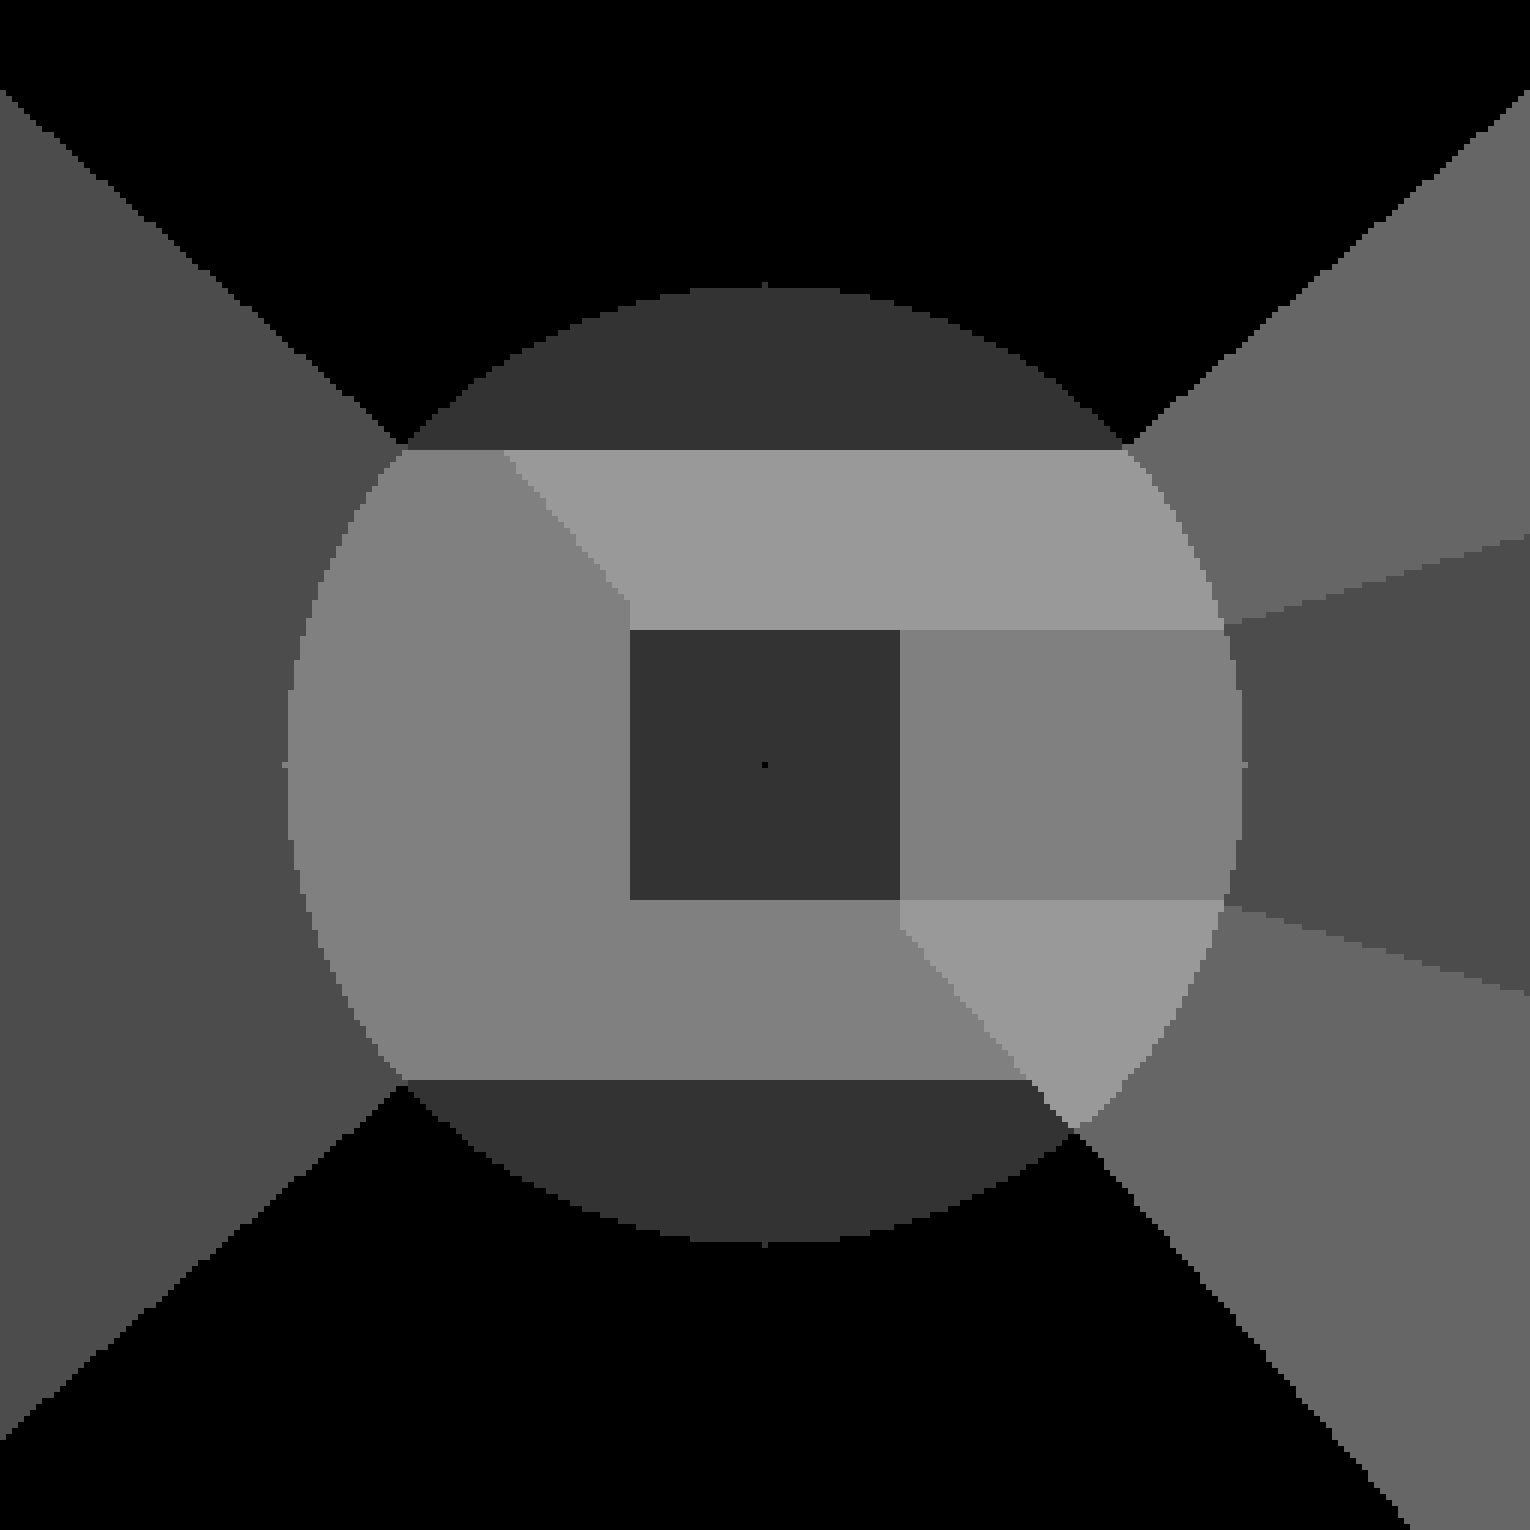
This shows you the stickmap for options while hanging from ledge (and the horizontal deadzone for your airdodge afterwards).
Here’s a labeled version of it, ignoring the deadzones:
This is useful for practicing ledgedashes.
Check your filtering settings and muscle memory for inputs to make sure you spend 17 ms or more in “Ledgedrop” before inputting forward, before inputting a jump button.
Value vs Time Plots
The Value vs Time Plots let you record 200 milliseconds of one axis of stick or trigger motion and plot it against time. The output values are plotted as a solid white line while unfiltered raw values are individual dots.
It also provides additional information based on what it was trying to record.
Use the left and right on the D-pad to choose between options and up and down on the D-pad to change the options.
Simply move the stick in a way relevant to the measurement type to trigger recording. However, if you have the cursor on the Highlight Sample # option, you must manually tell it to wait for motion by pressing the Start button. (This is a technical limitation due to how it records a looping buffer to save data from before the triggering action.)
Snapback
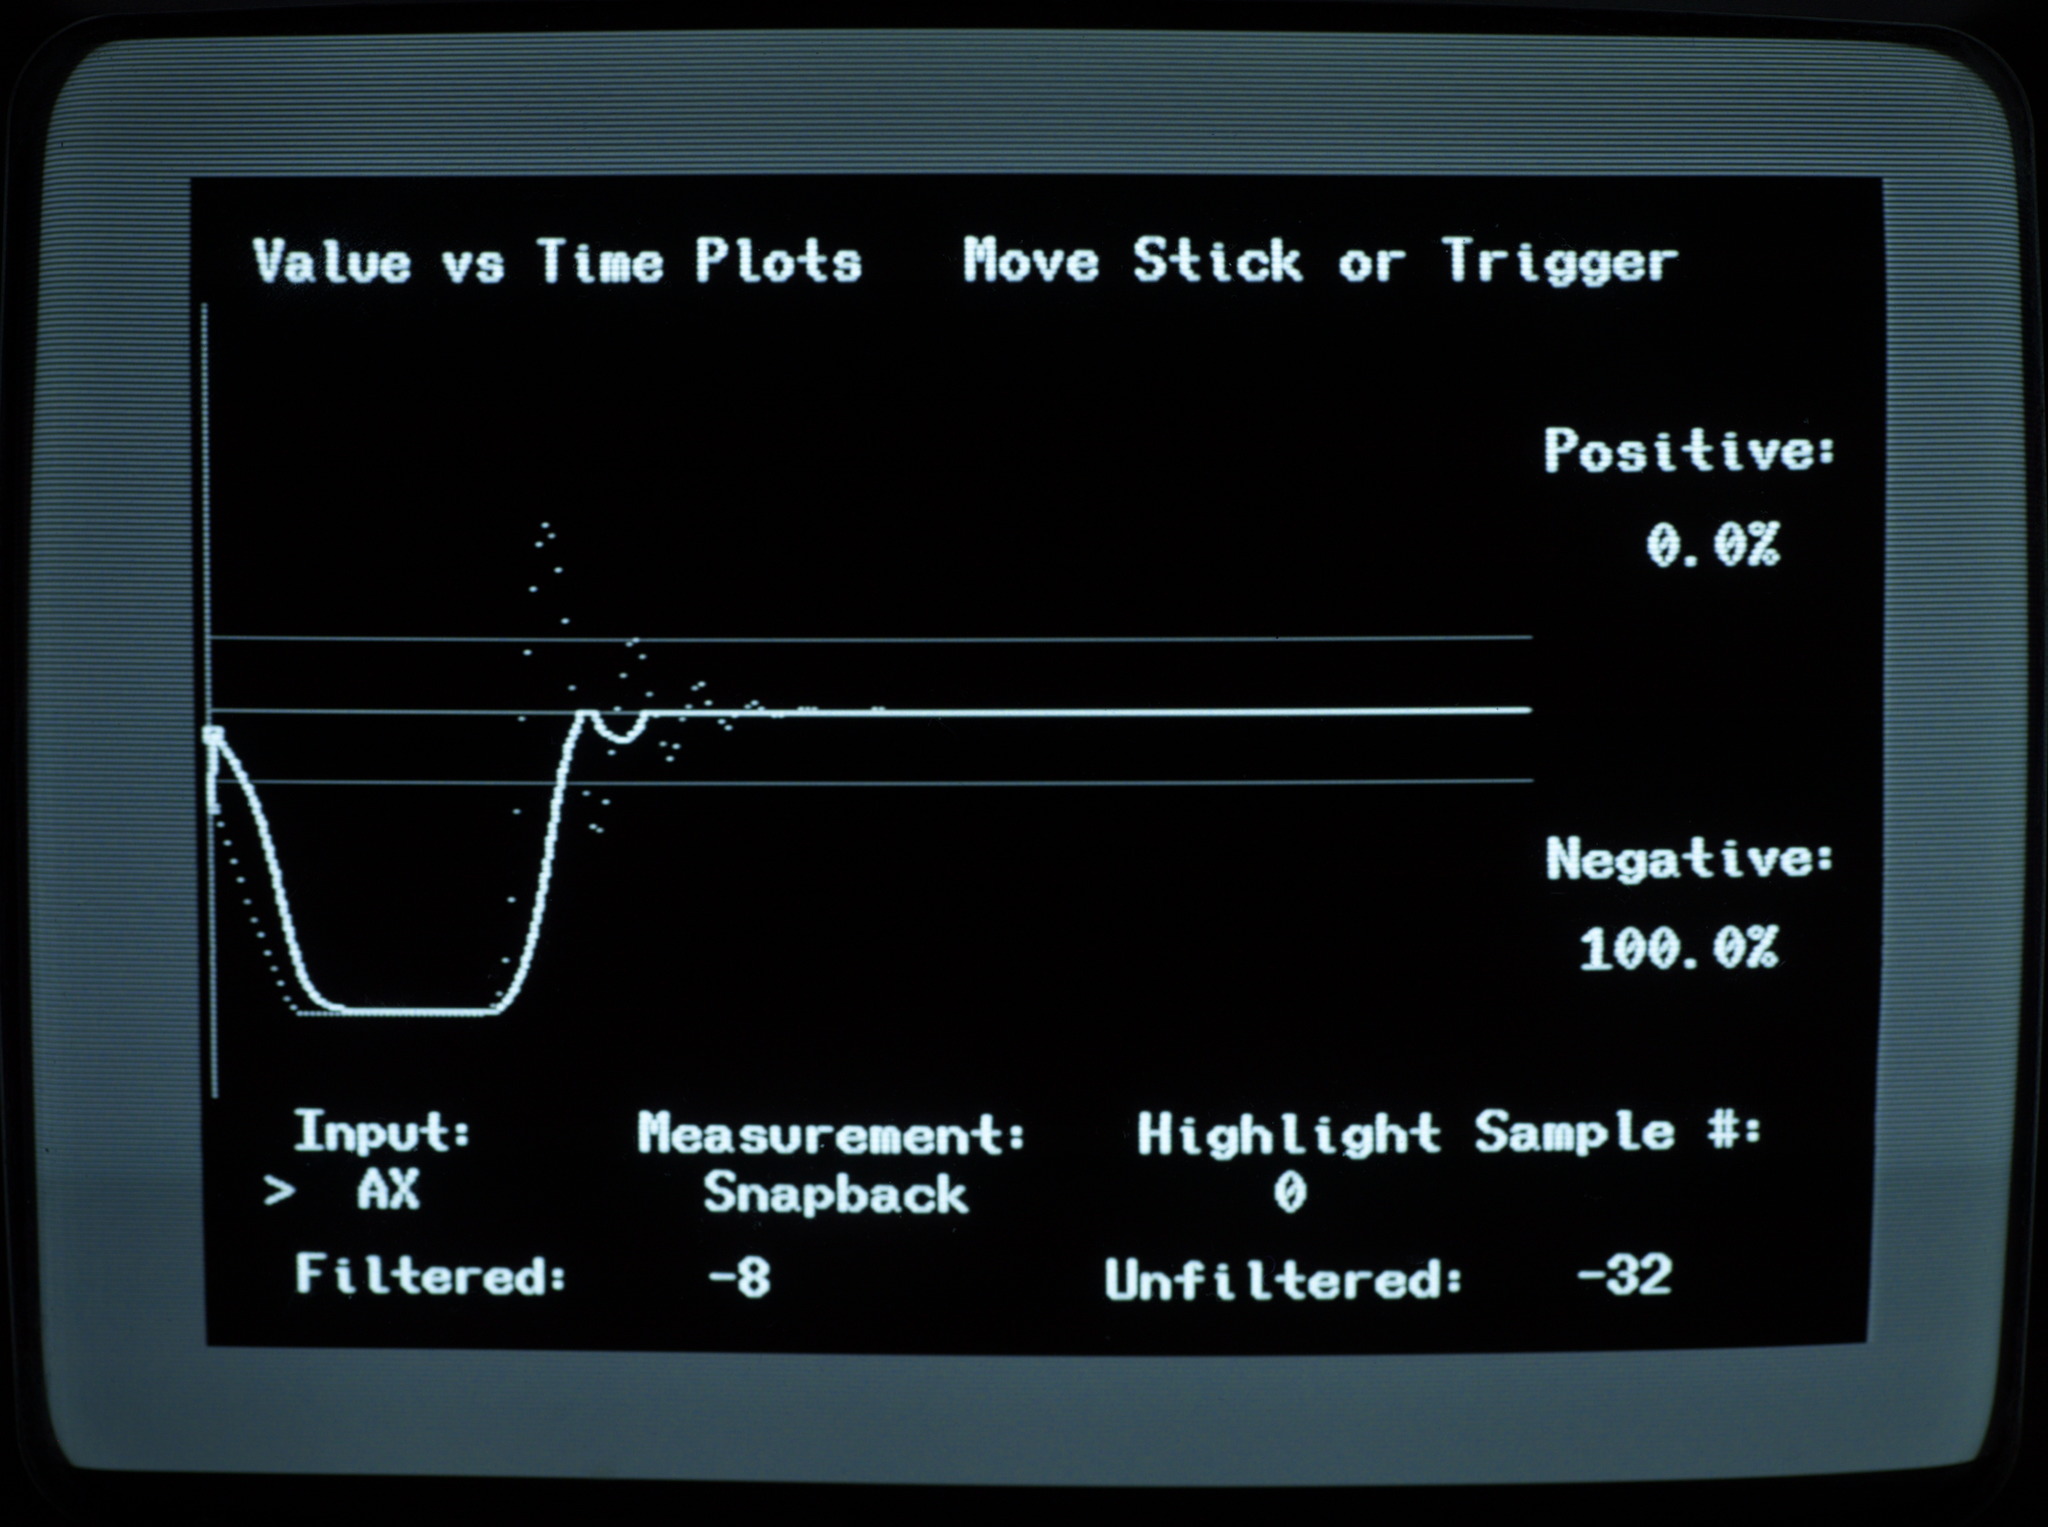
This is only available for stick axes.
This triggers when the unfiltered stick axis goes >80 one way and then falls below 23.
The graph shows lines just outside the Melee deadzones, ±23.
As long as you held it on one side long enough before letting go, the percents to the right of the graph will tell you the chance that the last input would be on each side (relevant for turnaround B).
Dashback
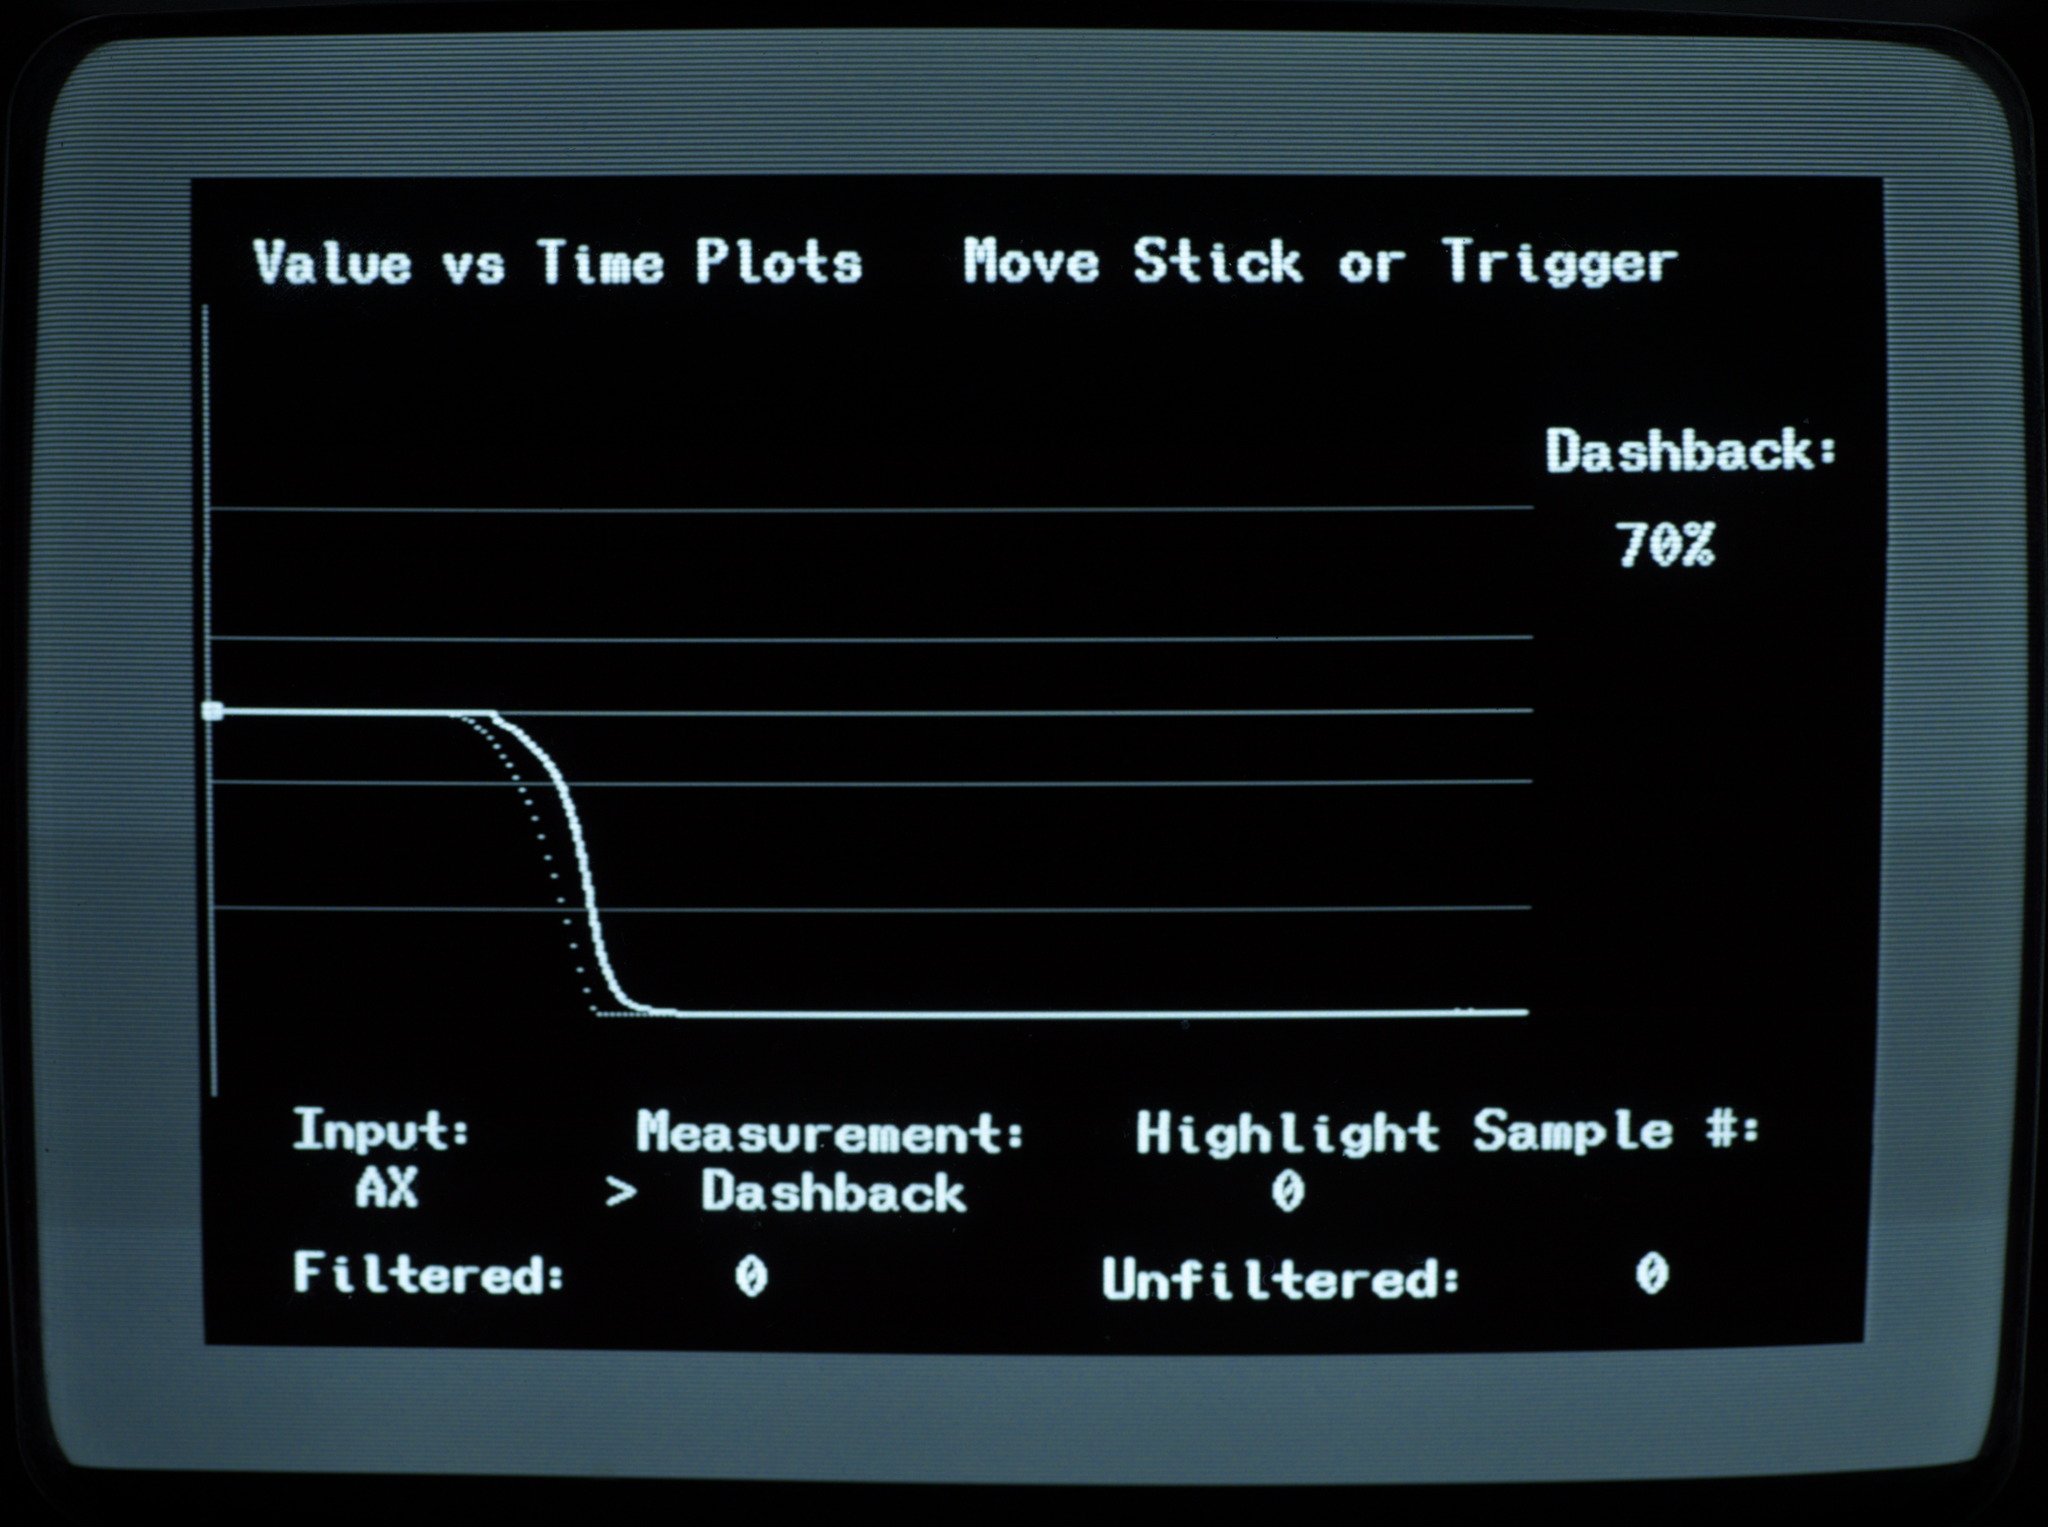
This is only available for stick axes.
This triggers when the unfiltered stick axis exceeds 23 on either side.
The graph shows lines just outside the Melee deadzones, ±23, and right at the dash threshold, ±64.
The percents on the right tell you the chance of successful standing dashback in vanilla Melee. The shorter the time the stick output spends in the range 23-63 inclusive, the less likely a standing dashback is to fail on vanilla Melee.
Pivots
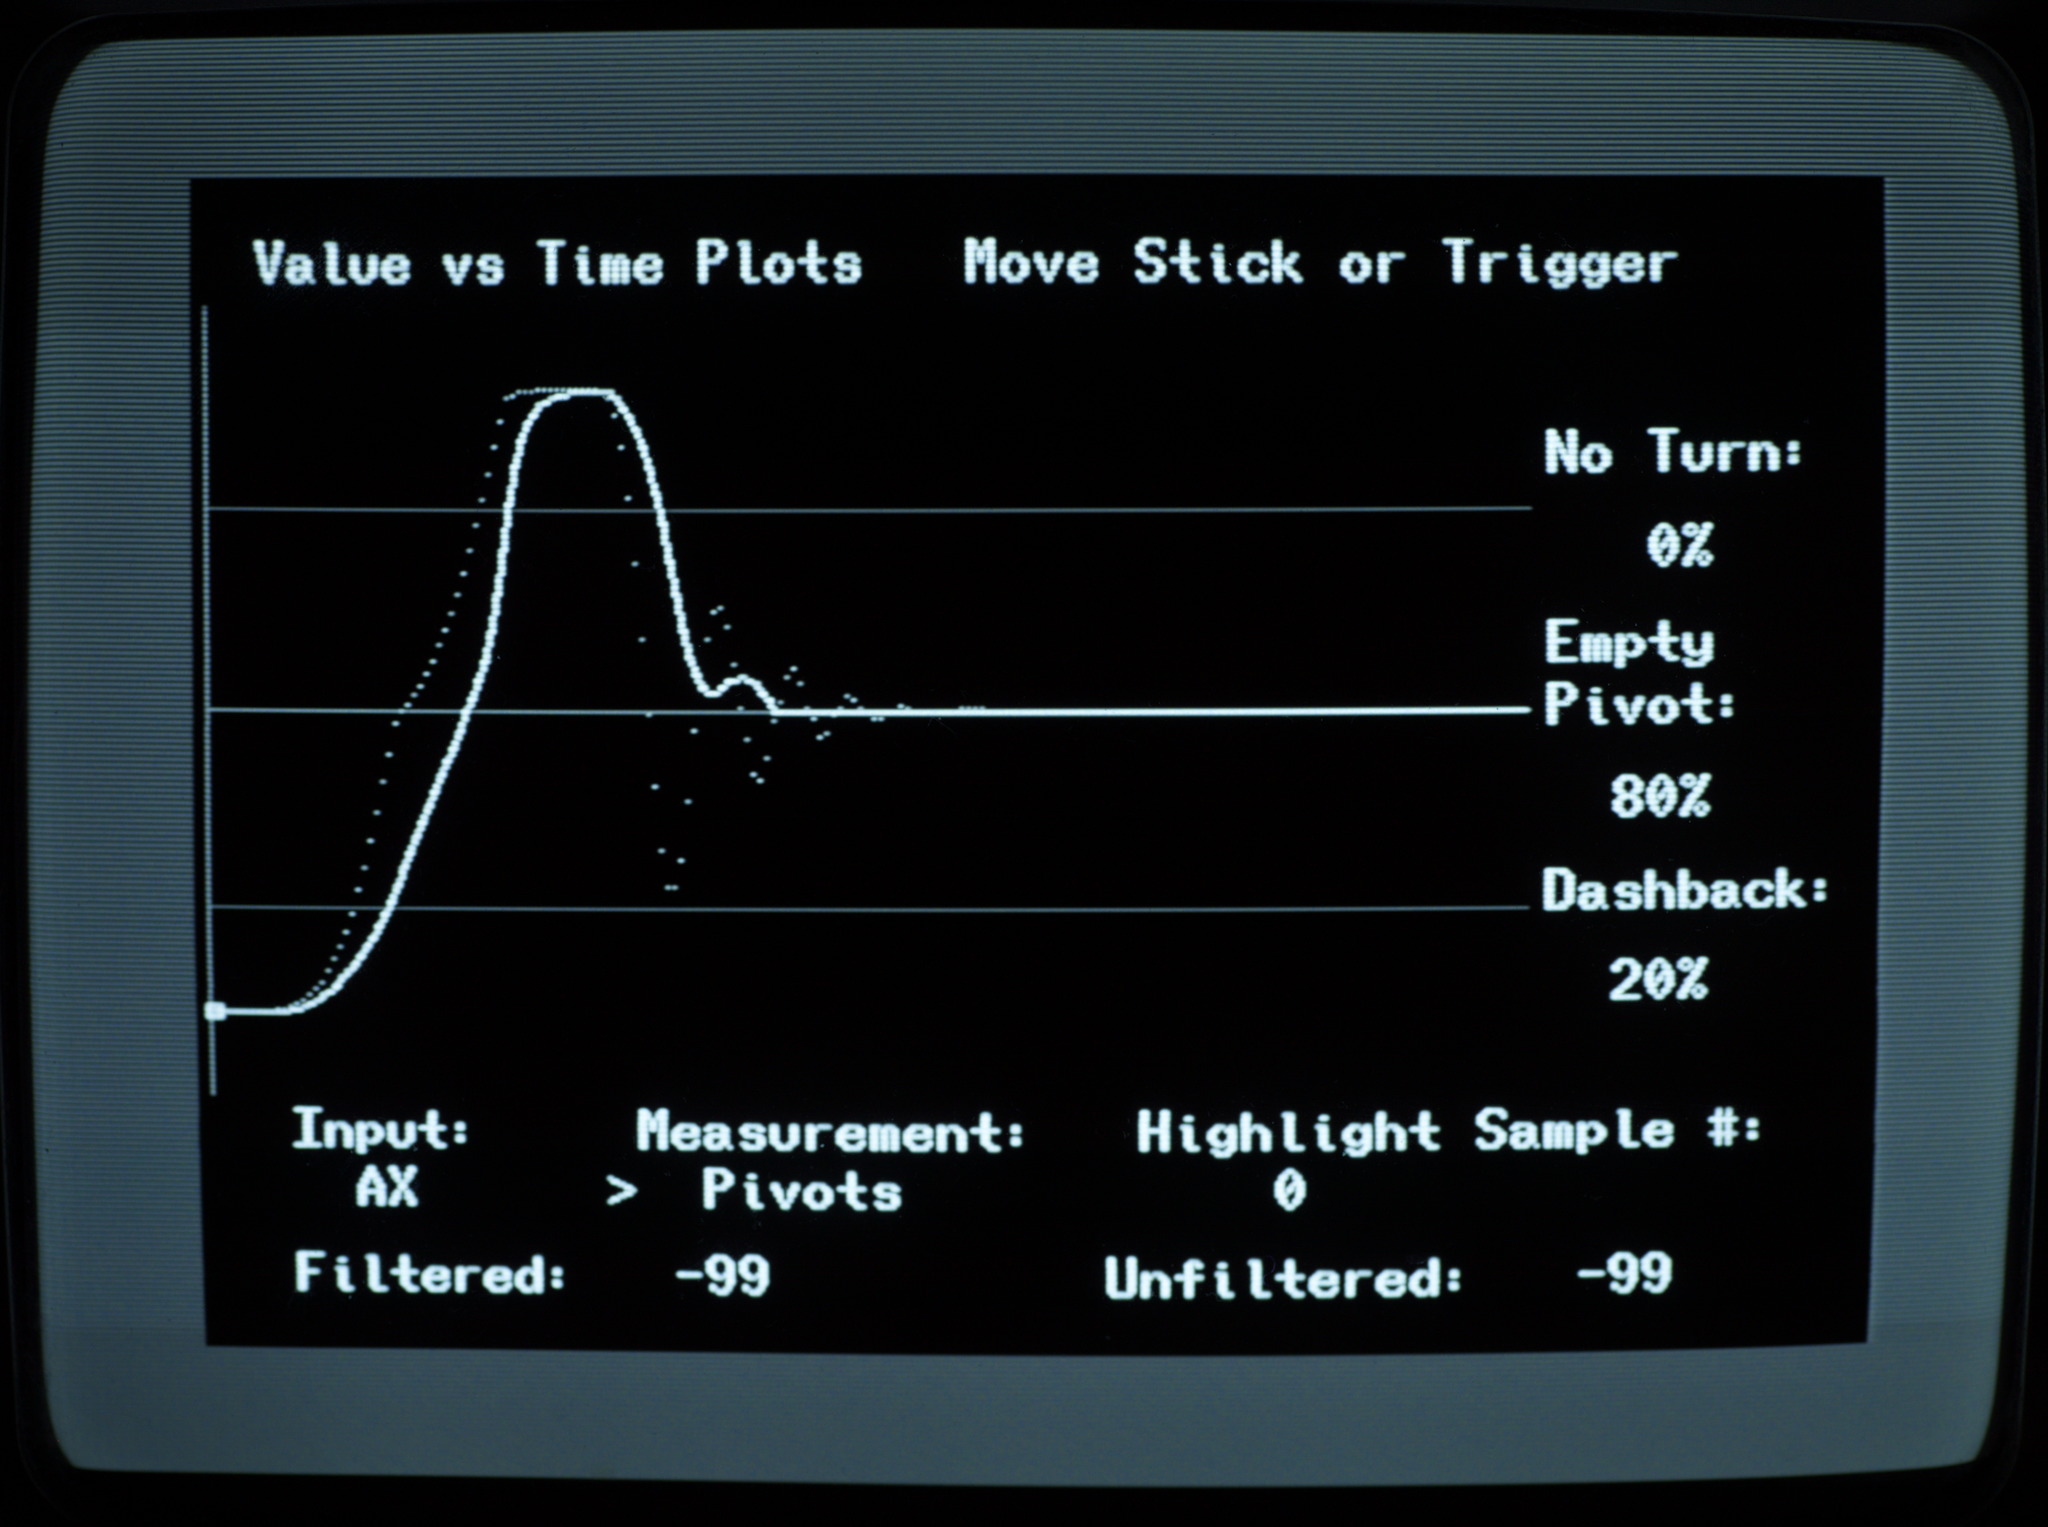
This is only available for stick axes.
This triggers when the unfiltered stick axis goes from 80 on one side to 80 on the other side.
The graph shows lines at the Melee dash threshold, ±64.
The percents on the right tell you the chance of not turning, empty pivoting, or fully dashing the other way.
For a 100% chance of an empty pivot, you want to be past the dash threshold for exactly 1 frame, or just under 17 milliseconds. Shorter than that, and there is a chance of not turning at all, while if you hold longer than 17 and less than 33, you might fully dash the other way. If the stick output is past the dash threshold for more than 33 ms, you are guaranteed to dash the other way.
Trigger
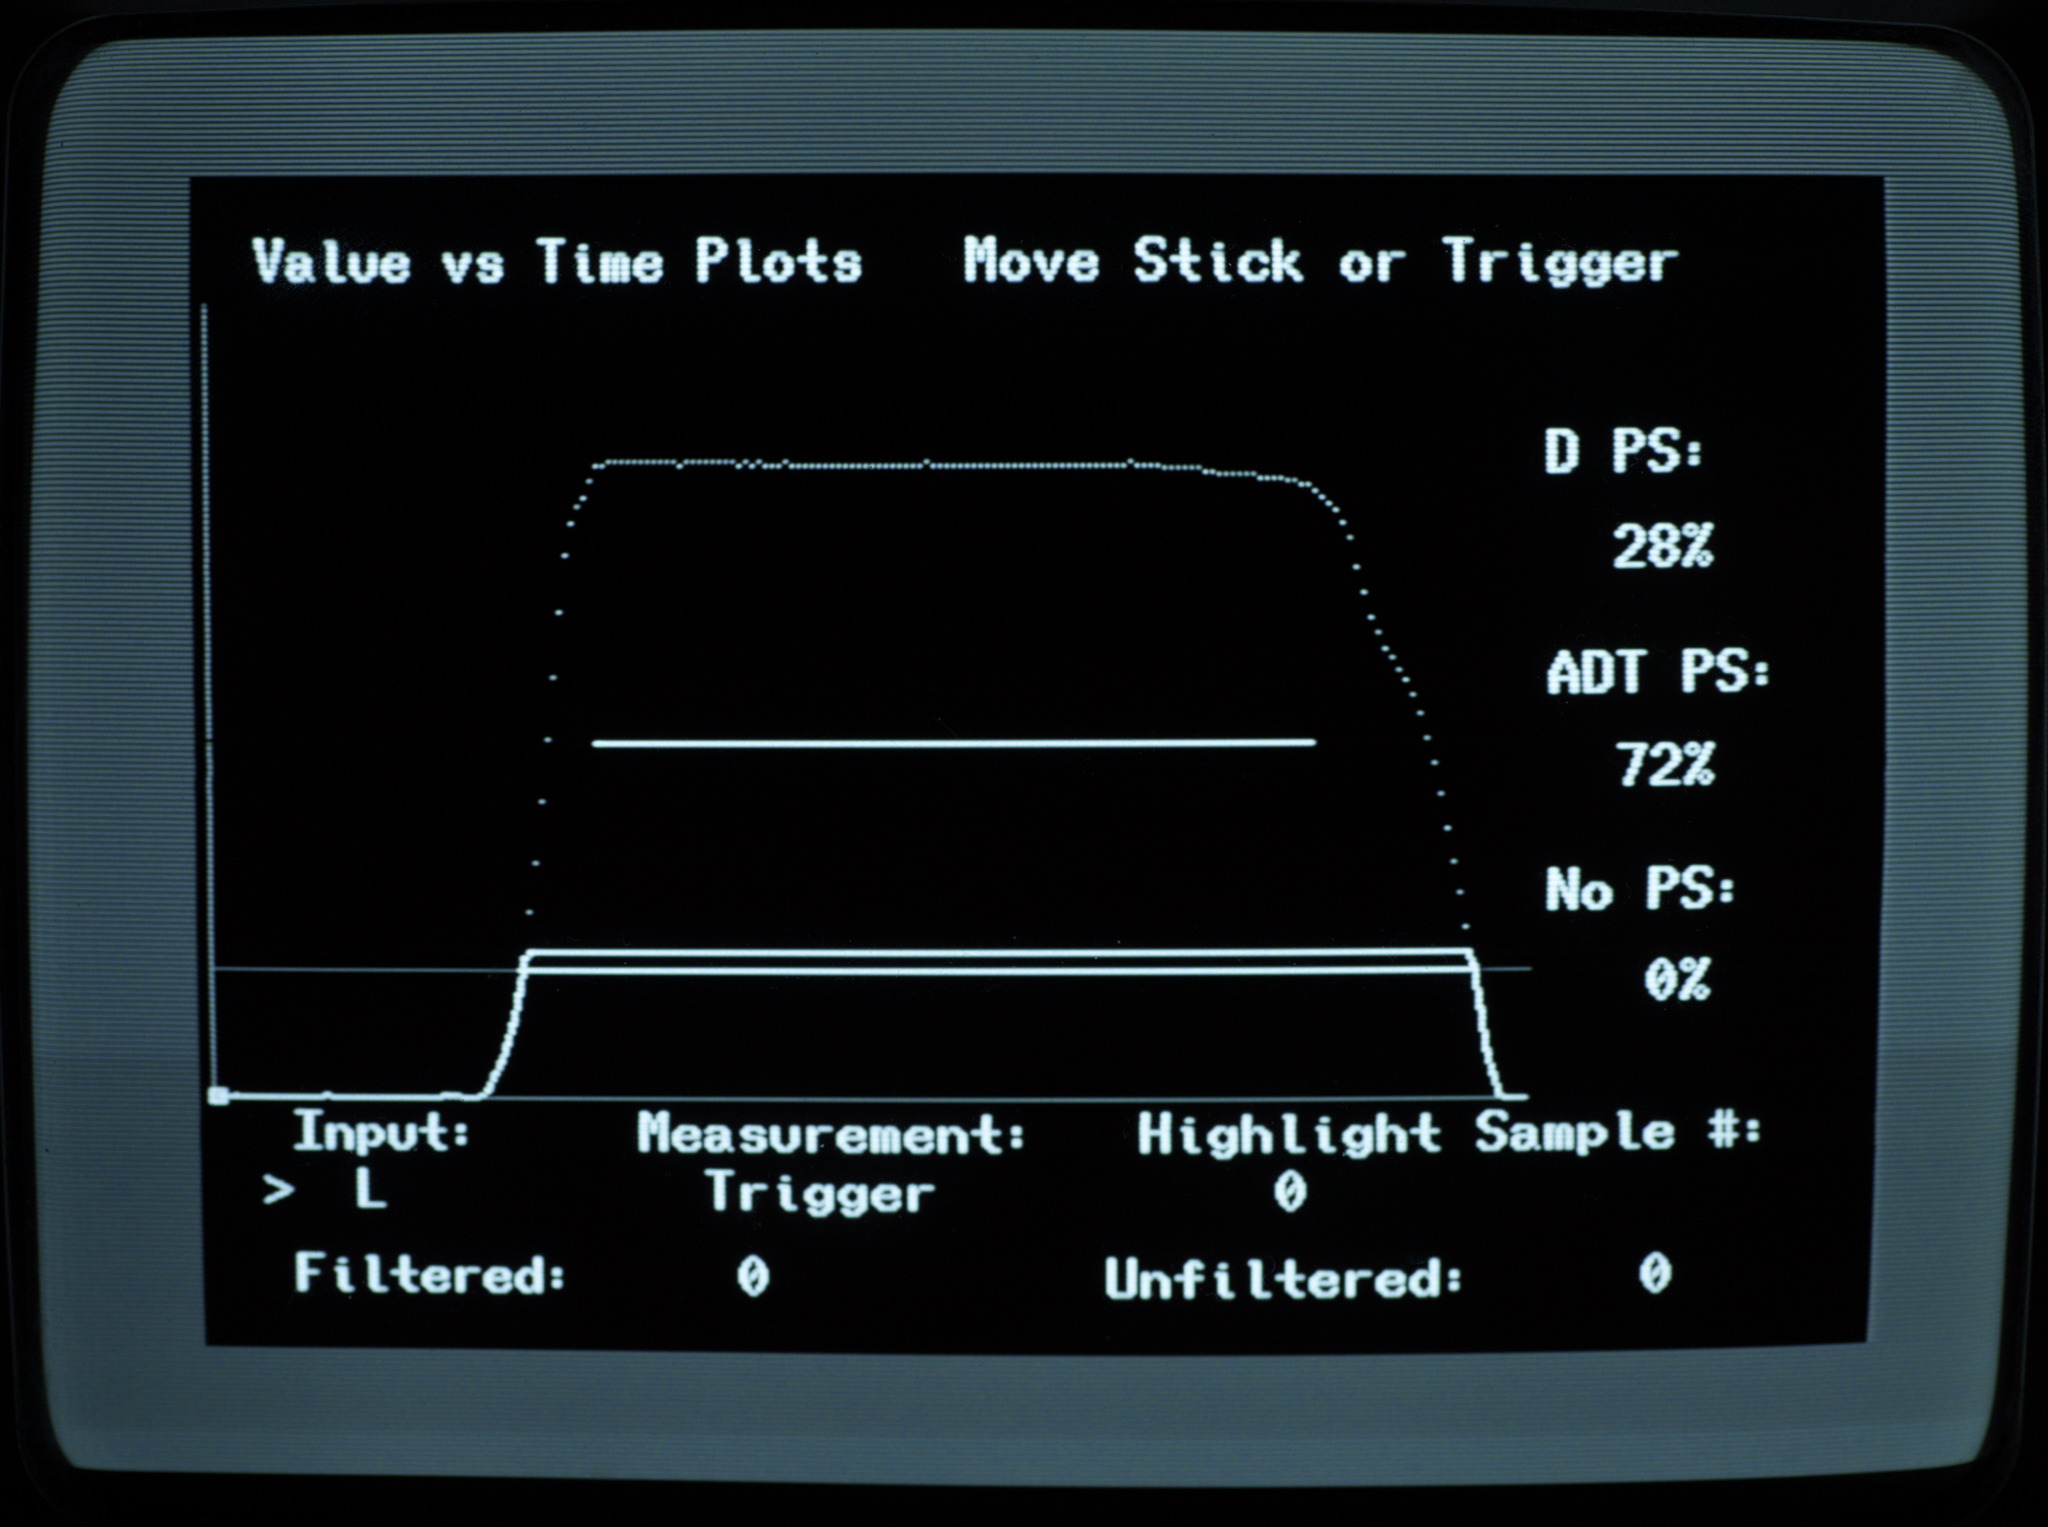
This is only available for L or R.
This triggers when either the analog output reaches 43 or the digital press is activated.
The graph shows a gray line at the Melee lightshield threshold, 43. That line turns white whenever the output is greater than or equal to 43.
When the digital press is active, a white horizontal line is drawn at 100.
The percents on the right tell you the chance that this input would be polled as a digital powershield, an ADT (analog-digital transition) powershield, or no powershield at all.
In Melee, an ADT powershield leaves you vulnerable to physical attacks but is occasionally helpful for powershielding projectiles; it occurs when you are polled with an analog shield
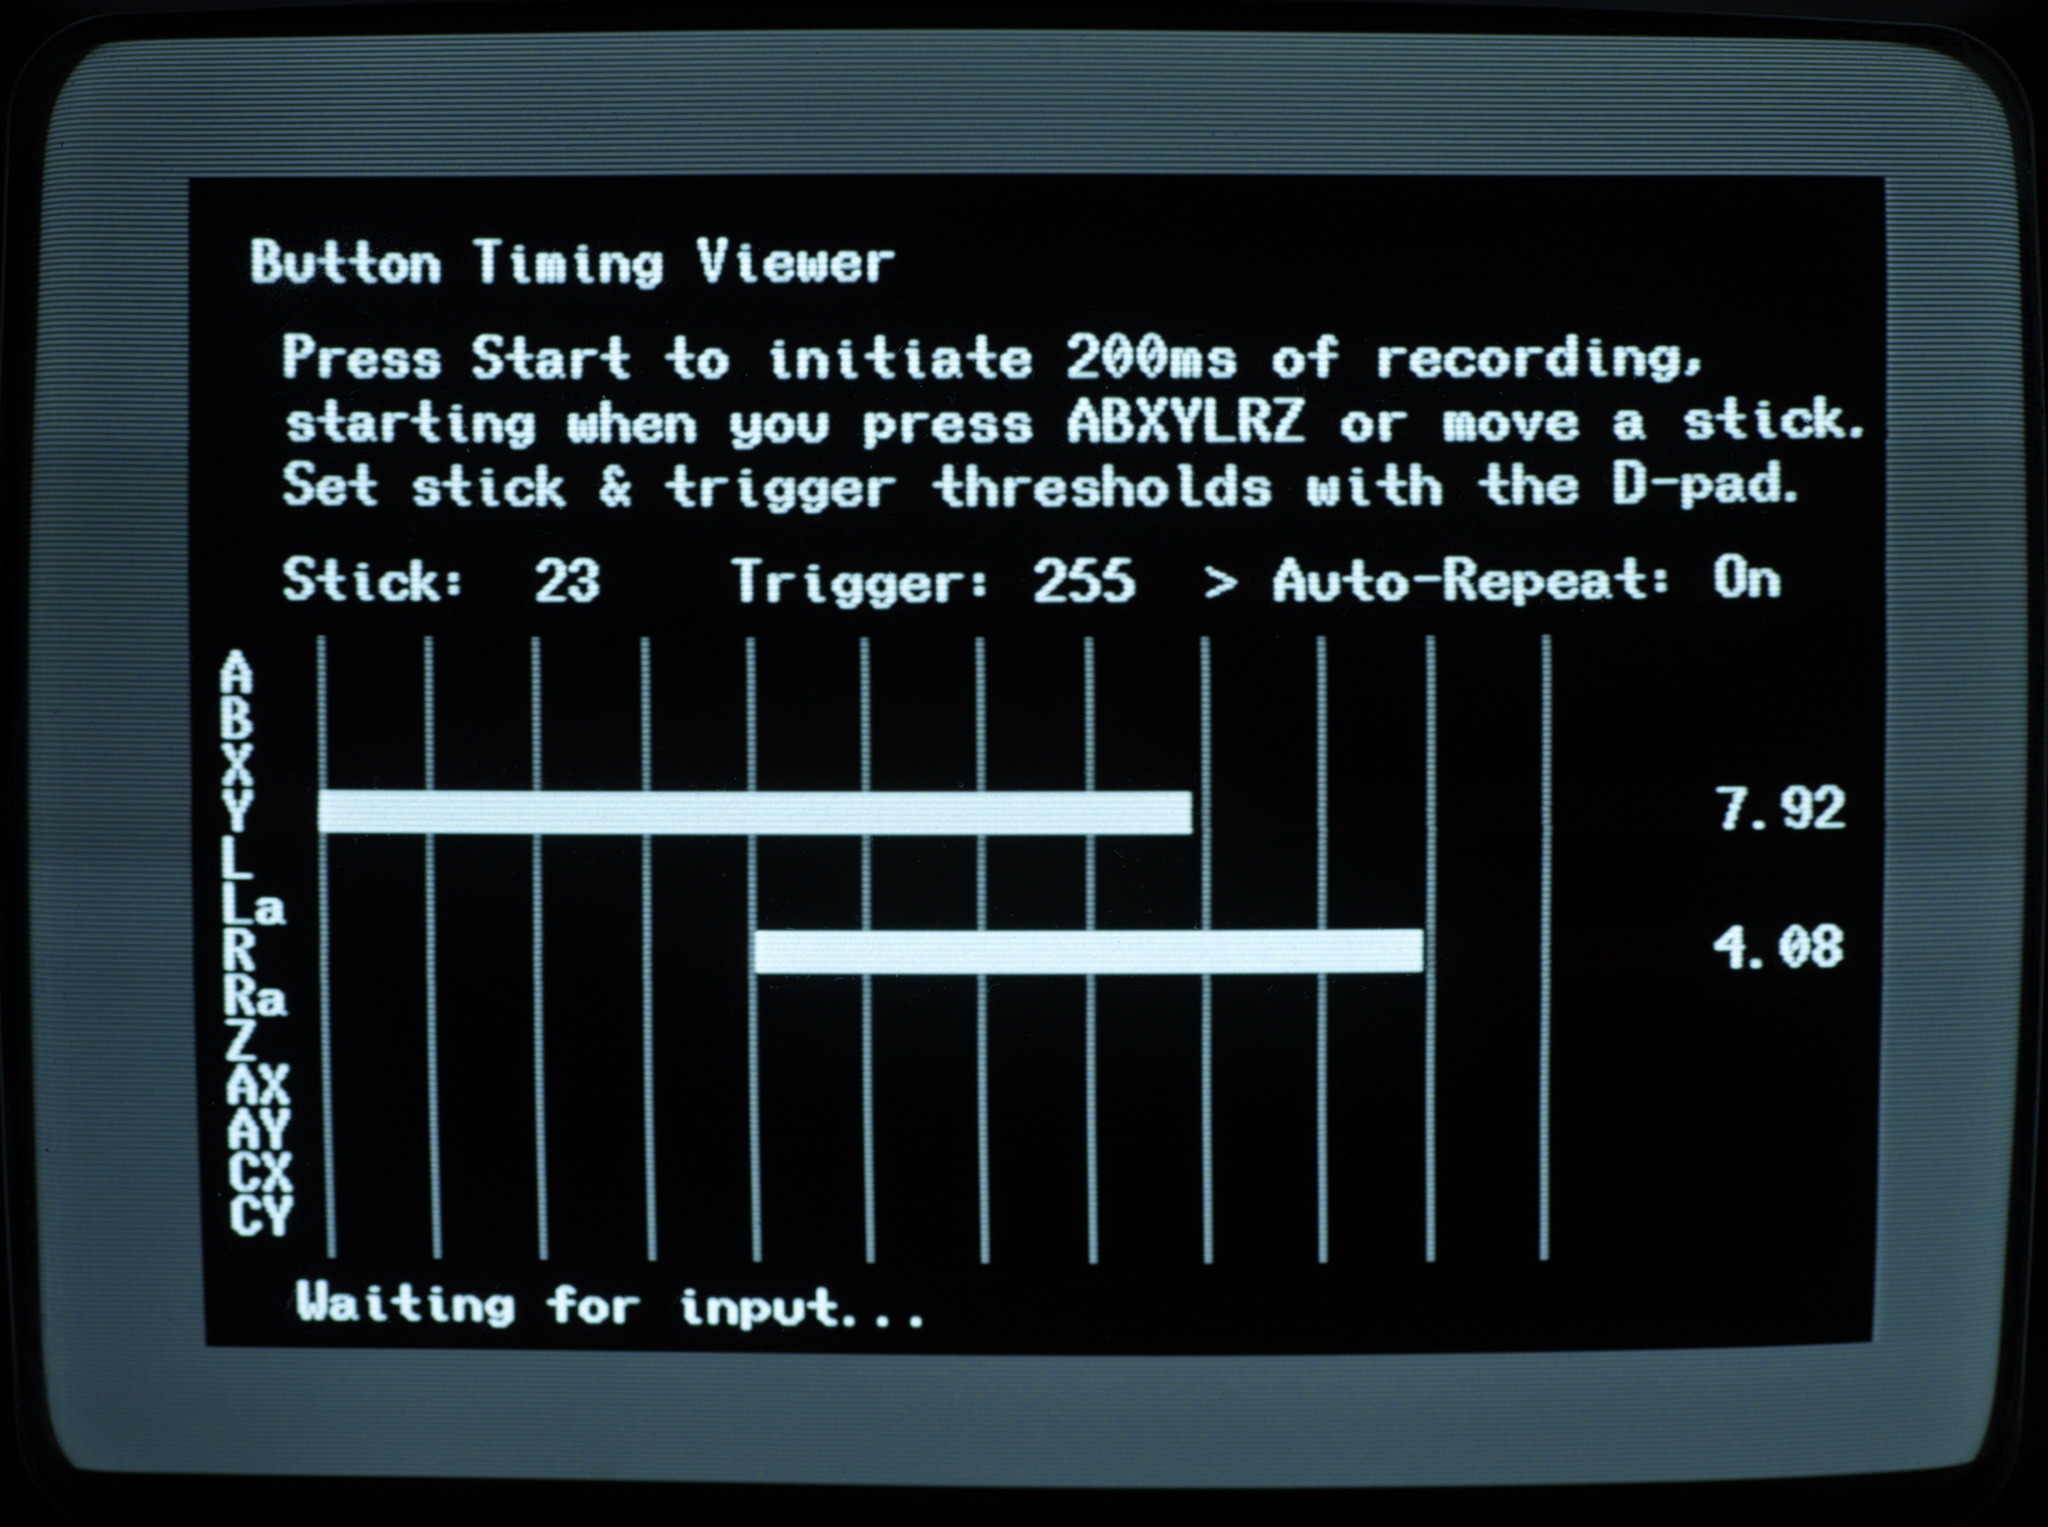
Button Timing Viewer
The Button Timing Viewer lets you record 200 milliseconds of digital button state and whether each analog axis is past a configurable threshold.
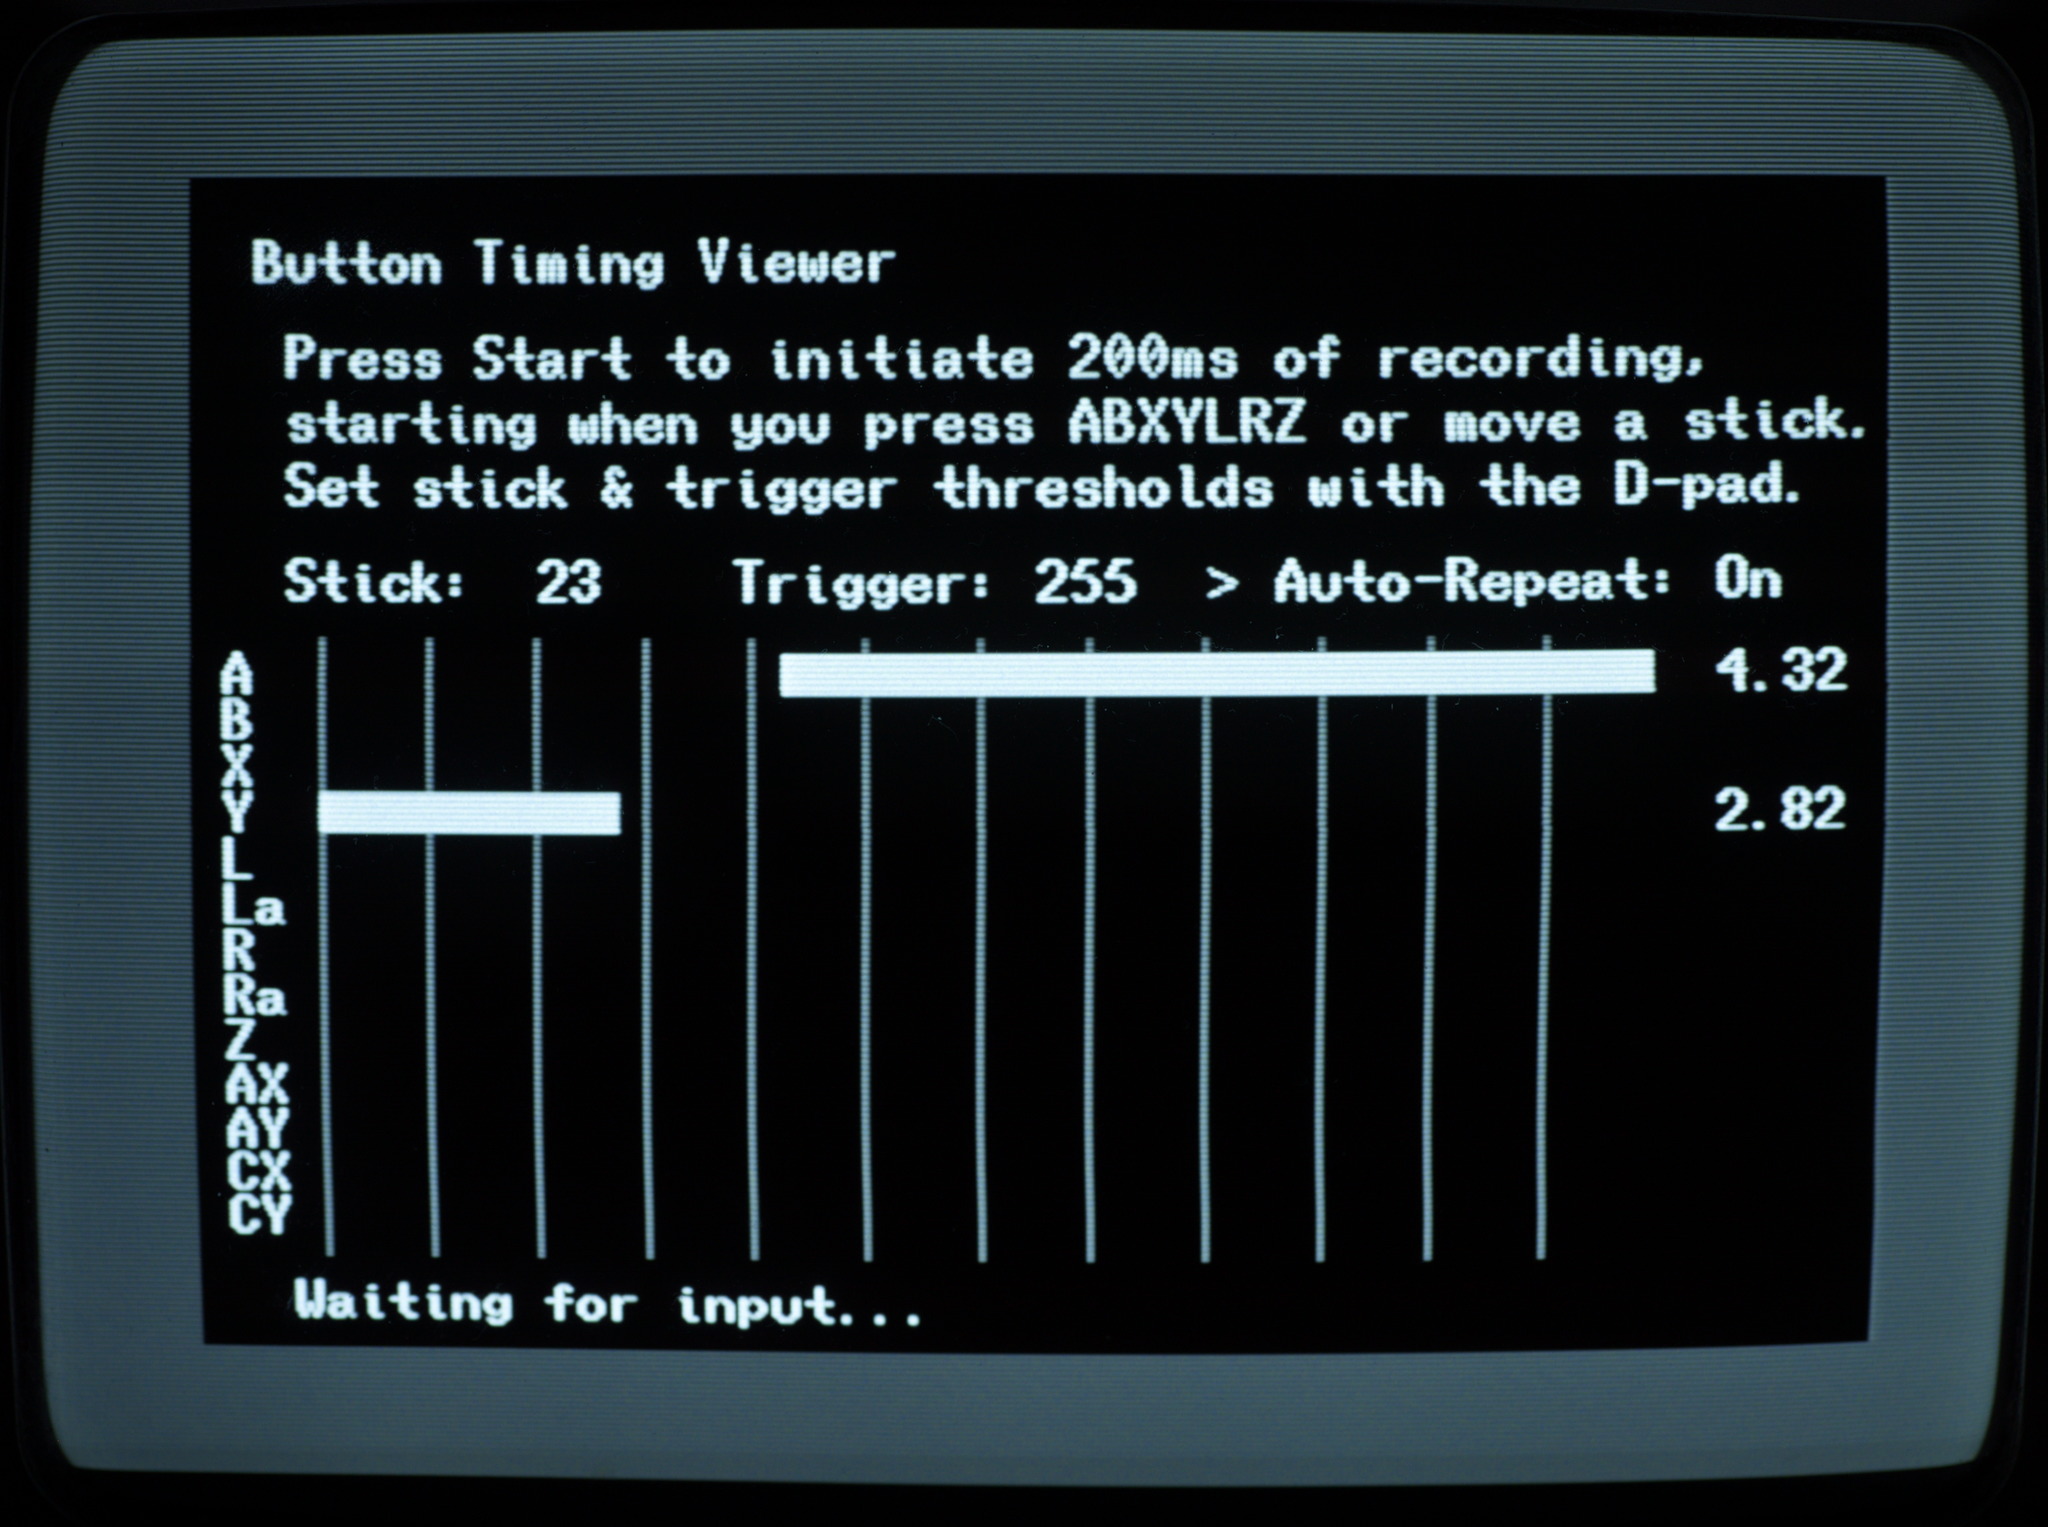
Press Start to begin a recording, or turn Auto-Repeat On to make it so you don’t have to keep pressing Start.
The graph shows bars for any digital input held at any given time, or any analog input above the set thresholds.
The numbers at the right indicate timings. For the button that initiated recording, this is how many frames the input was held. For any other buttons that were pressed, this is how many frames after the first input they were pressed.
The background lines indicate roughly frame spacing.
You can use this to practice things like frame 1 short hop nair (top image), wavedash timing (below), JC grabs, and more with sub-frame feedback precision.
Reaction Time Test
The Reaction Time Test is one of the most bare metal reaction time testers you can get, when used on a CRT.
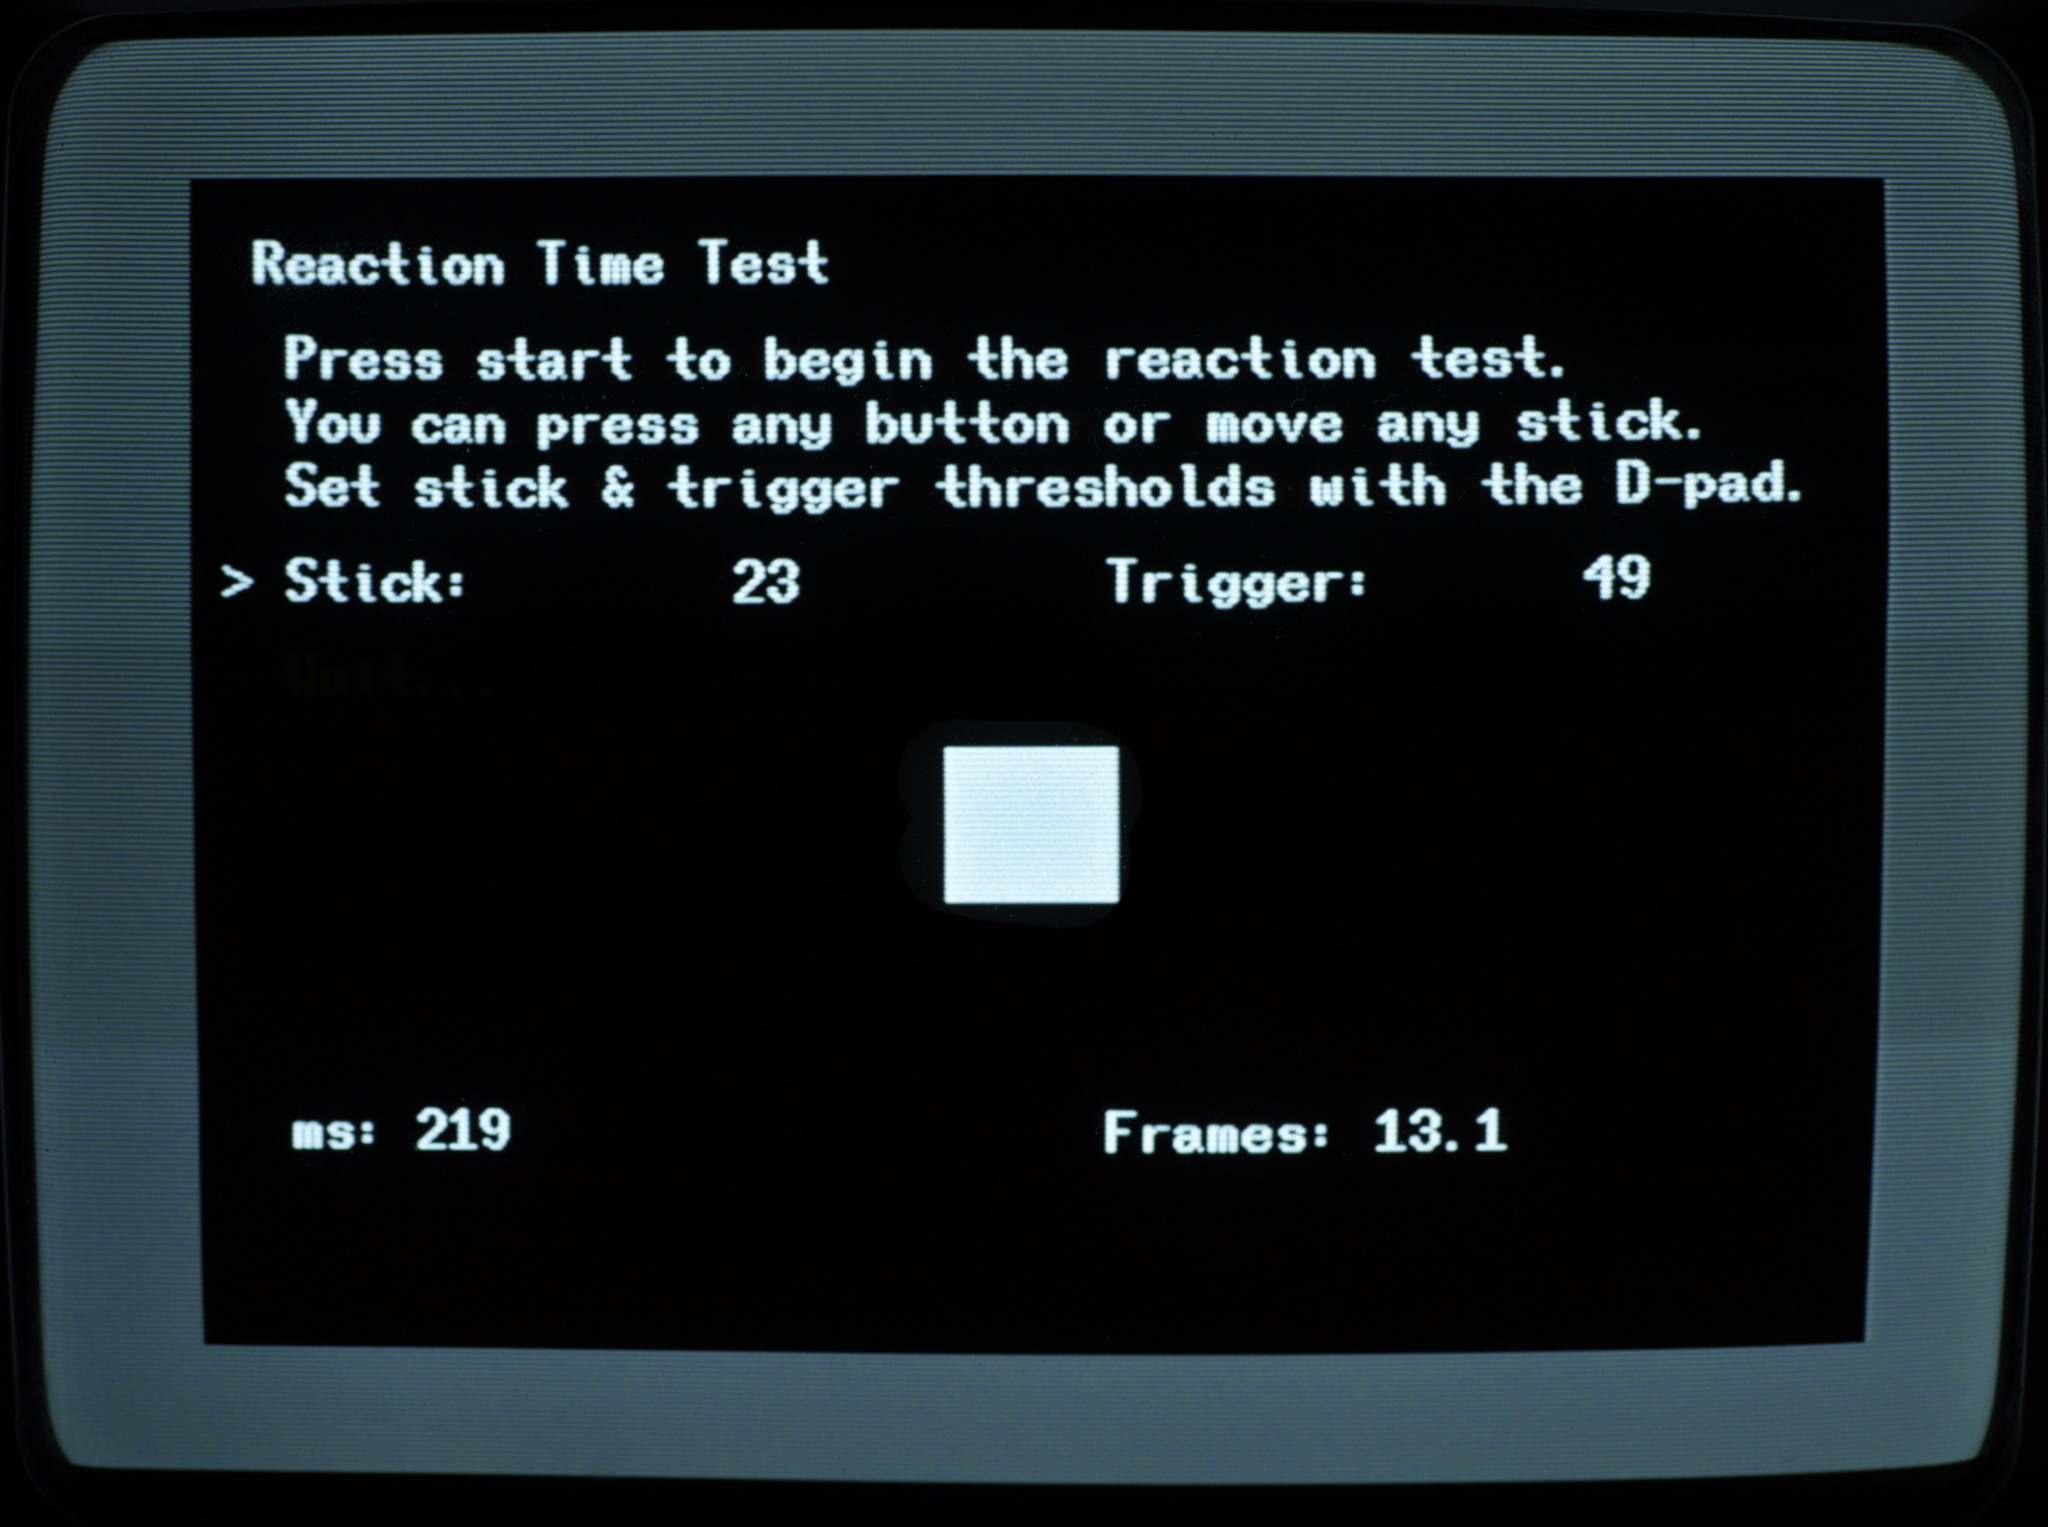
Press Start and then wait until the white square appears, then press any button or move the sticks. You can adjust the stick or analog trigger thresholds if you want.
It’s not 100% accurate in an absolute sense, because I don’t know exactly when the recording starts relative to drawing the white square, but it should be extremely precise and repeatable because the measurement is started in perfect sync with the drawing.
Games
Nothing to see here yet, sorry… maybe next version?
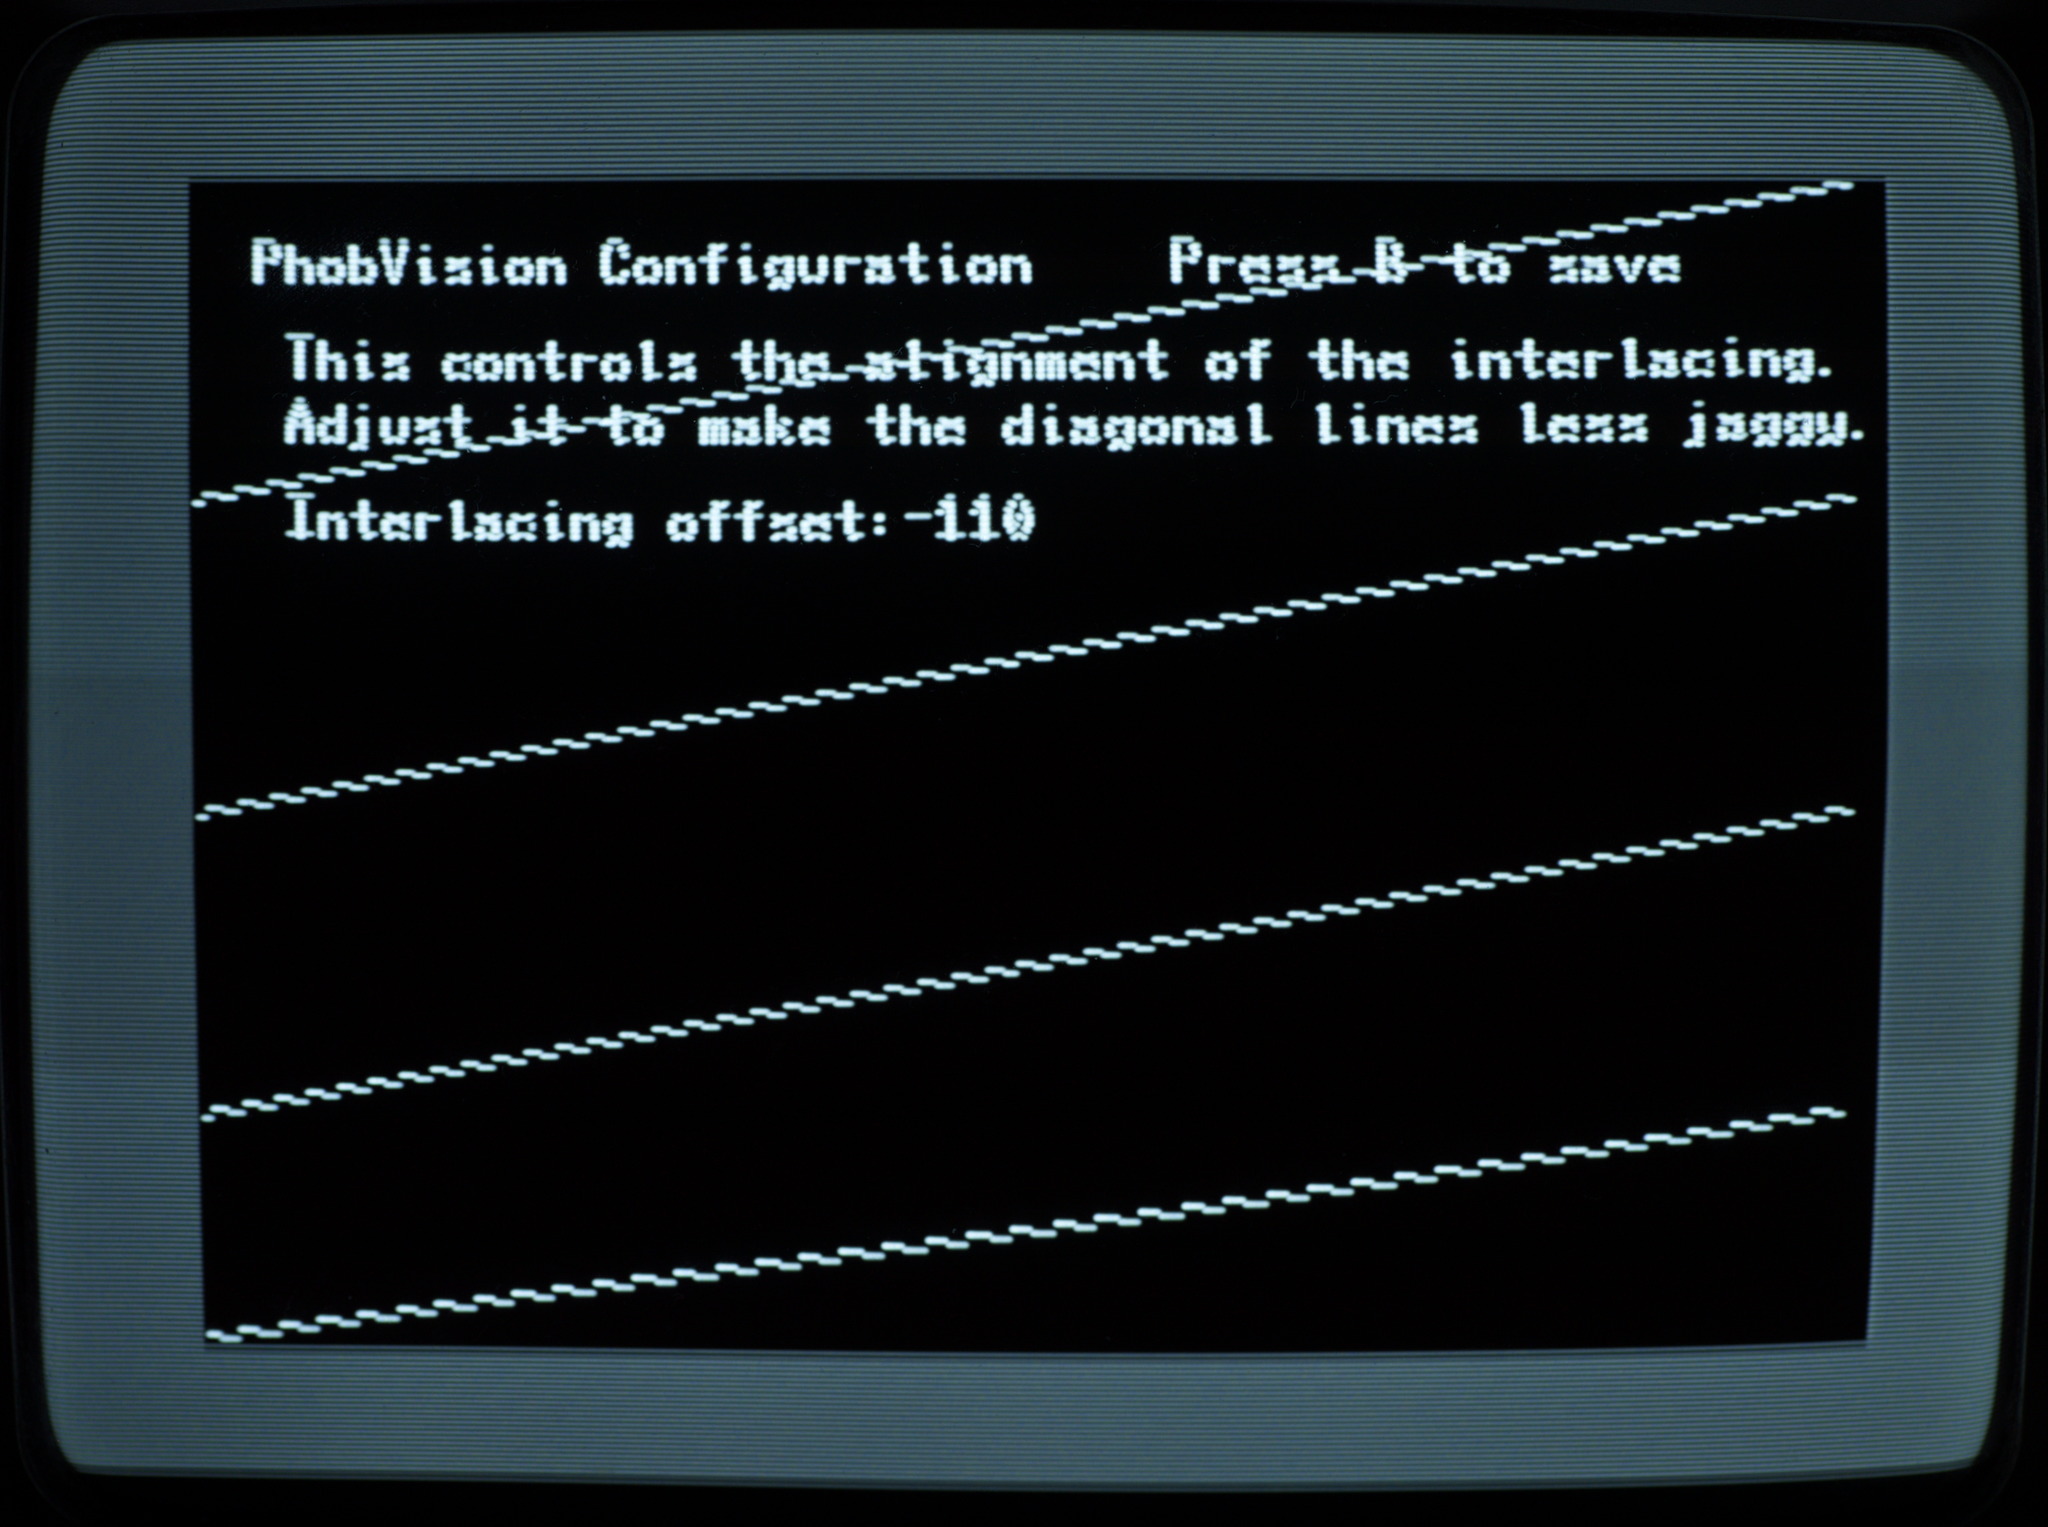
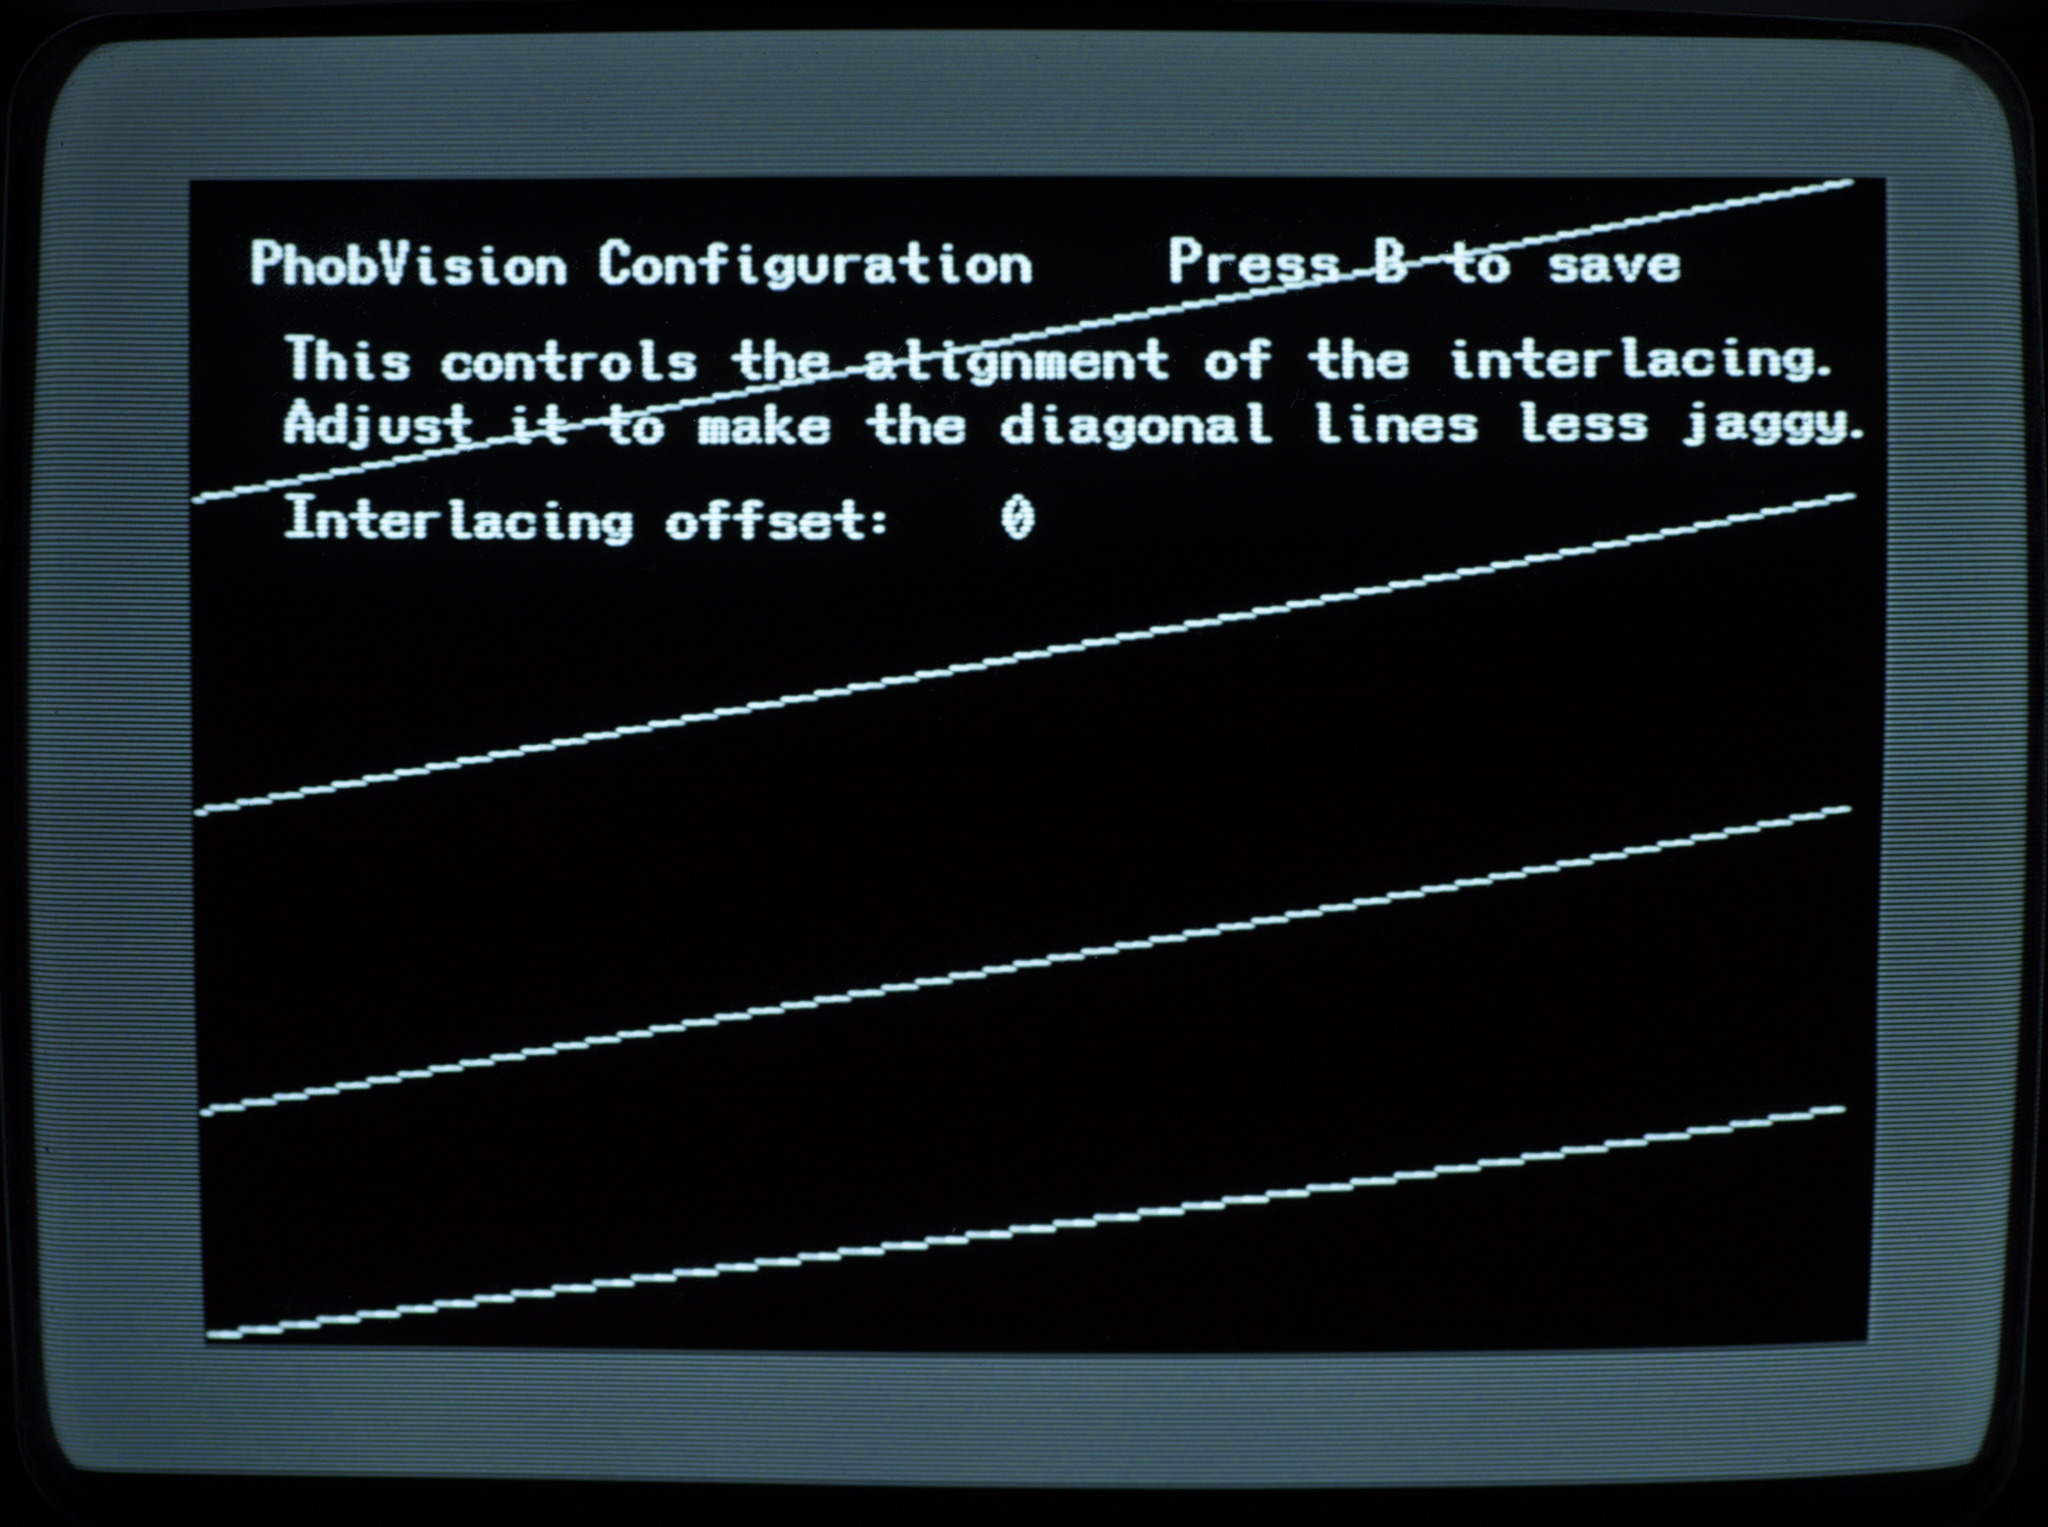
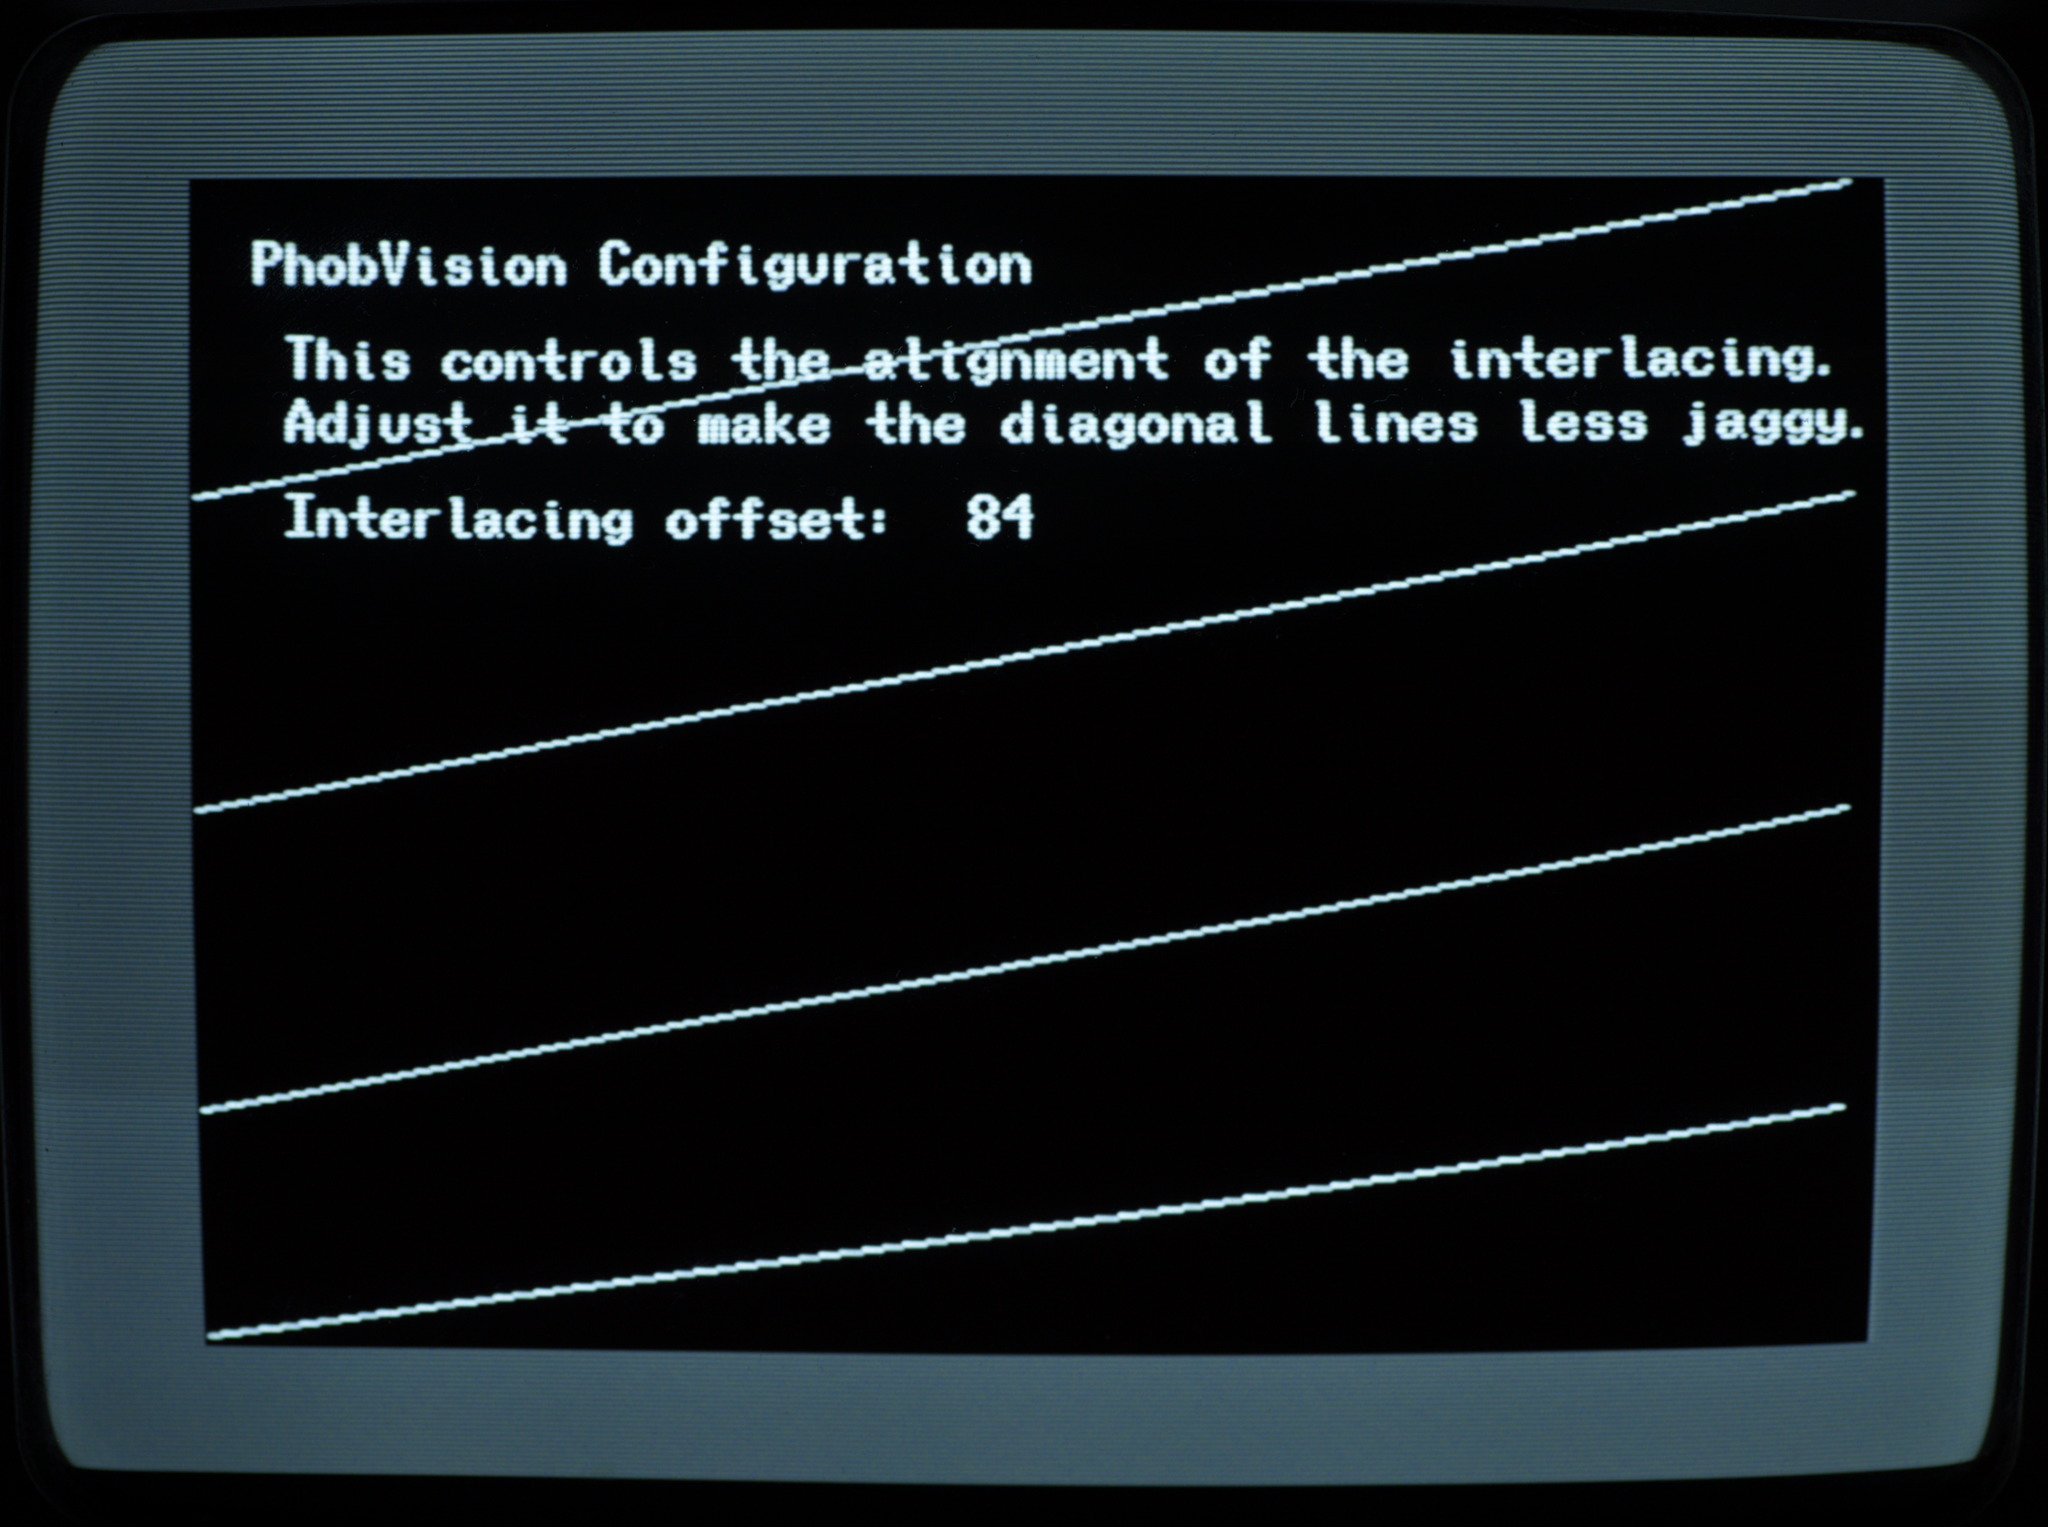
Phobvision Configuration
Some CRTs, especially high-end ones like Sony PVMs, show PhobVision with incorrect interlacing spacing.
Press up or down on the D-Pad to get the diagonal lines to be as smooth as possible on average across the whole screen to get the best image quality.
Default configuration on a finicky CRT:
Good configuration:
Very bad configuration: