Board Level Debugging
This is a document with illustrations that show you what a PhobGCC 1.2 board should look like fully assembled, with annotations that will help you debug electrical issues when assembling.
You will need a multimeter that can read voltages and resistances to make the most of this guide.
Physical Aspects to Check
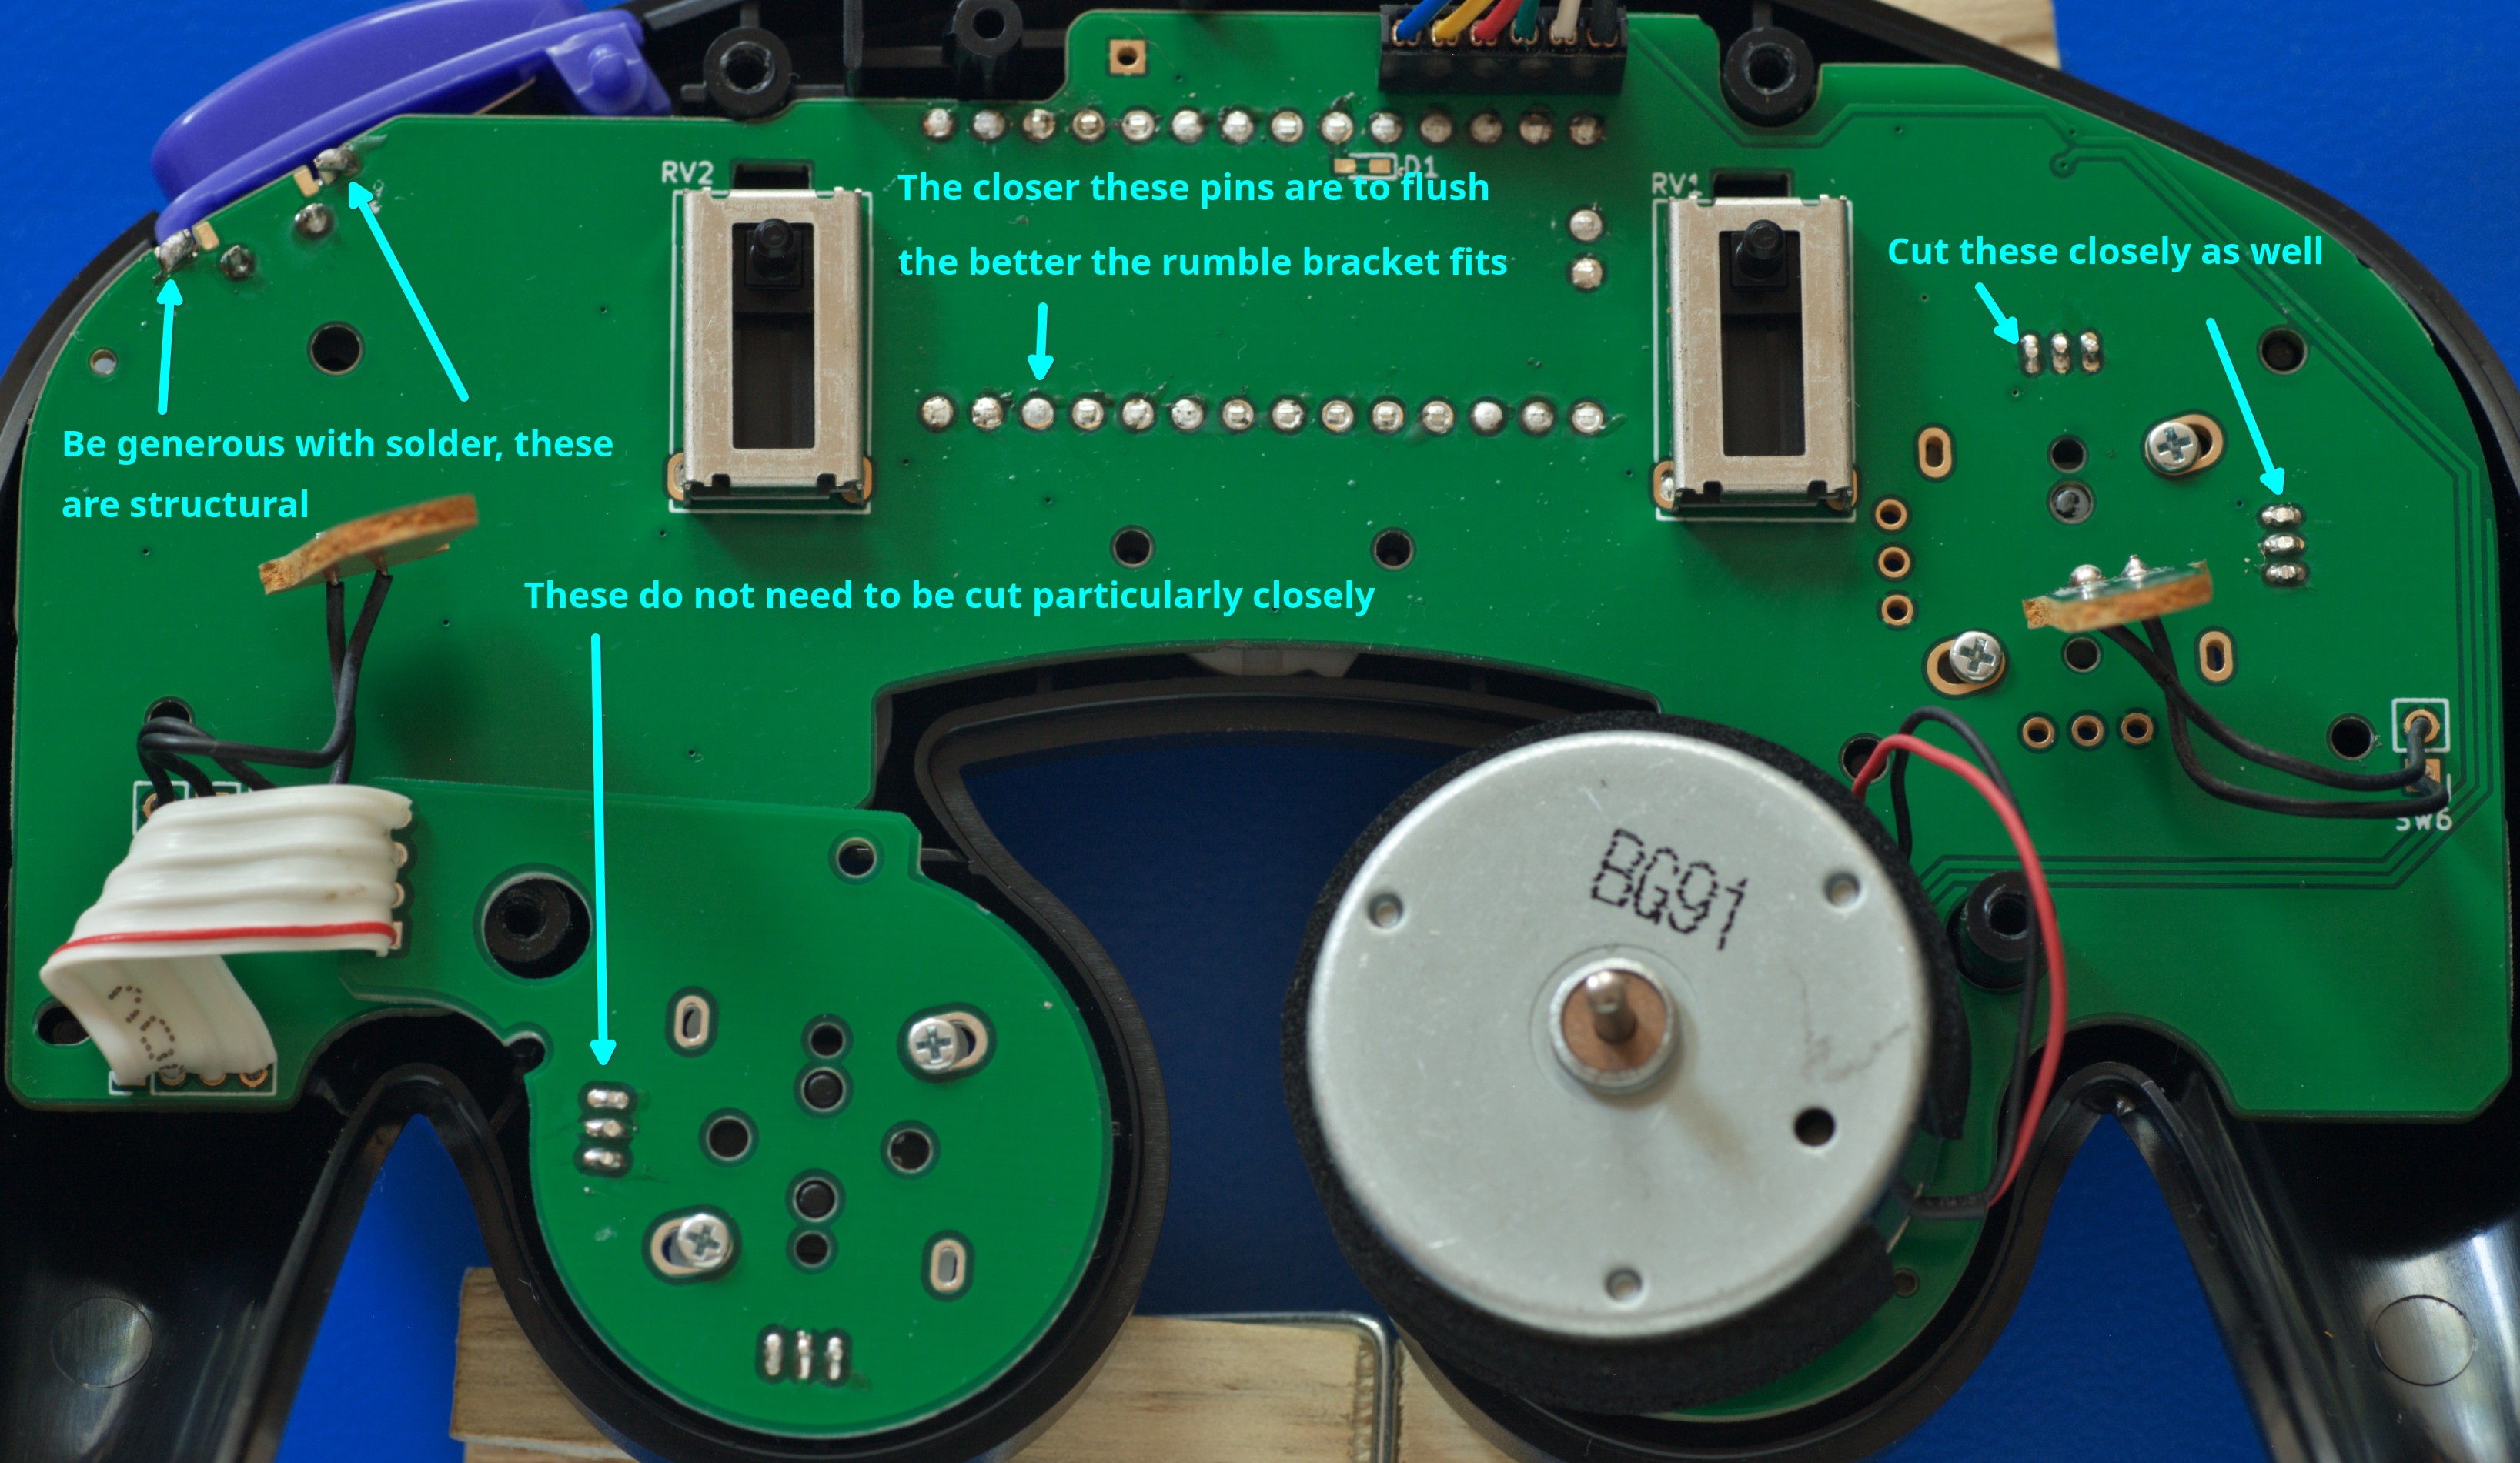
- On the Z-button, be very generous with solder on the legs that are on the edge of the board. These solder joints are structural, helping keep the button from breaking off when you mash grab (or Z-jump).
- The pins behind the Teensy must be flush as possible. The closer they are to completely flat with the board, the flatter the rumble bracket fits. If they protrude, the rumble bracket will always try to pop out.
- The Hall effect sensors for the Analog stick need to have their leads trimmed fairly closely to the board, though they don’t have to be completely flush. If you don’t, they press into the trigger guards, the plastic parts that are screwed down over the triggers. This makes it difficult to close the controller shell.
- The Hall effect sensors on the C-stick board do not have to be trimmed particularly closely.
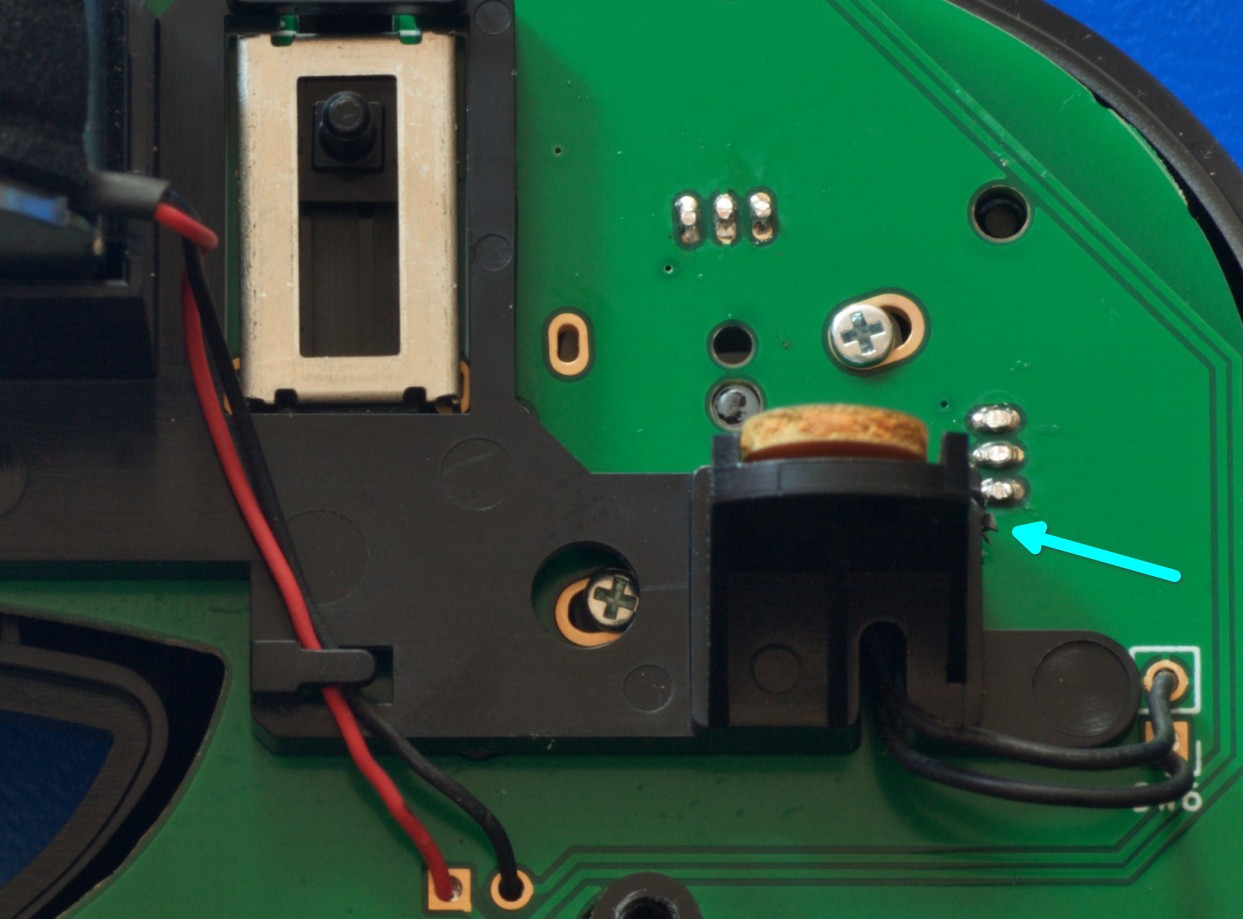
- The rumble bracket has a loop here that needs to be trimmed off to allow the bracket to lay flat easily.
Resistances to Check Before Plugging In
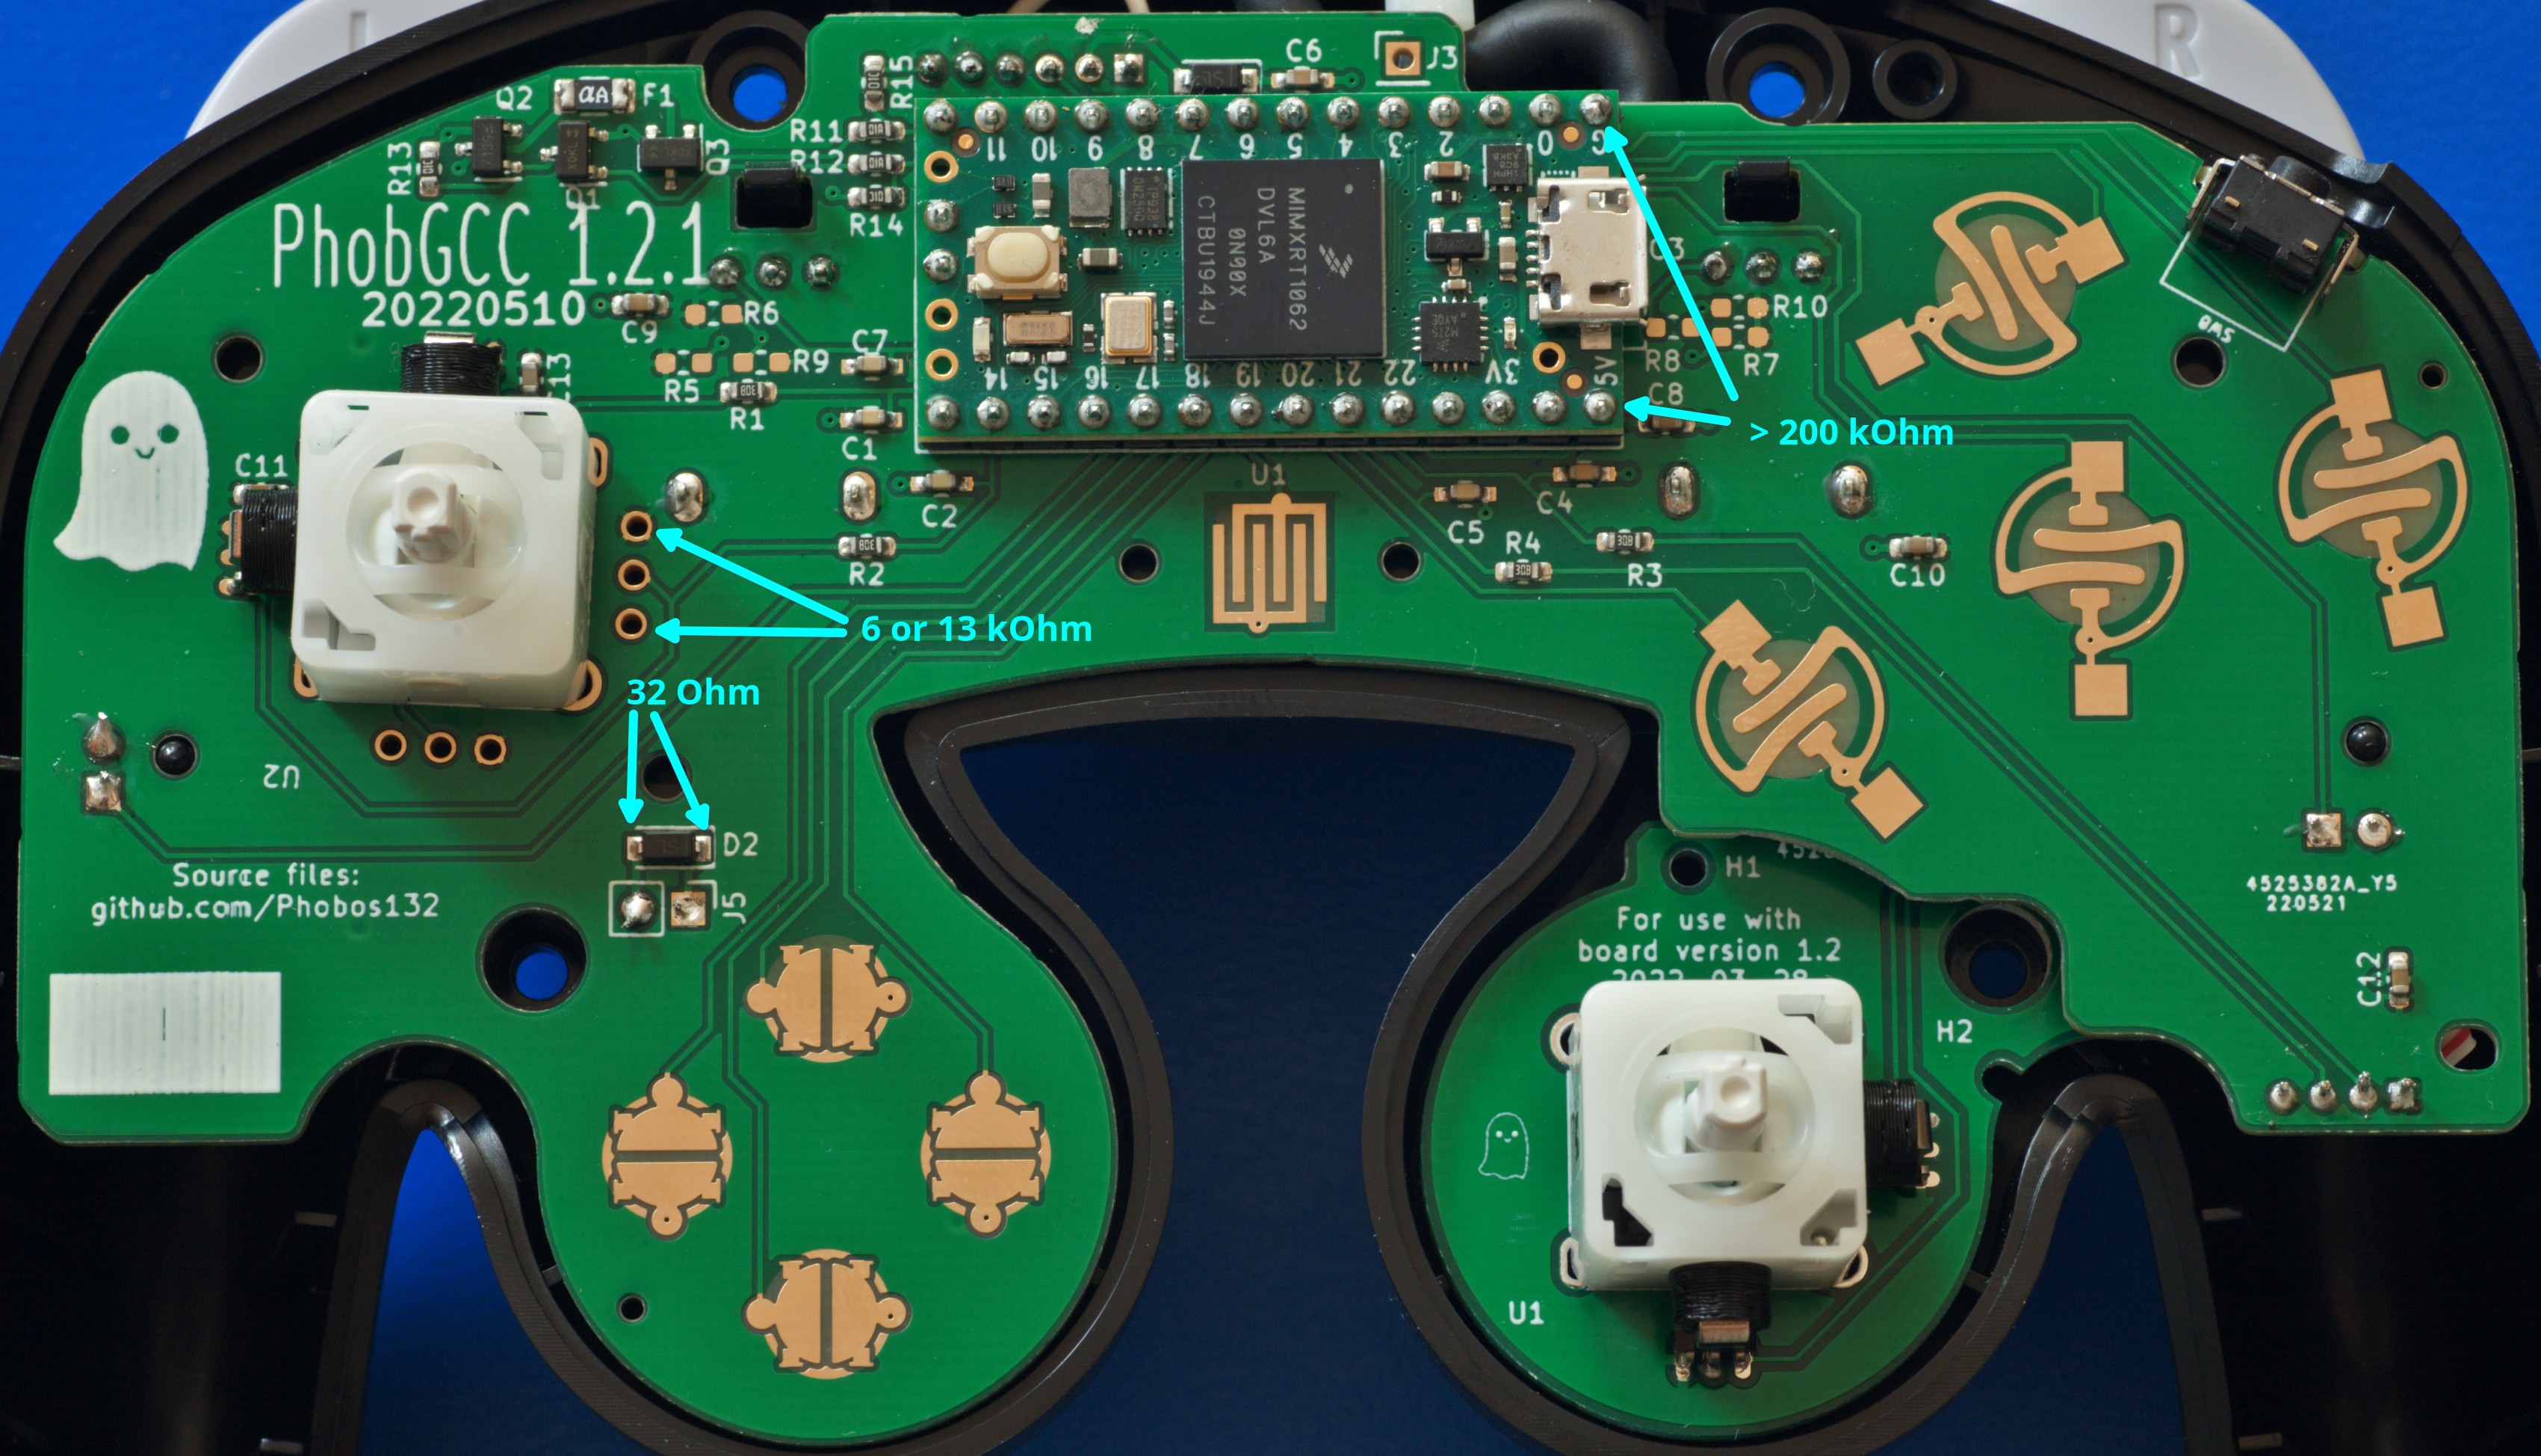
- Check these resistances before ever plugging in the controller to ensure that there are no short-circuits.
- The 32 Ohm one will be different if you don’t have an OEM rumble motor.
- 6 or 13 kOhm corresponds to the 3.3 volt power plane, which supplies all the analog sensors on the board. Depending on which polarity you measure (which side red and black multimeter leads are on), you will get these two values. If it’s significantly lower than this, then there’s a short that you will have to find.
- The short may be on the Hall Effect sensor pads, the trigger slider pads, or on the two lone pins at the end of the Teensy.
- > 200 kOhm corresponds to the 5V supply for the Teensy. On my multimeter, it is much greater than this (several MOhms) in one direction and somewhere above 200 kOhms in the other. Other multimeters may measure something else; I have seen reports of around 50 kOhm, and this is not a problem. However, if it’s too much below that, there might be an issue.
- If you have a short, go to the PhobGCC Discord for tech support, and explain what you found to be wrong. You will need to resolve these before it’s safe to plug in the controller.
If the Teensy doesn’t respond when plugged into a computer via USB, the likely culprits are either shorts between 3.3v and ground, or between 3.3v and the signal pins. Check the Hall sensor pads, which are the most prone to shorts.
Voltages to Check When Plugged In
If your controller is not functioning correctly, open the shell and plug it into a powered-on Gamecube, Wii, or GCC adapter (e.g. on PC with Dolphin open) to supply power, then check these voltages:
Supply Voltages
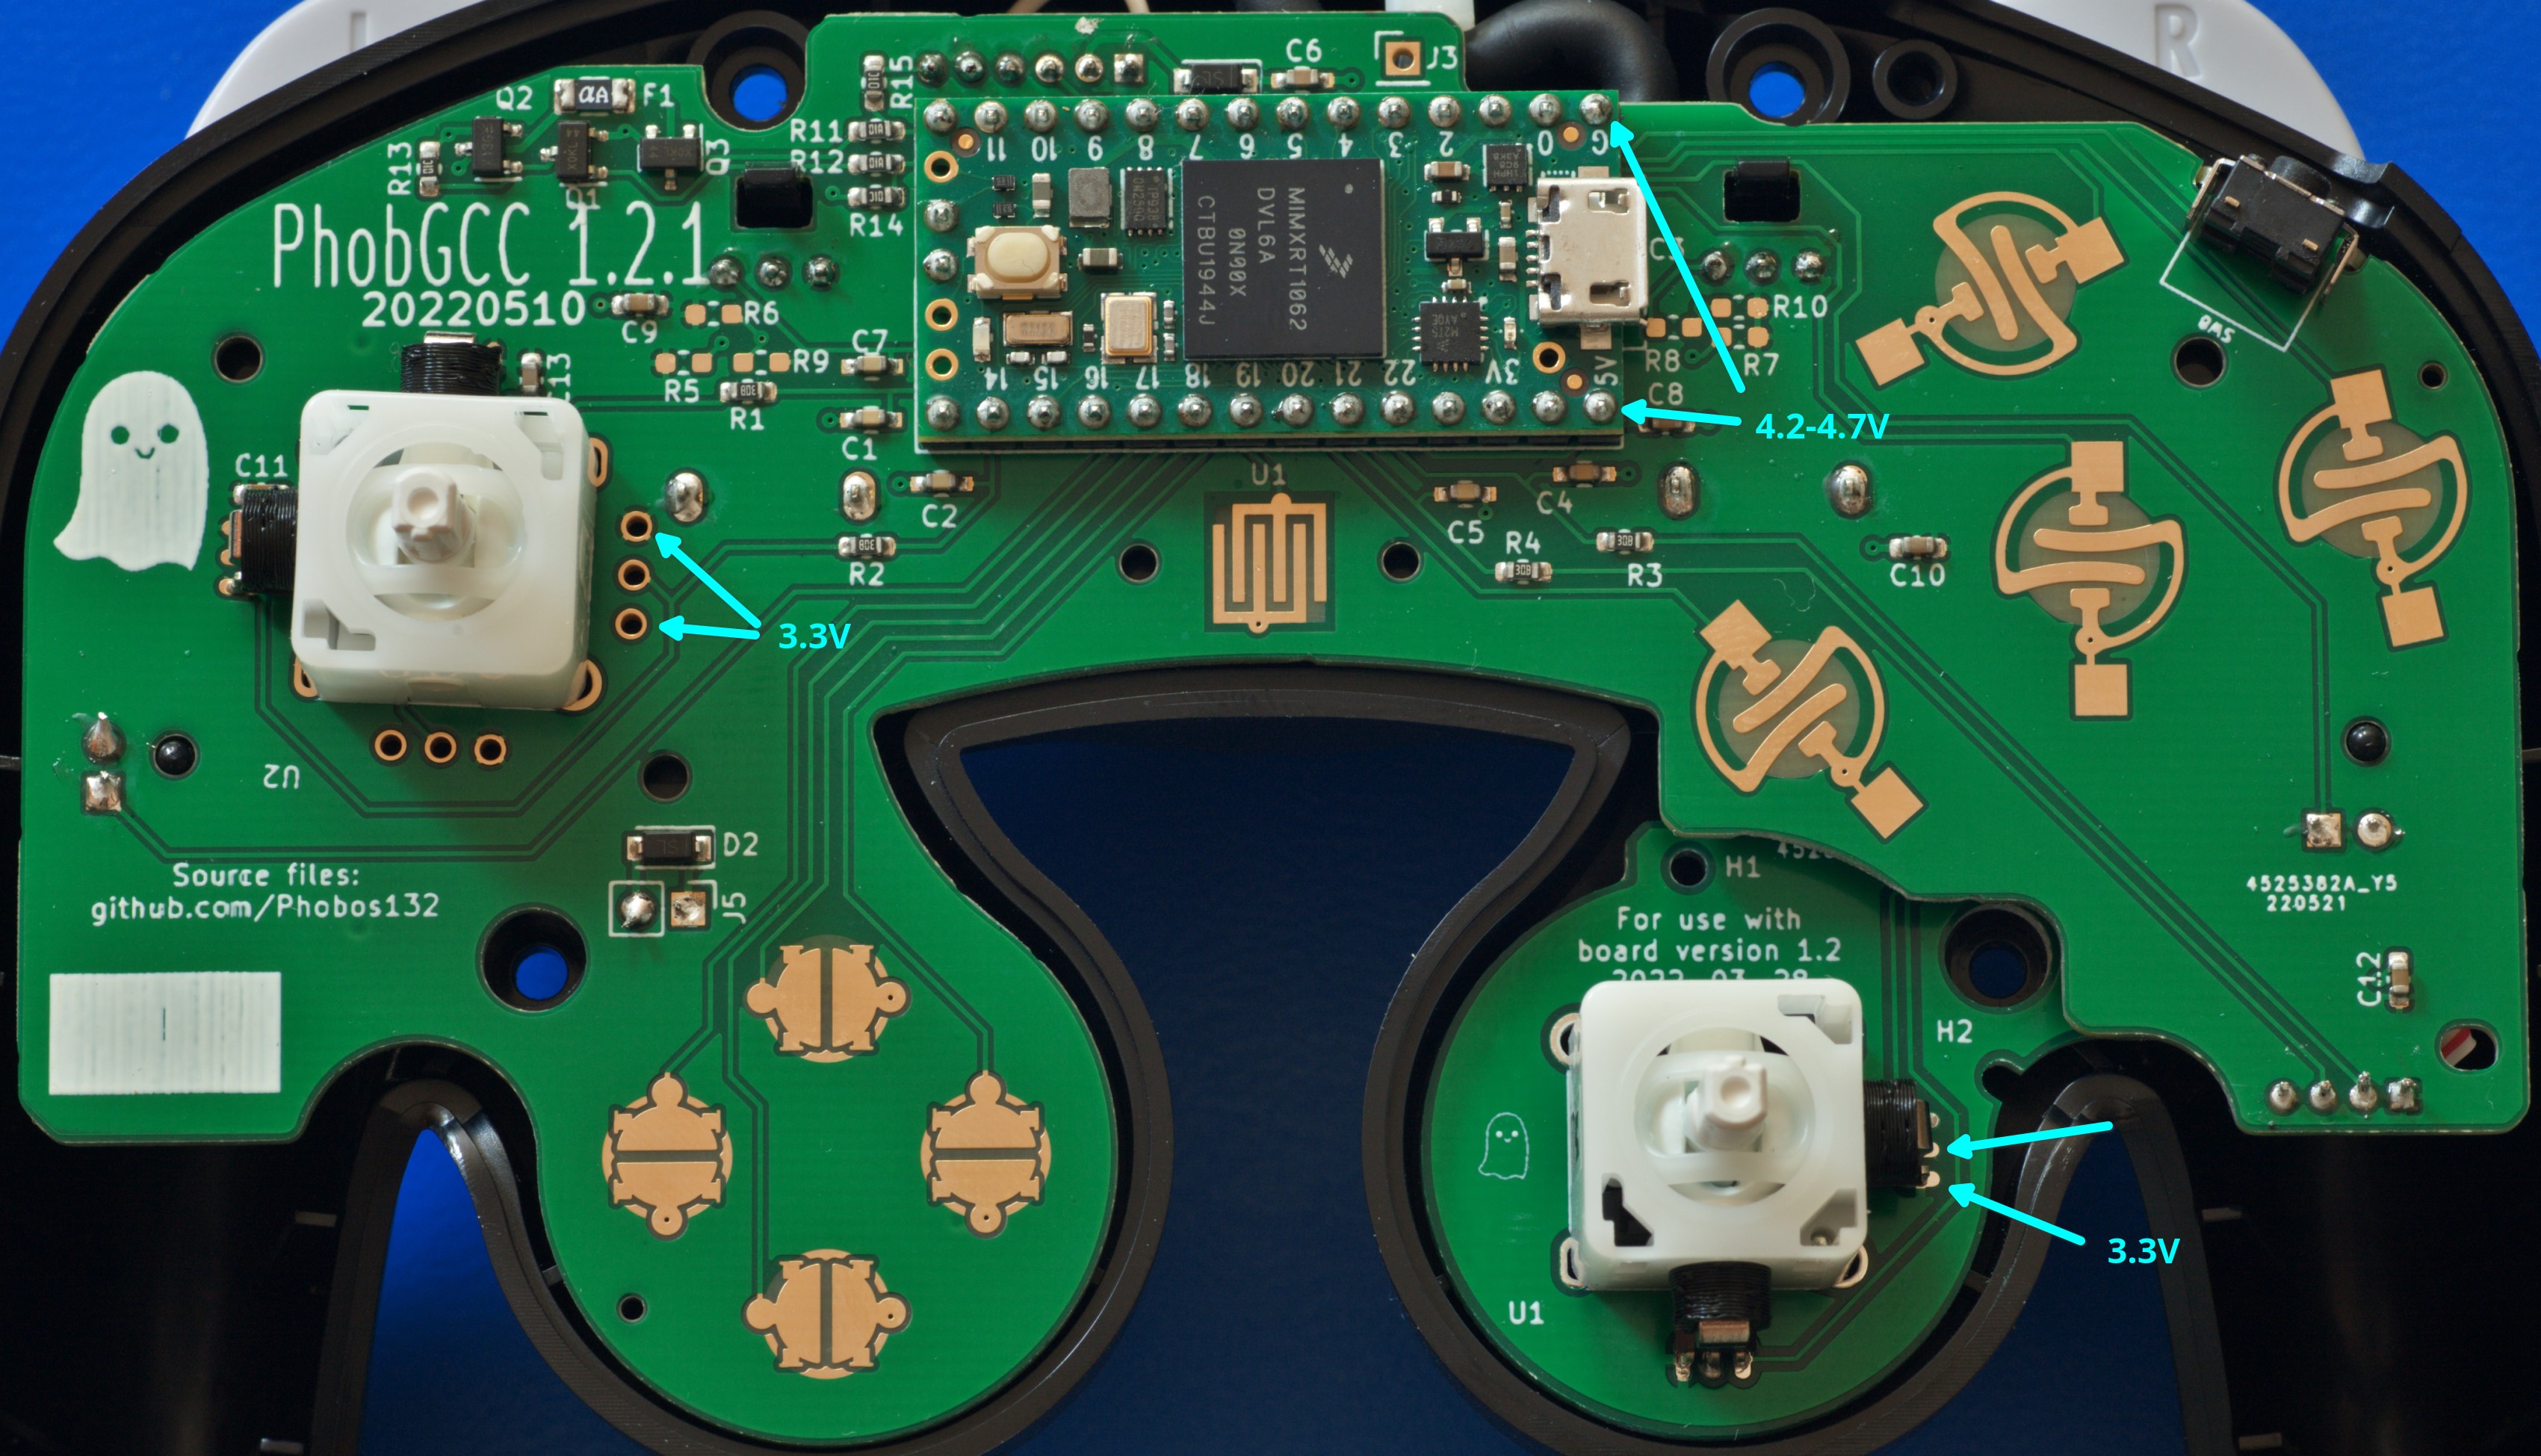
- These are the supply voltages for the various parts on the controller.
- 4.2-4.7V is the supply for the Teensy. This may vary depending on what the controller is plugged into and what the Teensy’s clock speed is set to.
- On my official Nintendo adapter with the Teensy at 600 MHz, this is 4.2V.
- On my Wii with the Teensy at 600 MHz, this is 4.7V.
- With the Teensy at 600 MHz, adding an extender cuts this by 0.3V until the point where the Teensy no longer operates.
- With the Teensy at lower frequencies, this voltage may be higher.
- 3.3V next to the Analog stick is the supply voltage for all the analog sensors. If this is too low, then you have a short somewhere or a bad component.
- 3.3V next to the C-stick should be exactly the same, but since this is connected via a cable it’s important to check it.
Output Voltages
If you have particular analog sensors (Analog stick, C-stick, or triggers) that are acting up, check the following voltages to compare:
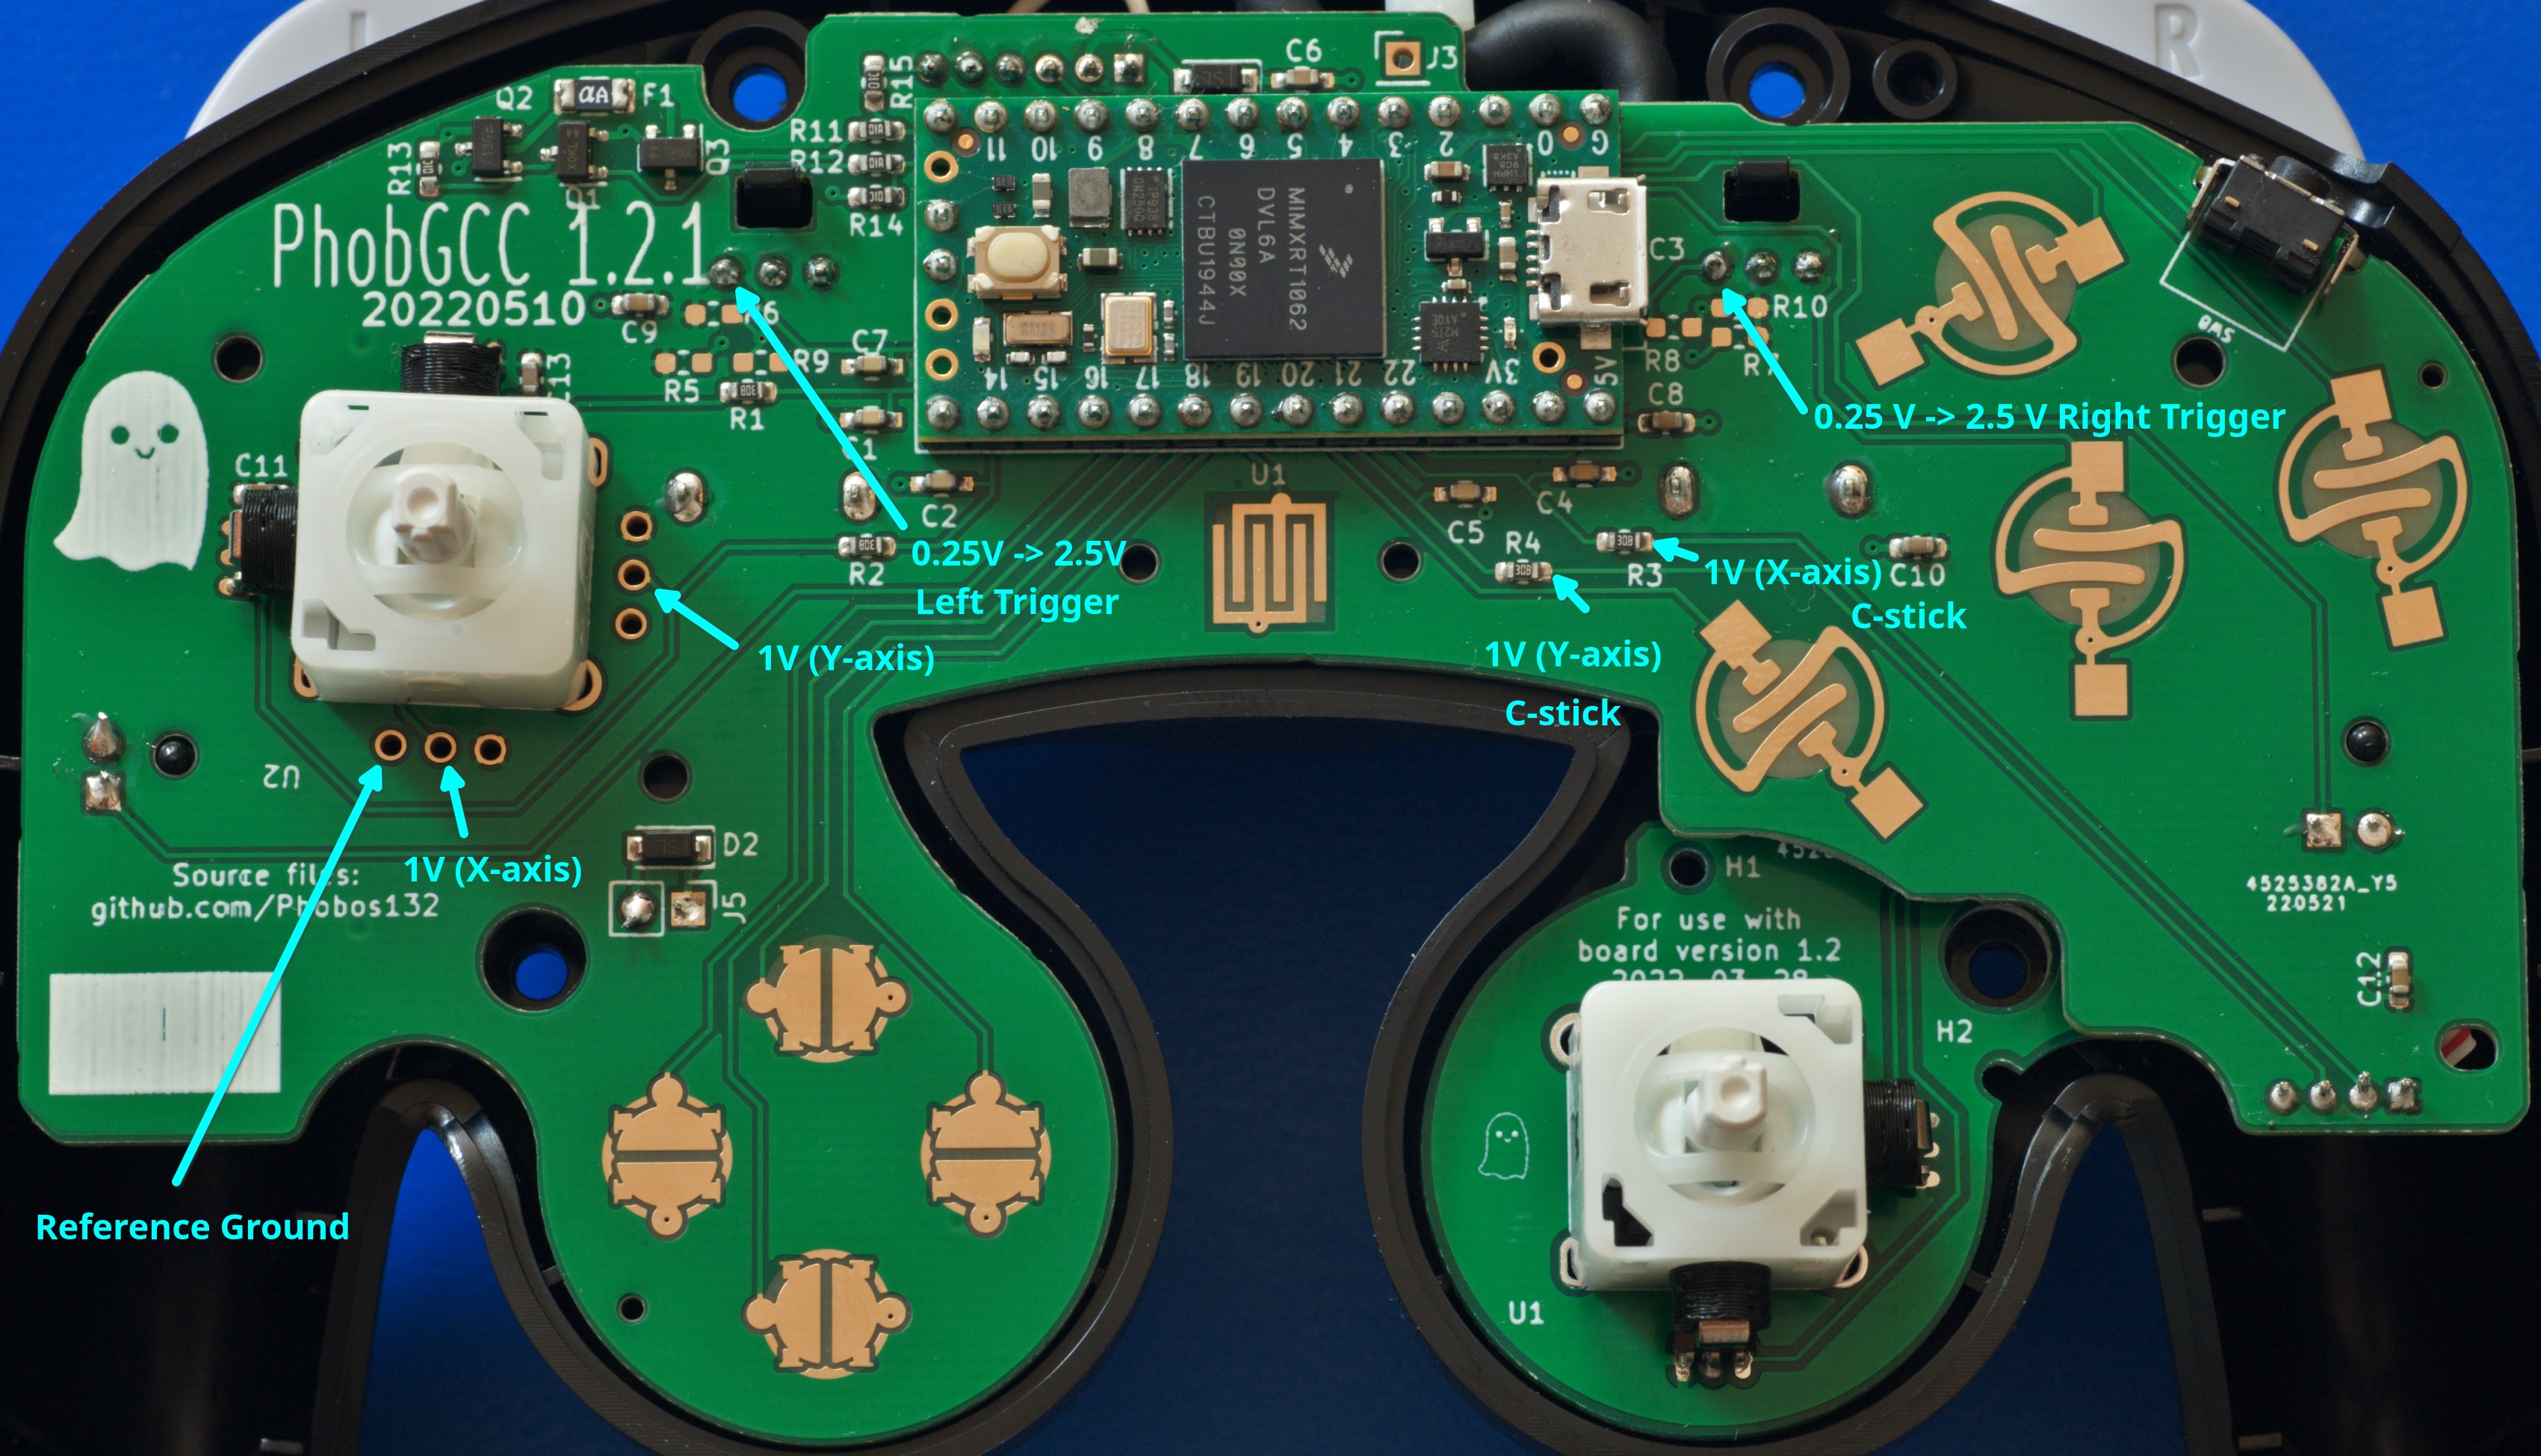
- Put the black lead of your multimeter where Reference Ground indicates and the red lead on the indicated test points.
- All the 1V values are outputs of the Hall effect sensors.
- These should vary depending on the stick position in the axis indicated.
- With DH1H1 magnets and mid-placed DRV5053CA or DRV5053PA sensors, the values should change by around +/- 0.2V.
- With DH1H1 magnets and mid-placed DRV5053EA or DRV5053RA sensors, the values should change by around +/- 0.4V.
- If the sensors are placed lower to the board, the change should be less.
- If your values are consistently very low or very high, your magnets may be mounted 90 degrees off. They must be horizontal.
- The trigger values should be very roughly 0.25V for a fully extended trigger, and when the trigger is fully depressed they should reach 2.5V.
- If you leave the spring out, then they will start out higher.
- If you use trigger plugs, they likely won’t reach 2.5V.
If something seems off, go to the PhobGCC Discord for tech support, and explain what you found to be wrong.
 This work is licensed under a Creative Commons Attribution-ShareAlike 4.0 International License.